Getting Started with the Synology Storage Console for VMware
Getting Started with the Synology Storage Console for VMware
I have used VMware vSAN and a Synology DS1821+ for several years for my home lab’s storage. However, up to now, I have never deployed the Synology Storage Console for VMware. Realizing that the console might have valuable benefits, I decided it was time to try it. This post will walk through the deployment process for the Synology Storage Console for VMware and review its various features.
- Getting Started with the Synology Storage Console for VMware
- What is the Synology Storage Console for VMware?
- System Requirements
- Deploying the Synology Storage Console for VMware
- Adding your Synology Storage System for Management
- Optimizing VMware ESXi Host iSCSI Adapter Configurations
- Provisioning New iSCSI LUNs or NFS Volumes
- Mount Existing iSCSI LUNs or NFS Volumes
- Expanding Existing iSCSI LUNs
- Adding the Synology Storage Console for VMware’s VASA Provider to VMware vCenter Server
- Final Thoughts
What is the Synology Storage Console for VMware?
The Synology Storage Console for VMware is a virtual appliance provided by Synology that integrates into the VMware vSphere Client, allowing you to easily monitor and manage your multiple Synology storage systems and allowing application consistent volume snapshots to be captured directly from DSM. Additionally, the Synology Storage Console for VMware provides a VASA 1.0 provider that can be added to your VMware vCenter server to manage VM storage policies.
The following management features are added to the VMware vSphere Client:
- Create new iSCSI and NFS volumes
- Mount new or existing iSCSI LUNs and NFS volumes to VMware ESXi hosts
- Expand existing iSCSI LUNs (NFS datastore expansion not supported)
- Optimize the iSCSI adapter settings for the best performance
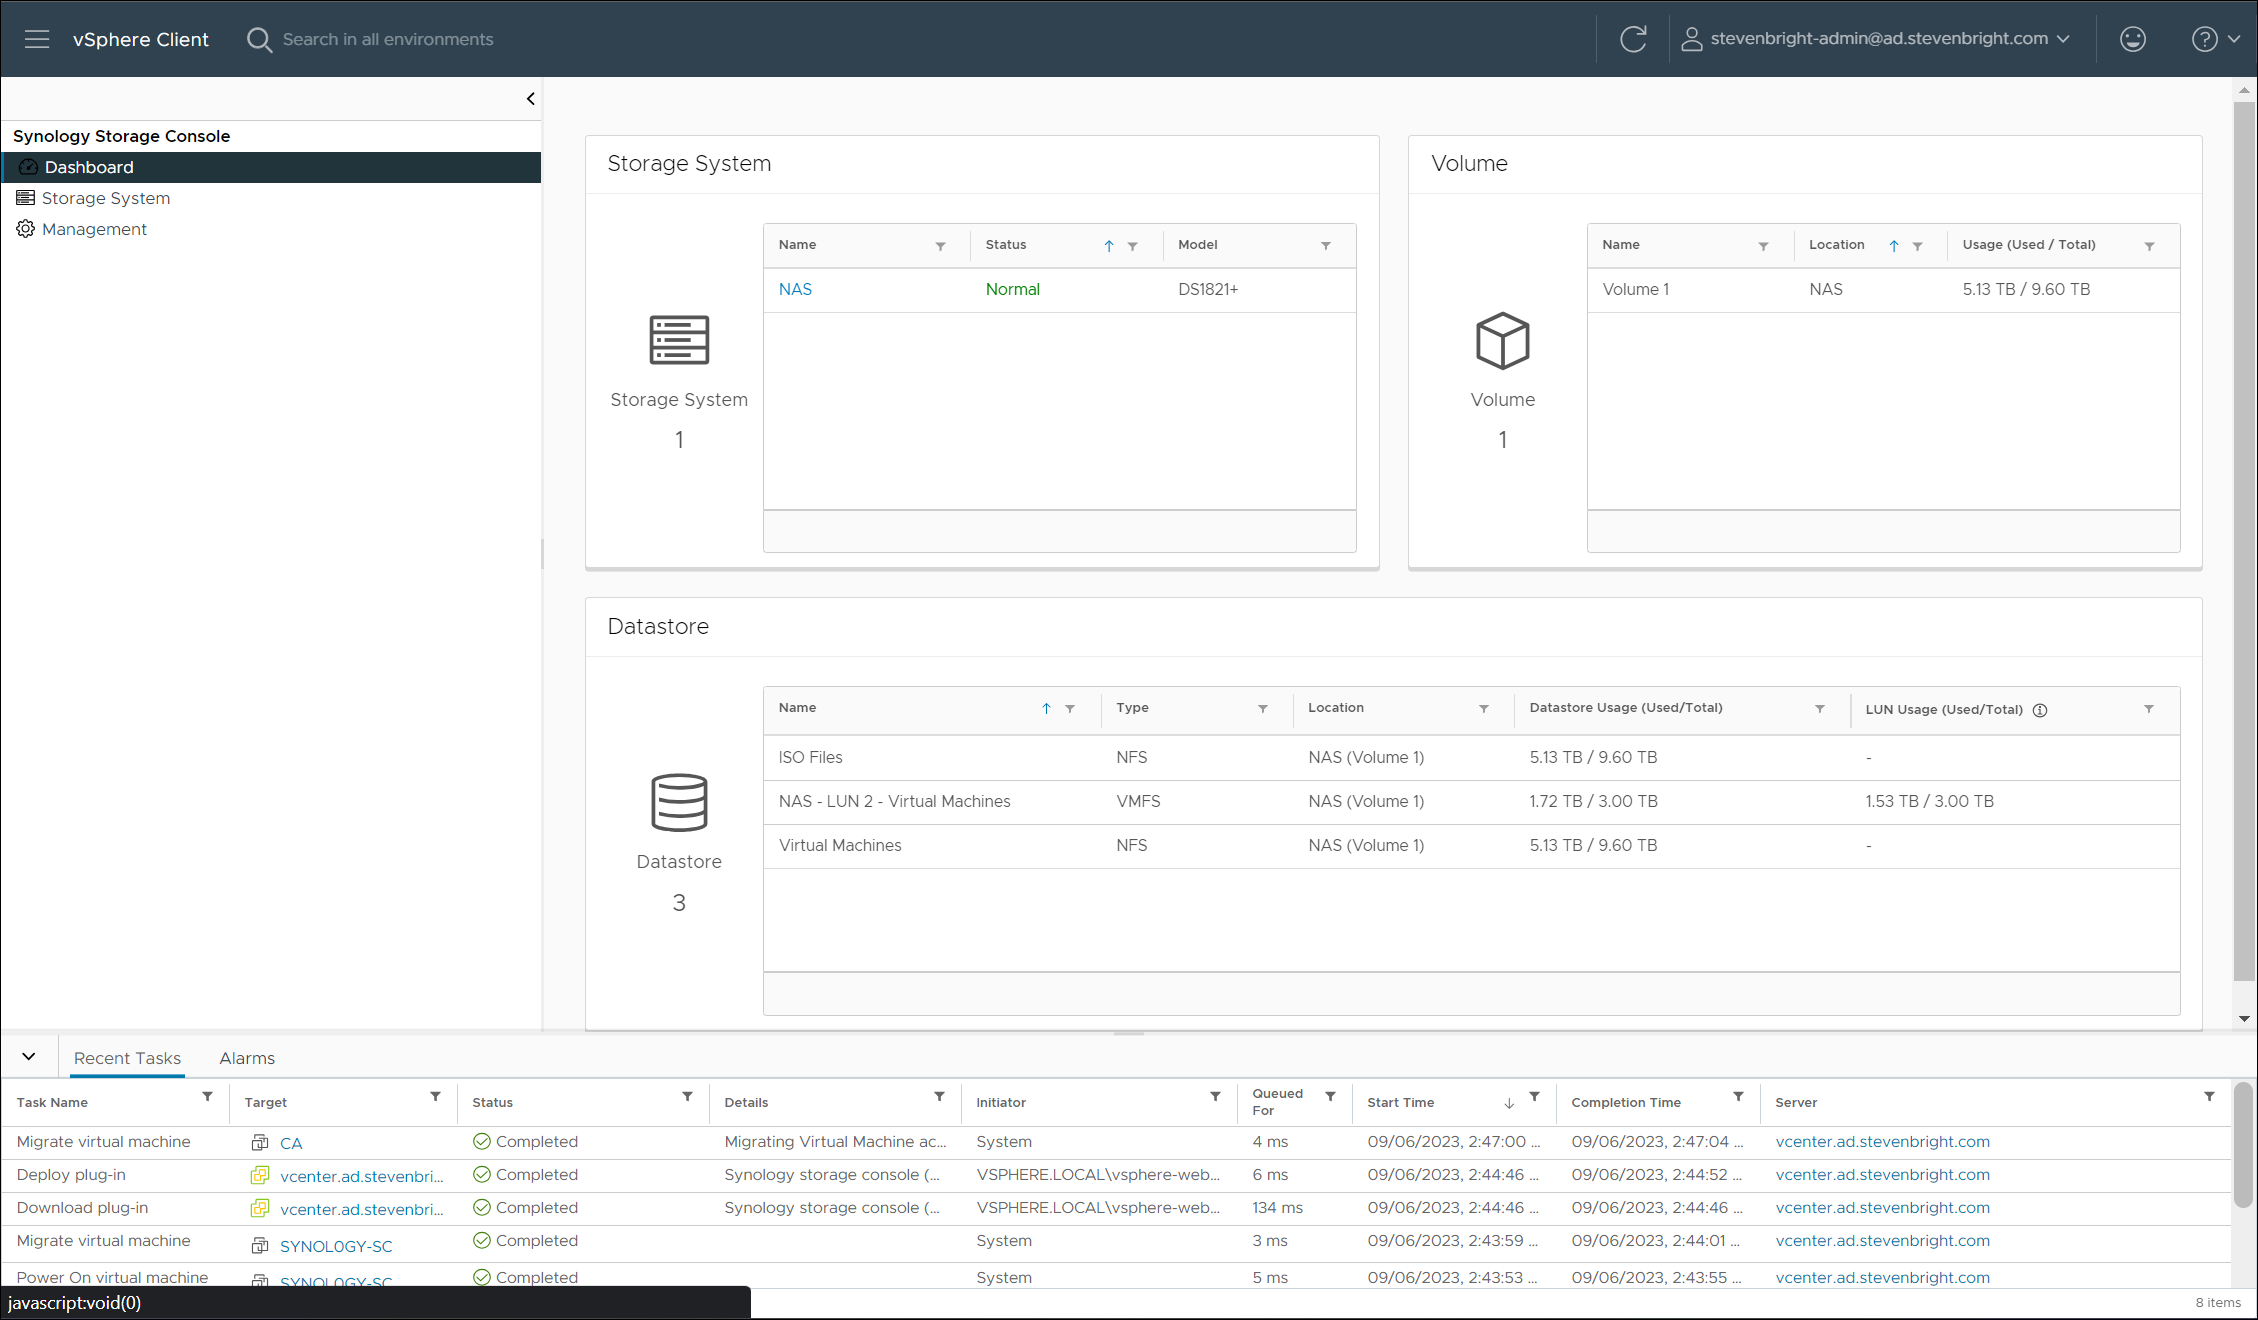
Additionally, you can access the Synology Storage Console for VMware Dashboard within the VMware vSphere Client, which allows you to monitor the status of all registered storage systems, including system status, volume details, and datastore details.
System Requirements
The Synology Storage Console for VMware is a virtual appliance based on CentOS 8 and utilizes the deprecated local plug-in architecture for integration within the VMware vSphere Client. It supports VMware vCenter Server Appliance 6.5 U2 or above and requires Synology DSM version 6.2.3 or above. The virtual appliance requires the following resources:
- 2 vCPUs
- 2GB of RAM
- 16GB of storage
- 1 IP address
Deploying the Synology Storage Console for VMware
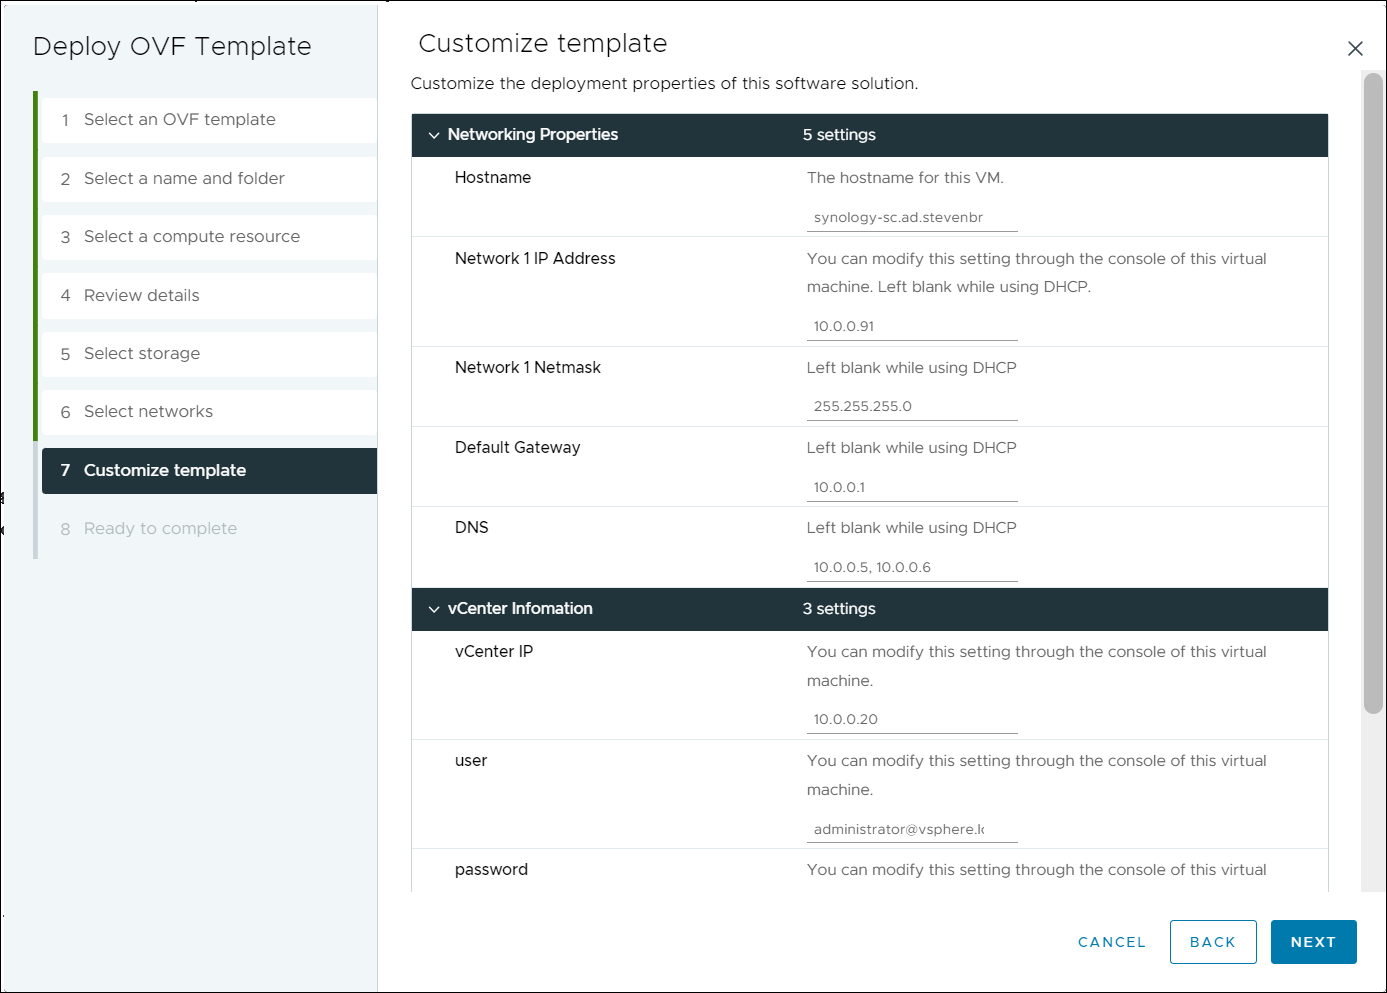
Deployment of the Synology Storage Console is a simple process that involves deploying a small OVA virtual appliance. Deployment of the appliance supports either DHCP or static IPv4 address assignments. Additionally, you must provide your VMware vCenter Server Appliance’s IP address and a username/password with access to the VMware vCenter Server. Synology does not mention what privileges this user account must have in their documentation. Since the account will manage VMware ESXi host storage, I suggest you start with an account with Administrator privileges.
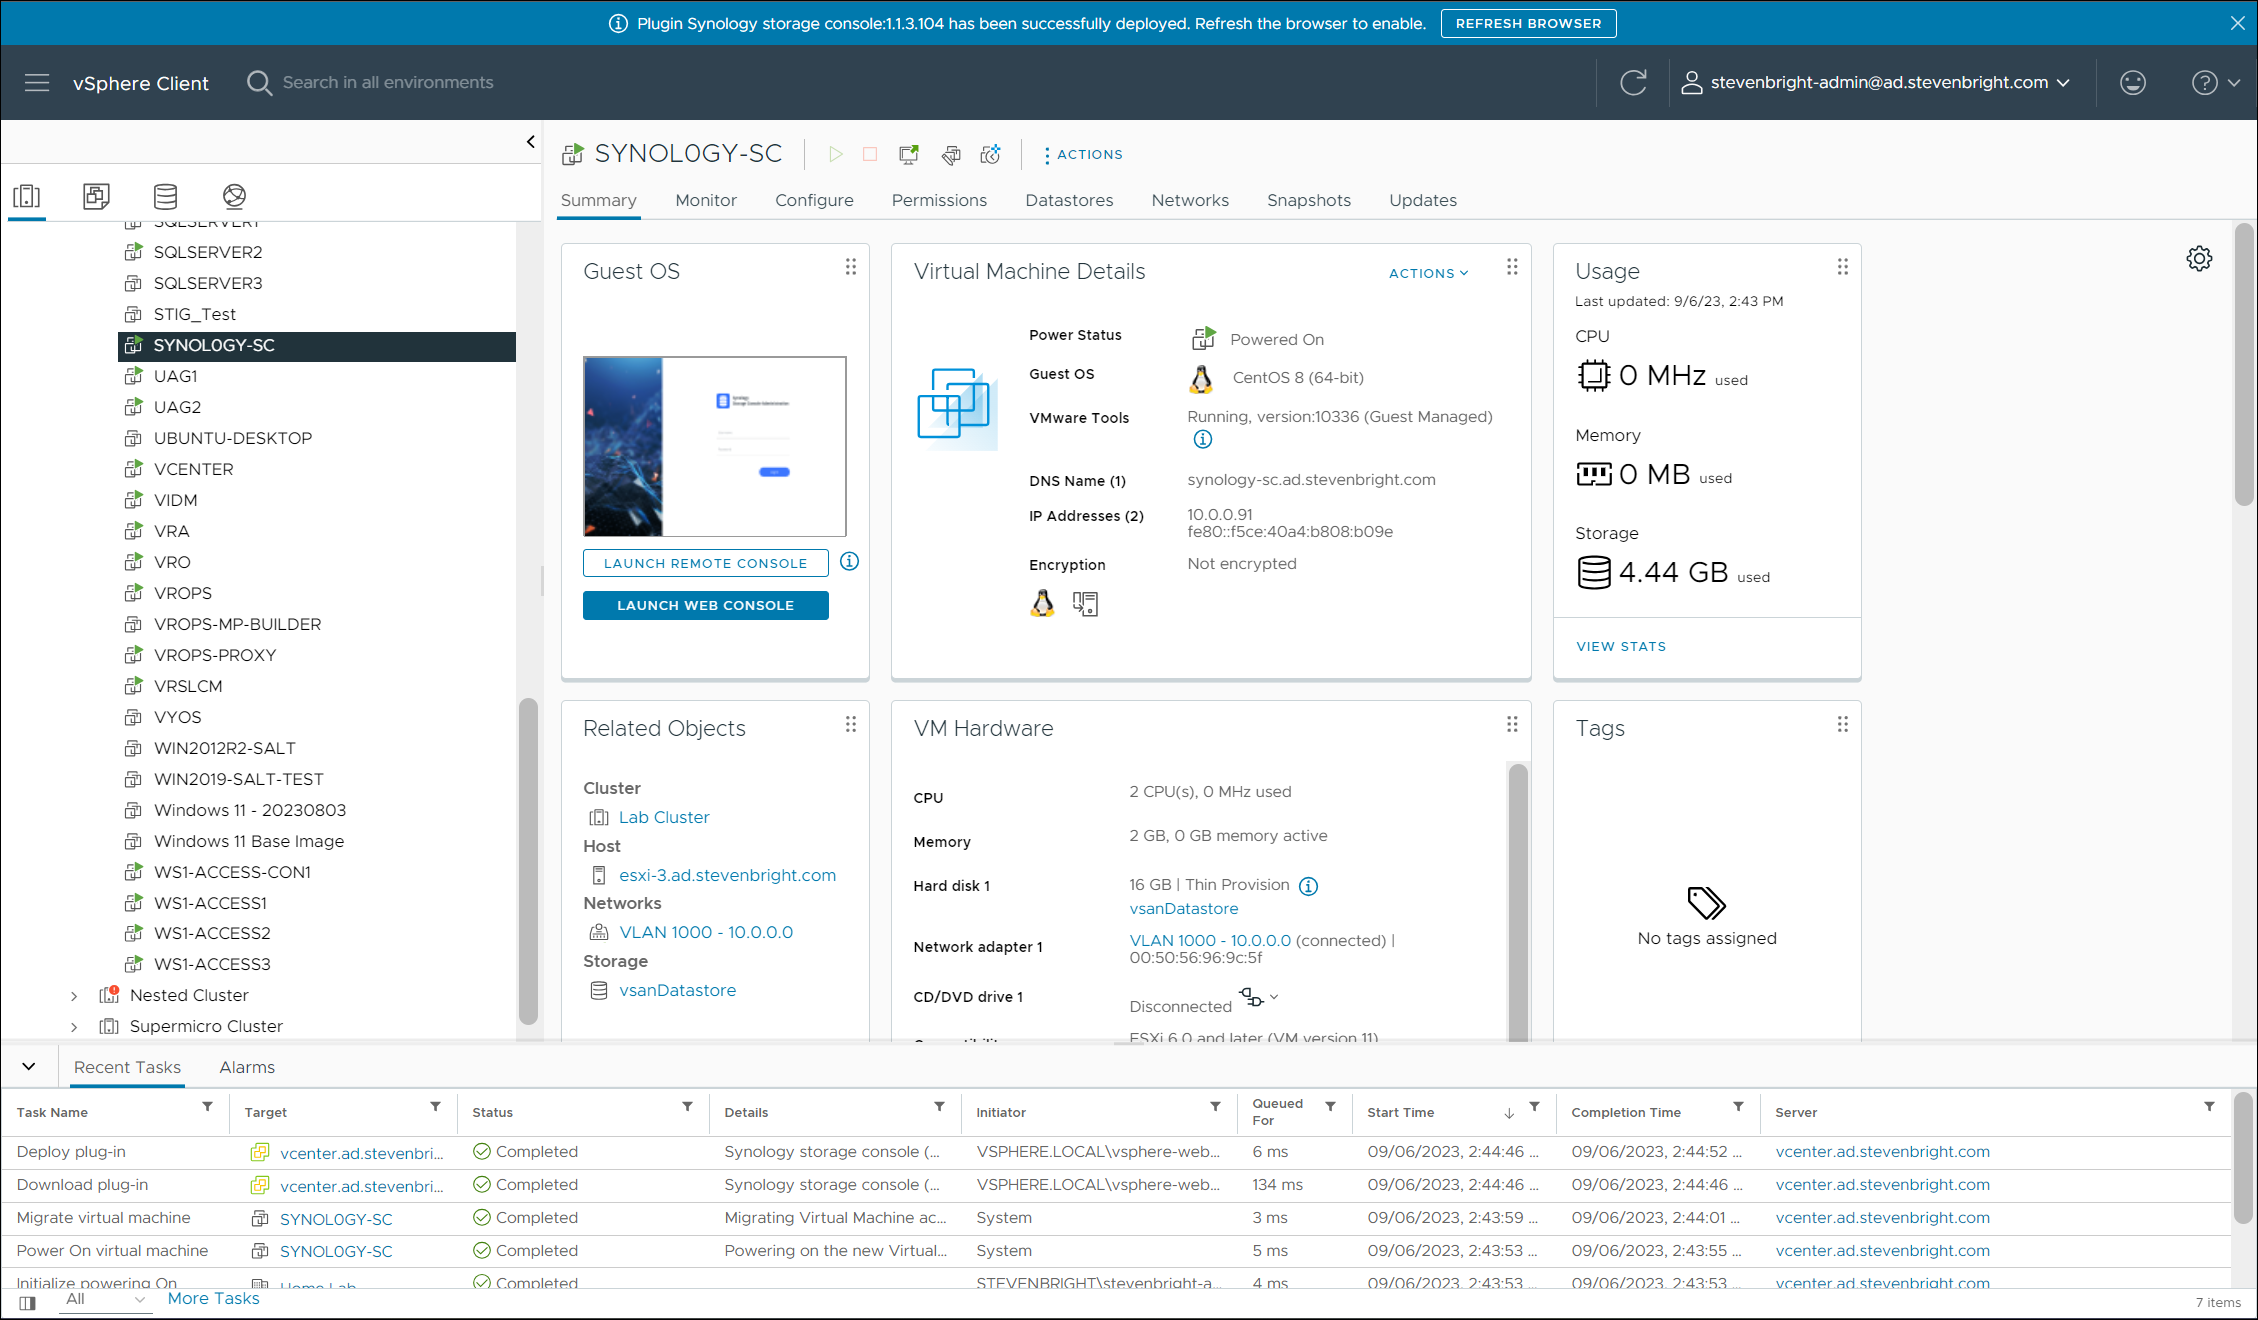
Once the appliance is deployed and powered on, it will register itself with the VMware vSphere Client, and you should see a notification in the VMware vSphere Client at the top of the screen stating that you should refresh your browser.
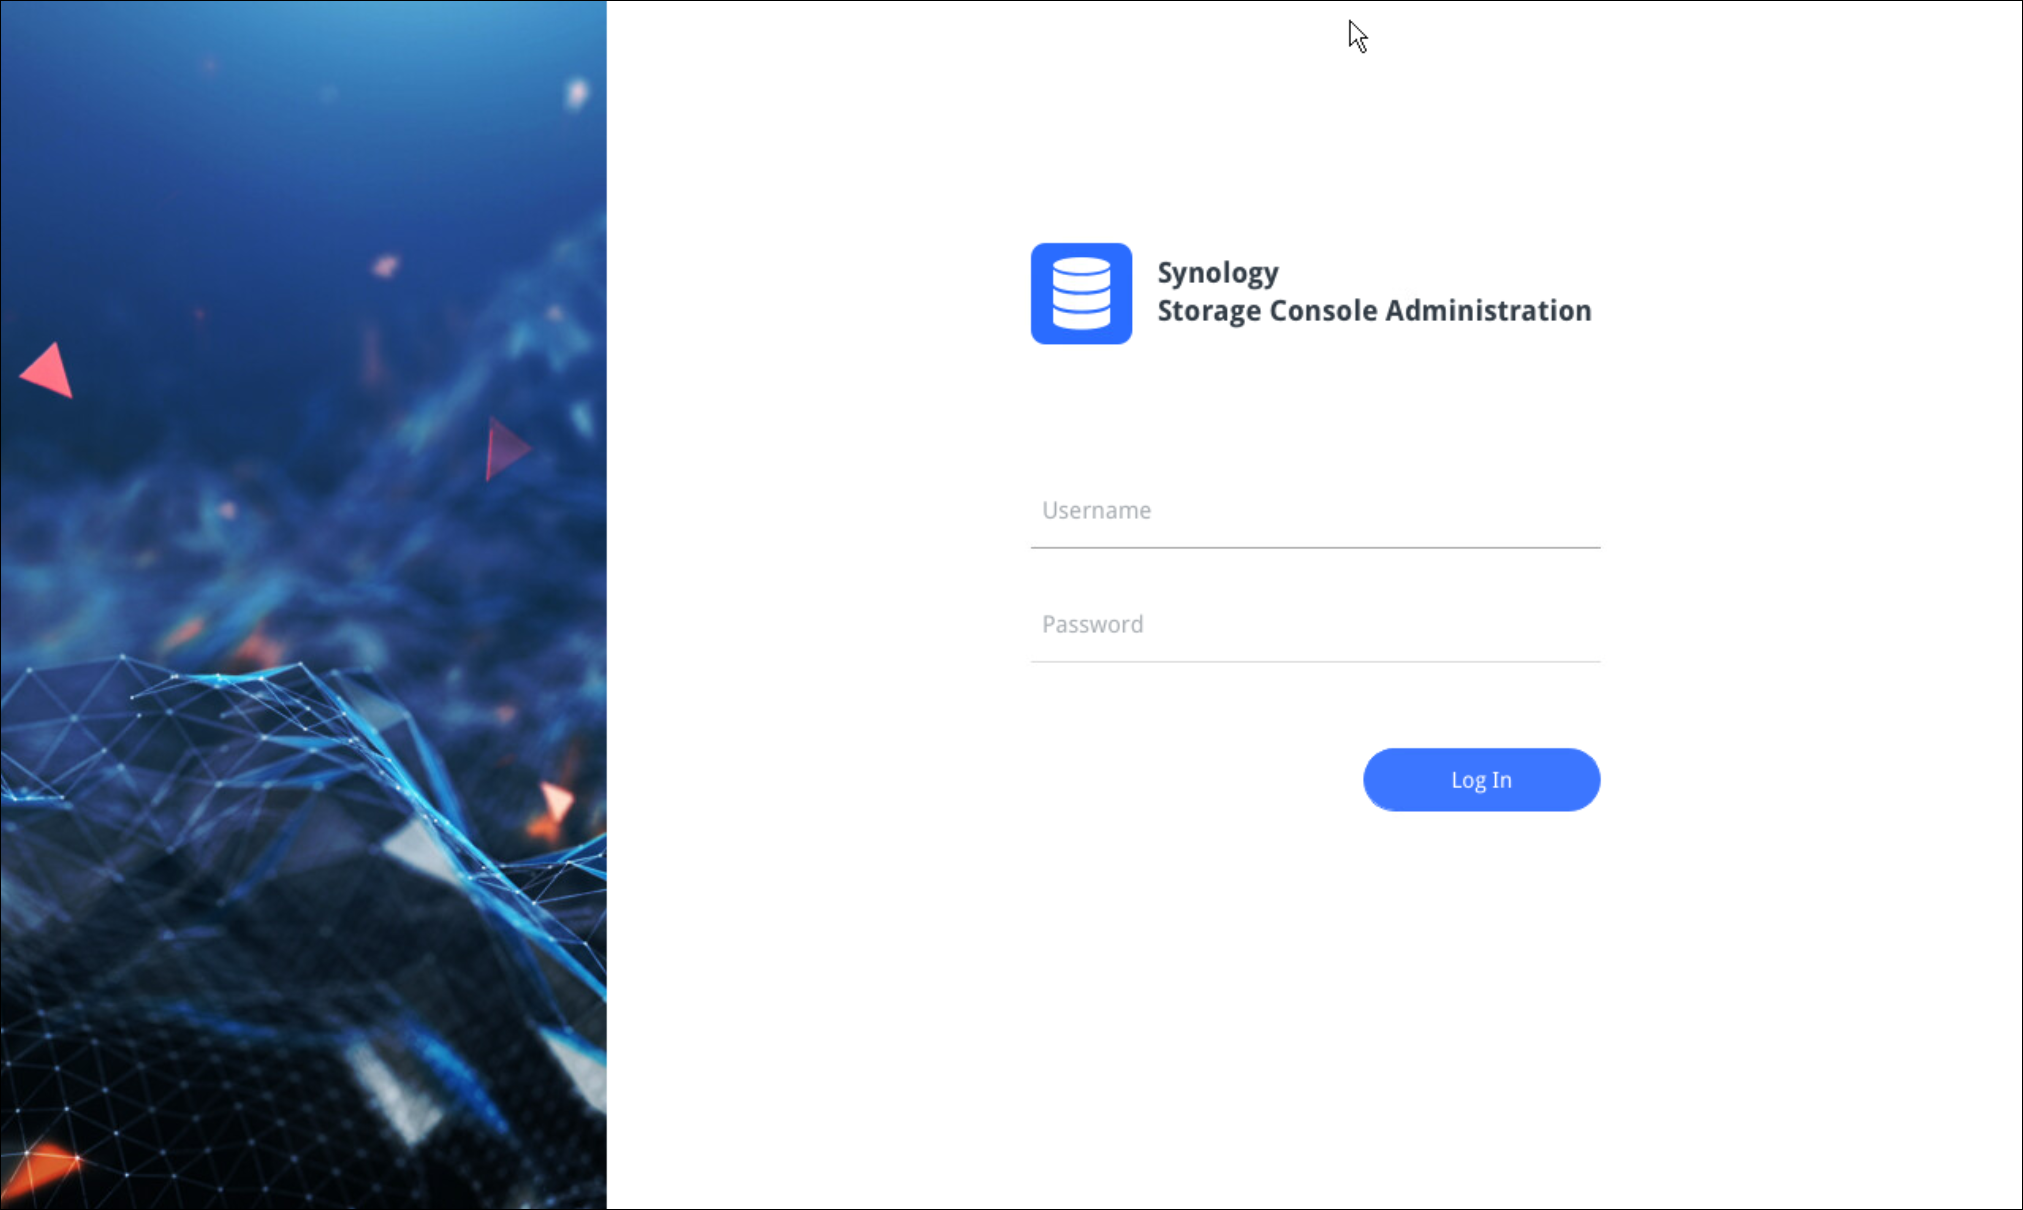
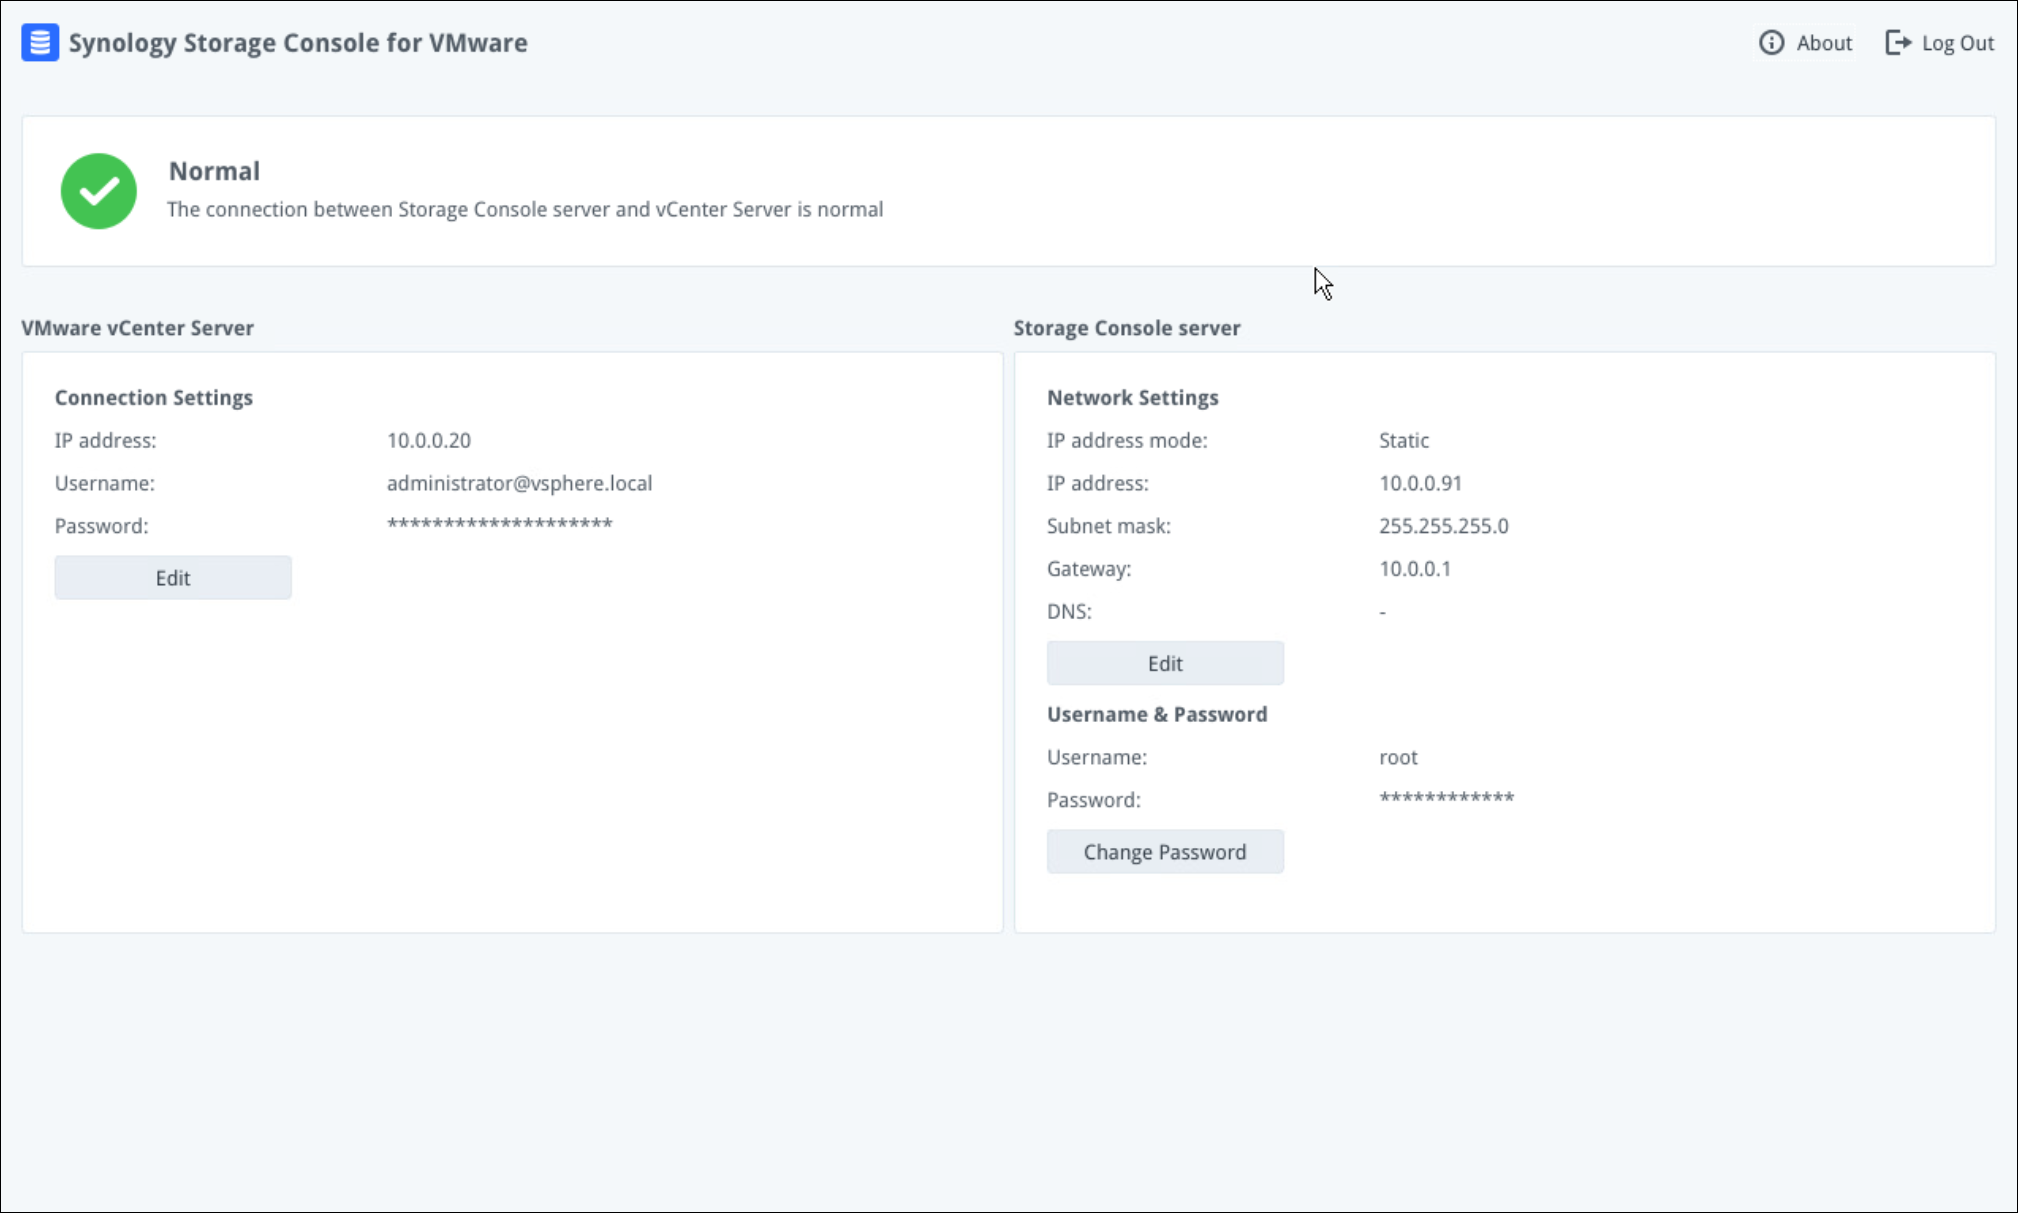
The virtual machine hosting the Synology Storage Console for VMware provides a UI that allows you to reconfigure the network settings, reconfigure the vCenter Server settings, including the username/password, and update the root user account password. The default credentials for accessing this UI are:
Username: root Password: synology
Adding your Synology Storage System for Management
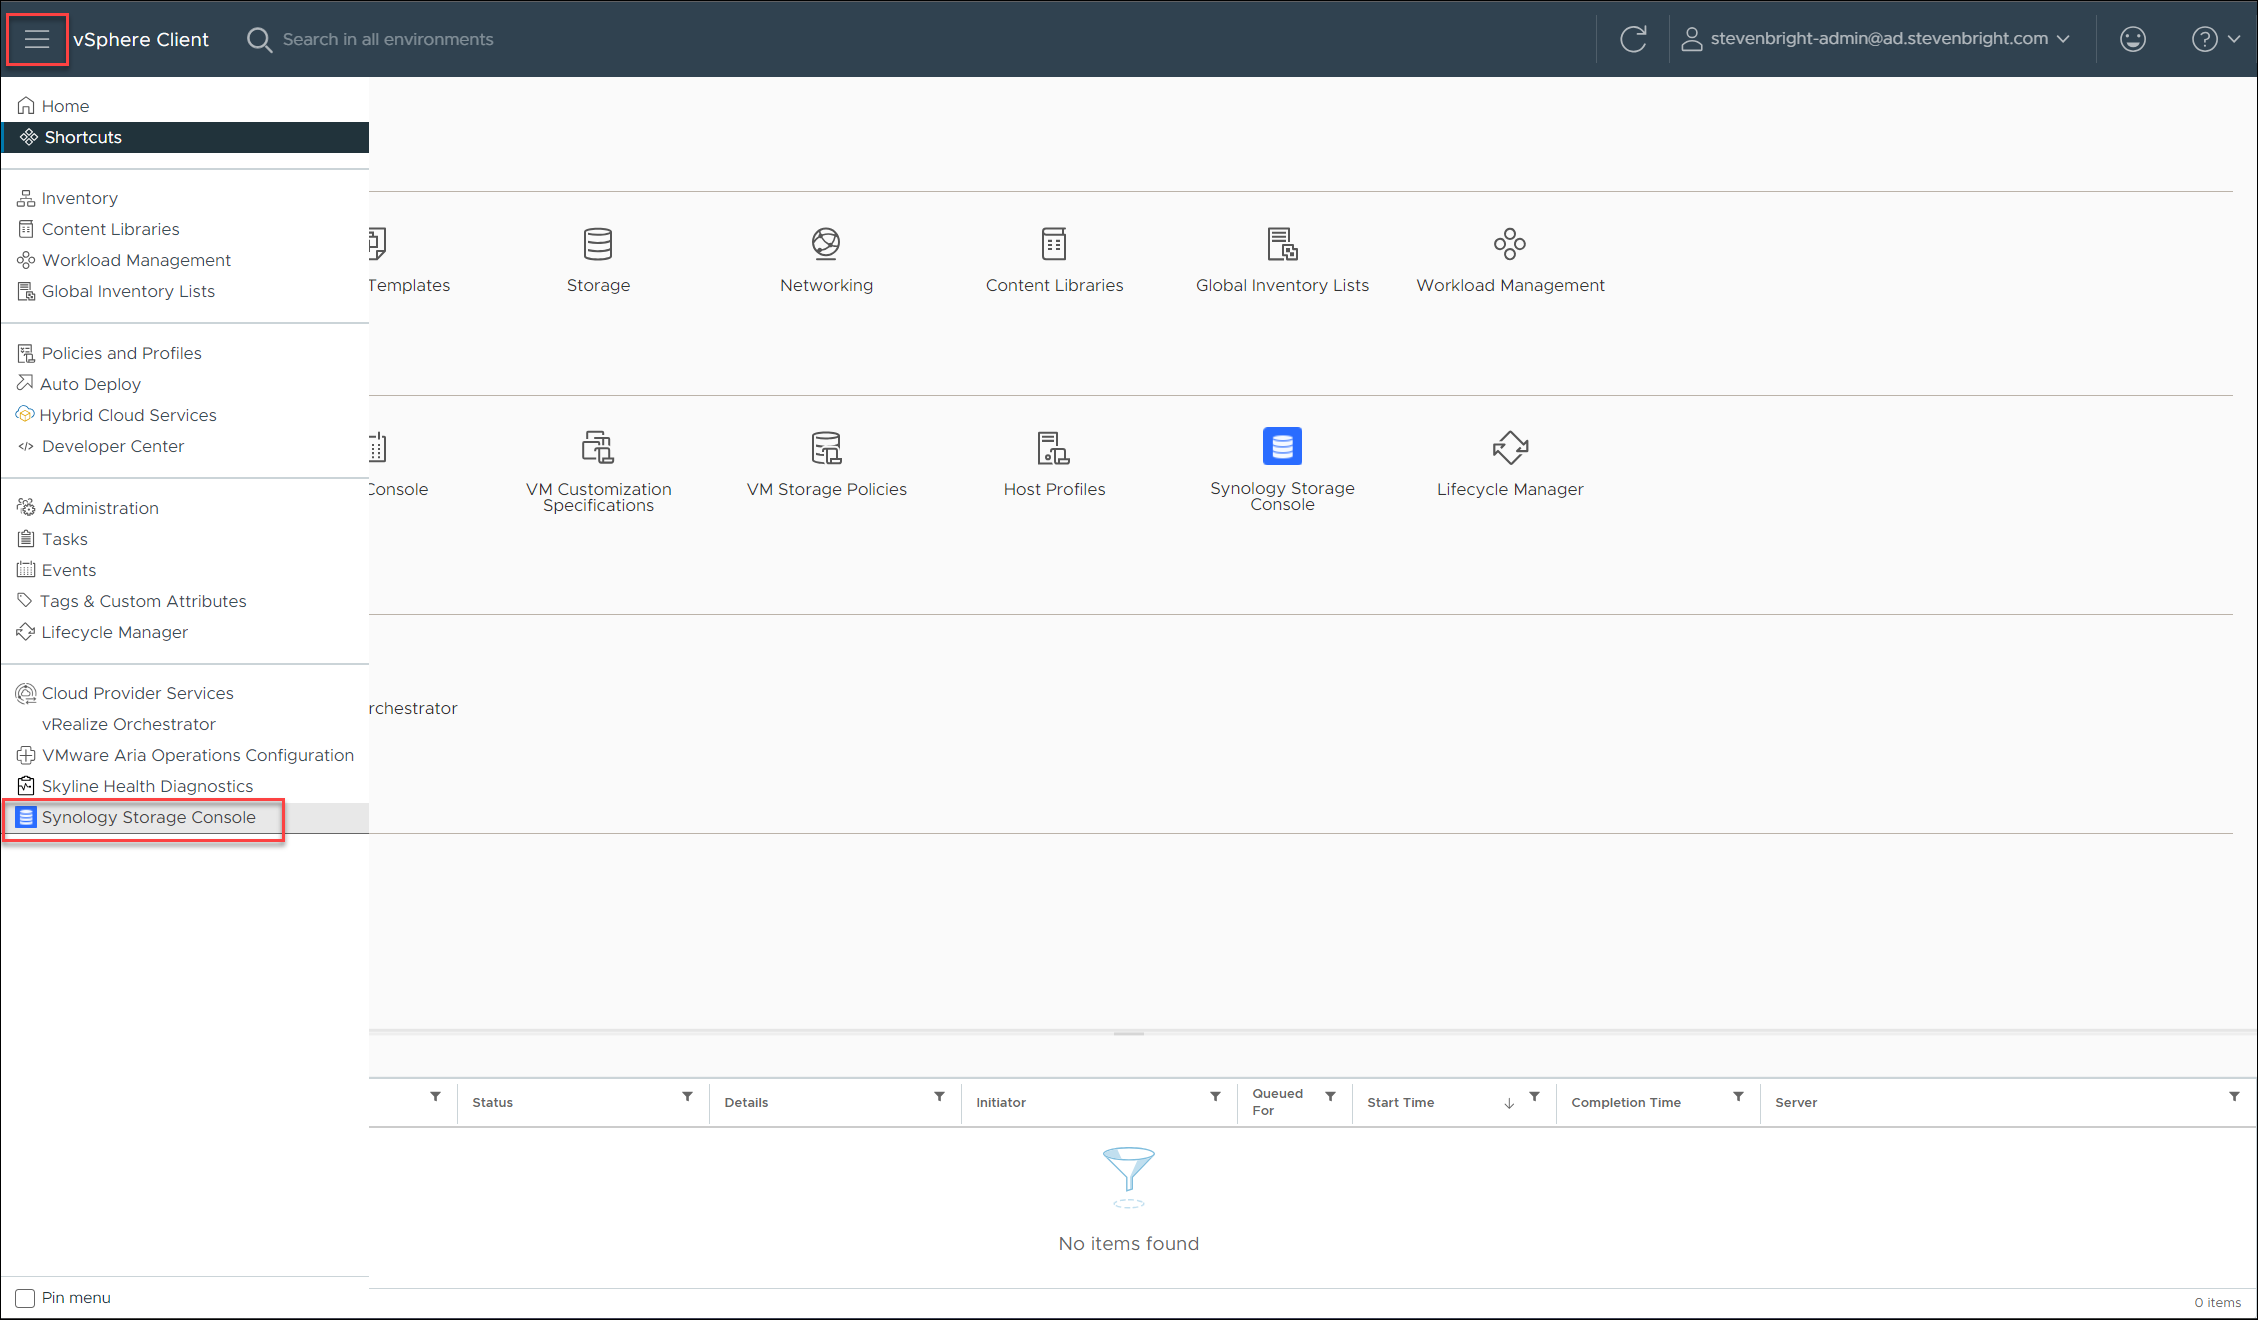
The first step after successfully deploying the Synology Storage Console for VMware is to add your Synology storage system to the plug-in for management. To accomplish this, select the menu icon at the top left of the VMware vSphere Client to bring up the list of available shortcuts, then select the Synology Storage Console.
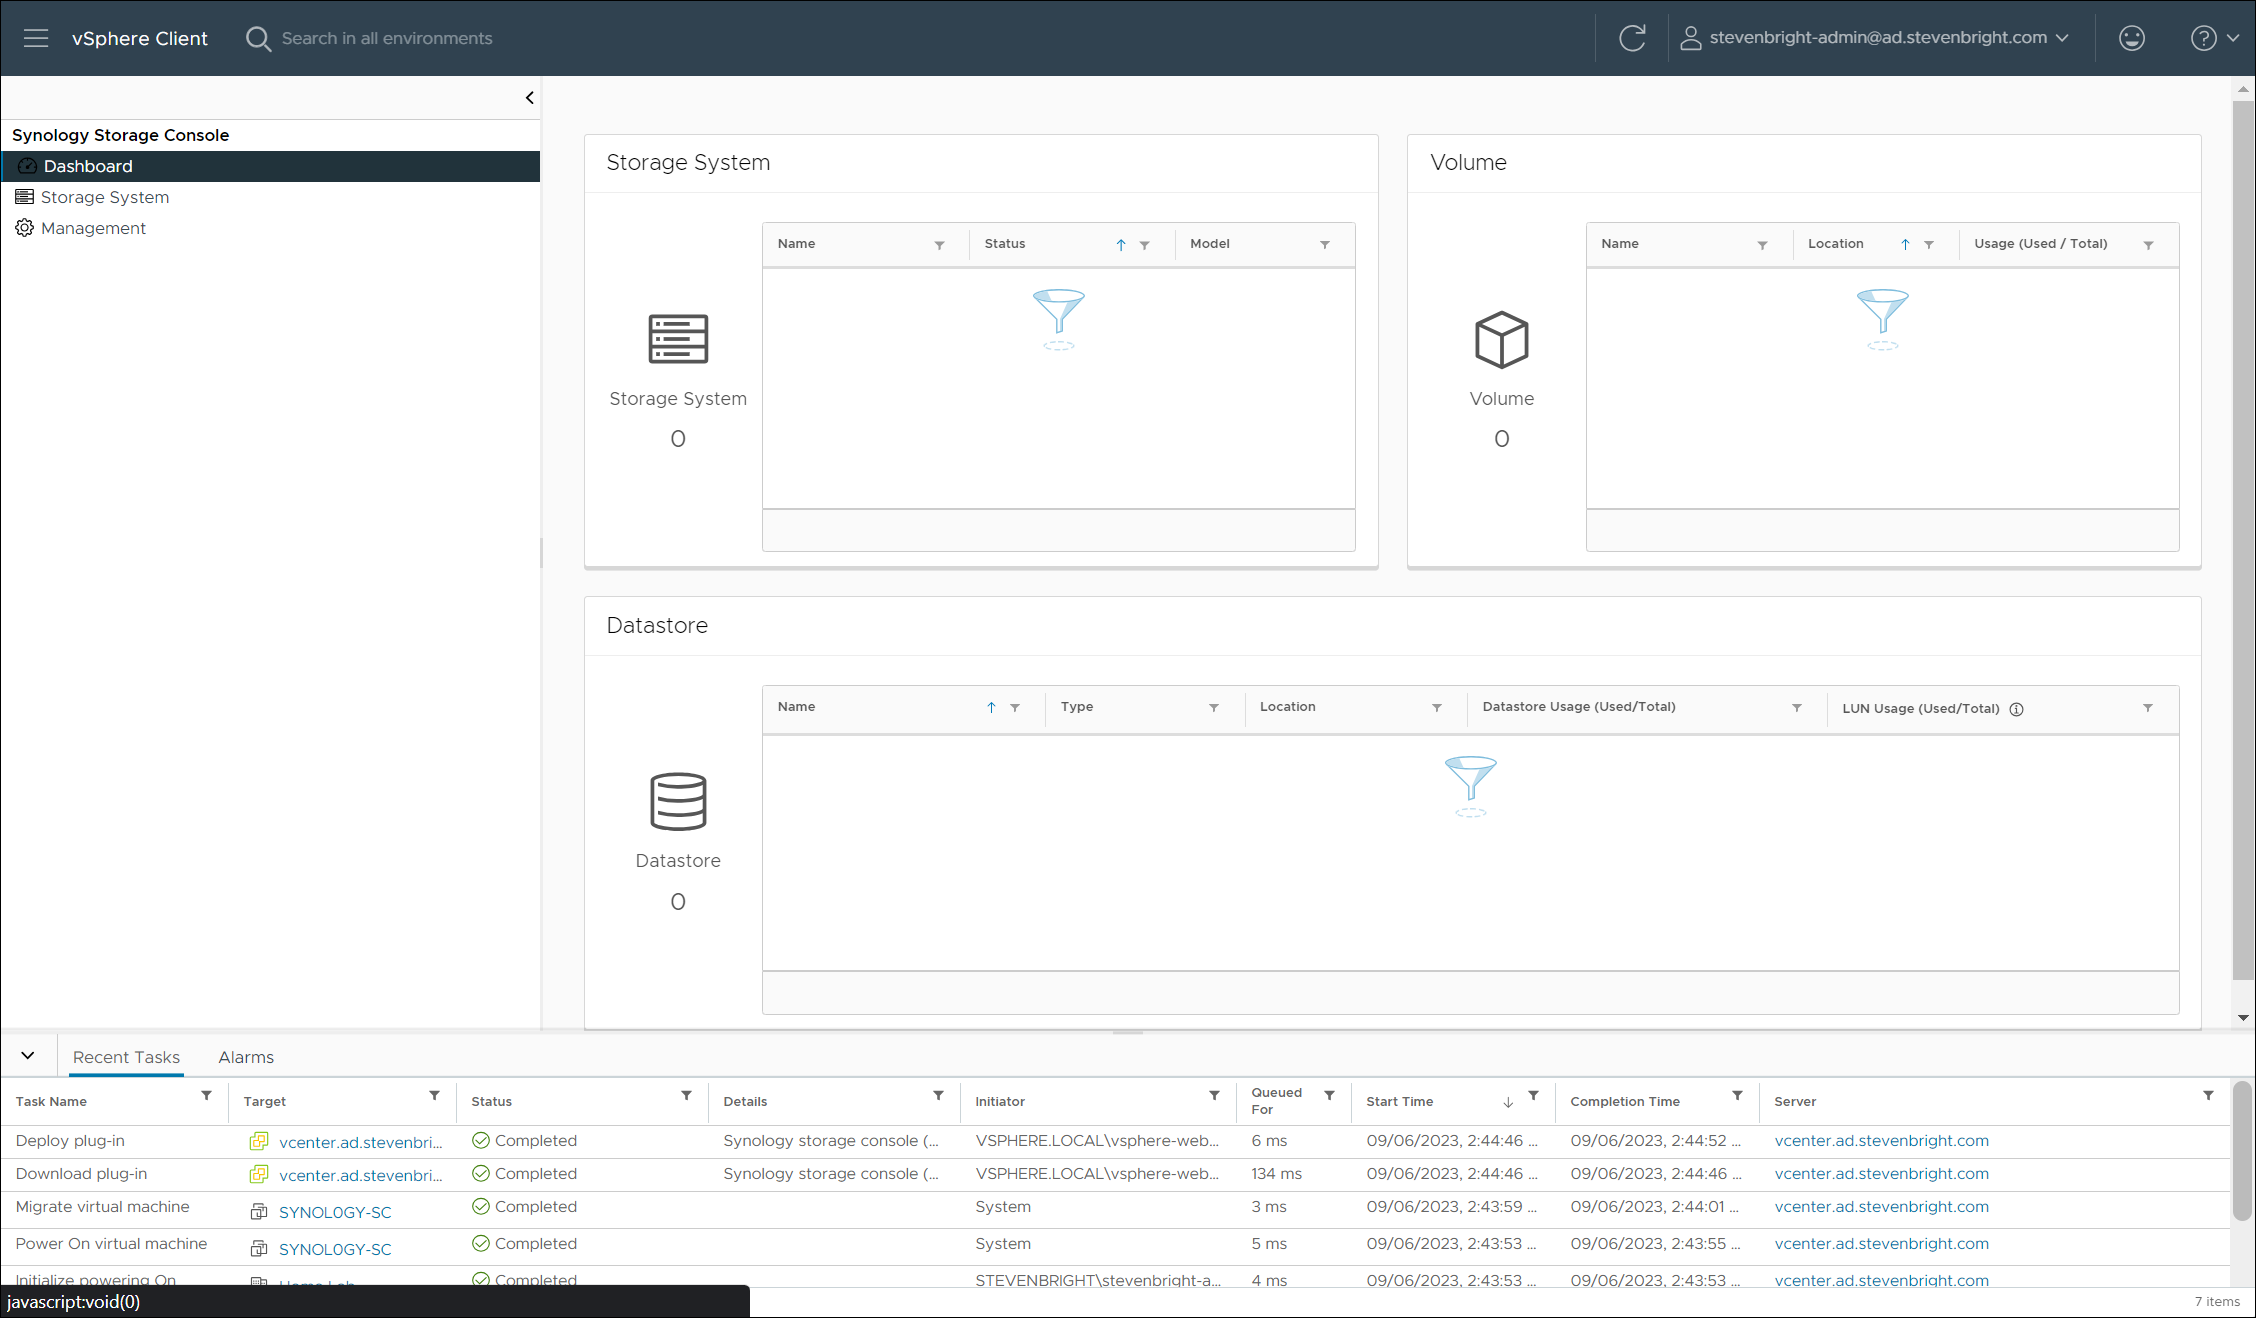
The empty dashboard for the Synology Storage Console for VMware will greet you.
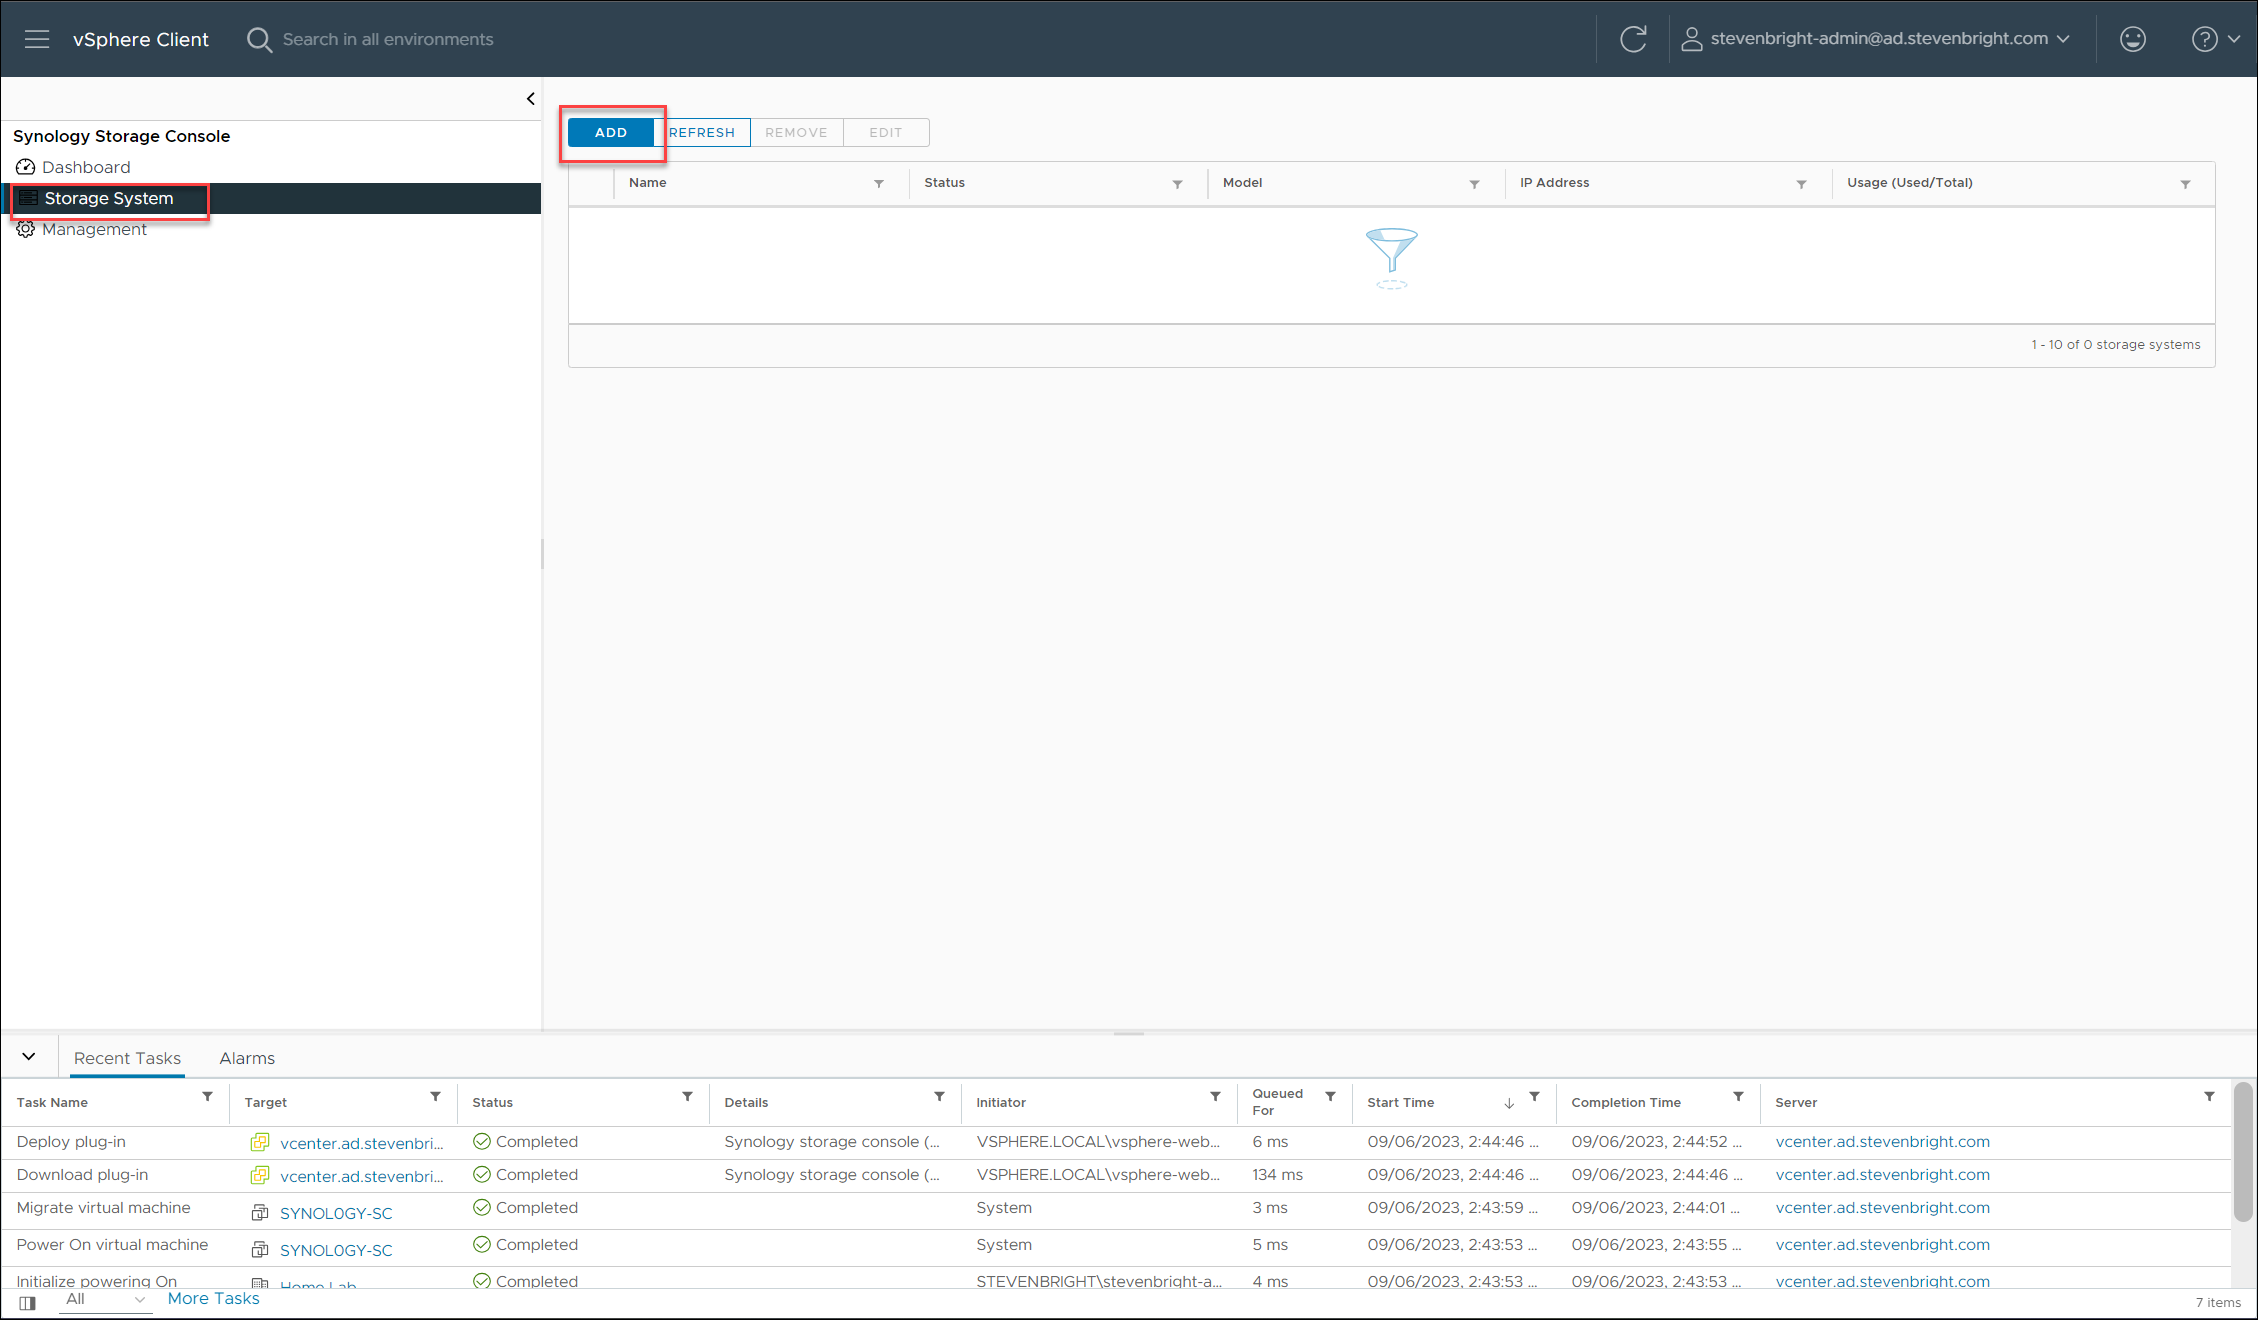
Click the Storage Systems link on the left side to bring up the list of configured storage systems, then click the ADD button at the top of the screen.
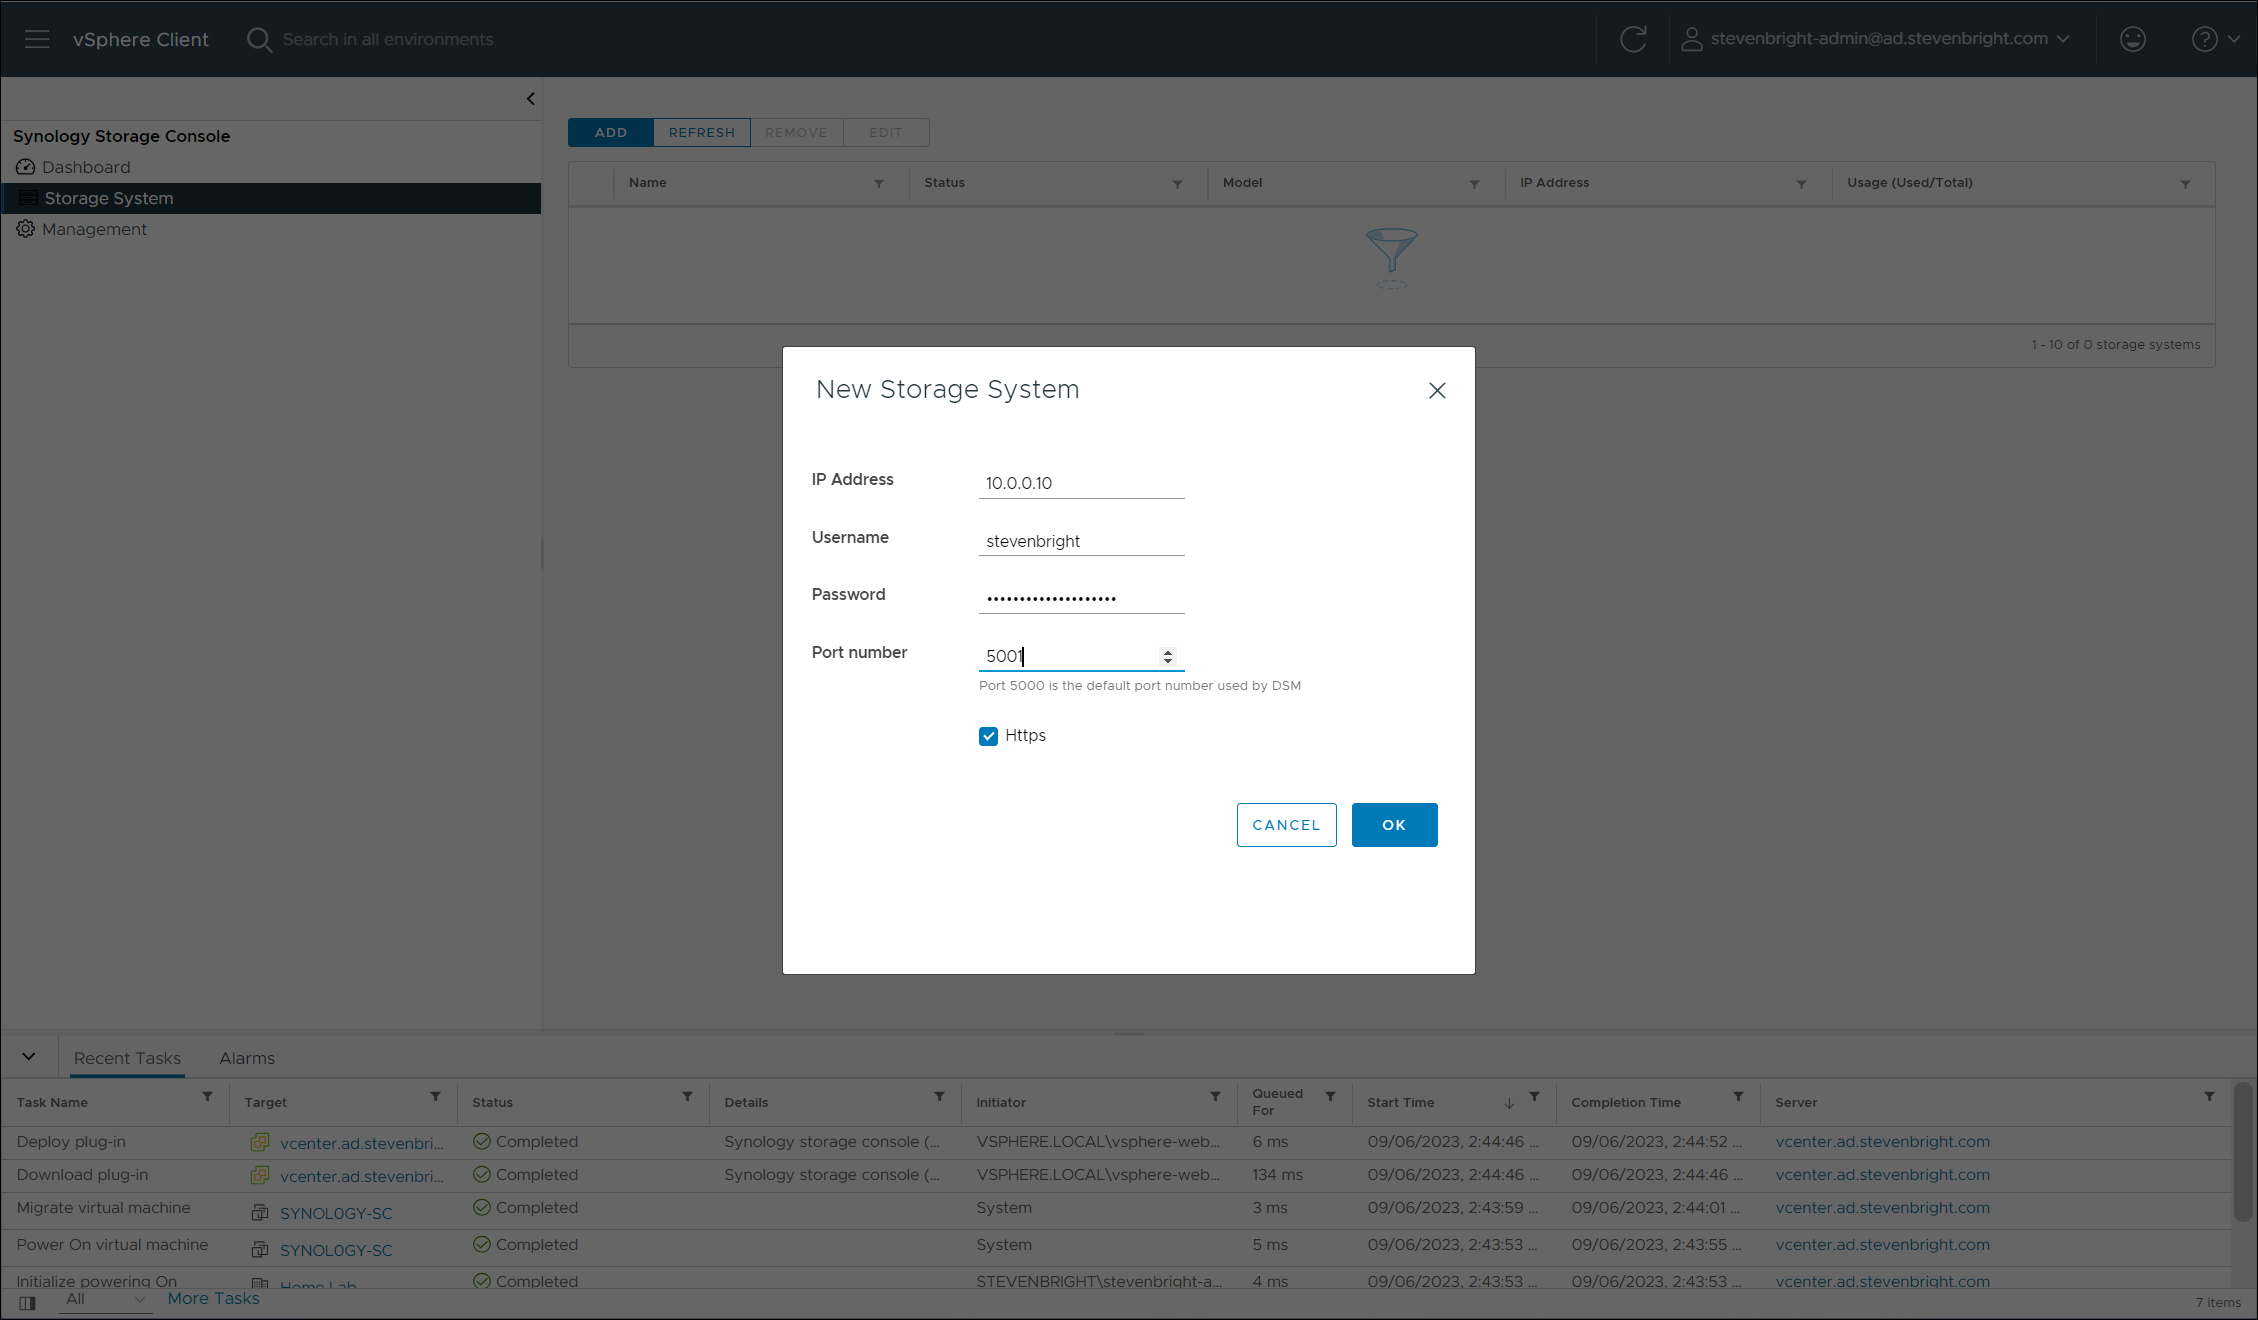
Provide the IP Address , the Username and Password for an account with Administrator privileges to your storage system, select whether or not to use HTTPS , and provide the Port Number (the default is 5000 for HTTP, 5001 for HTTPS). Click the OK button to add the storage system.
If successful, the storage system list will update with the details for your Synology storage system. The details include the device’s name, status, model, IP address, and usage information.
Clicking the Dashboard button on the left reveals the dashboard now populated with information regarding the storage system, volumes, and datastores.
If you are utilizing more than one Synology storage system within your virtual infrastructure, repeat these steps to add each additional storage system.
Optimizing VMware ESXi Host iSCSI Adapter Configurations
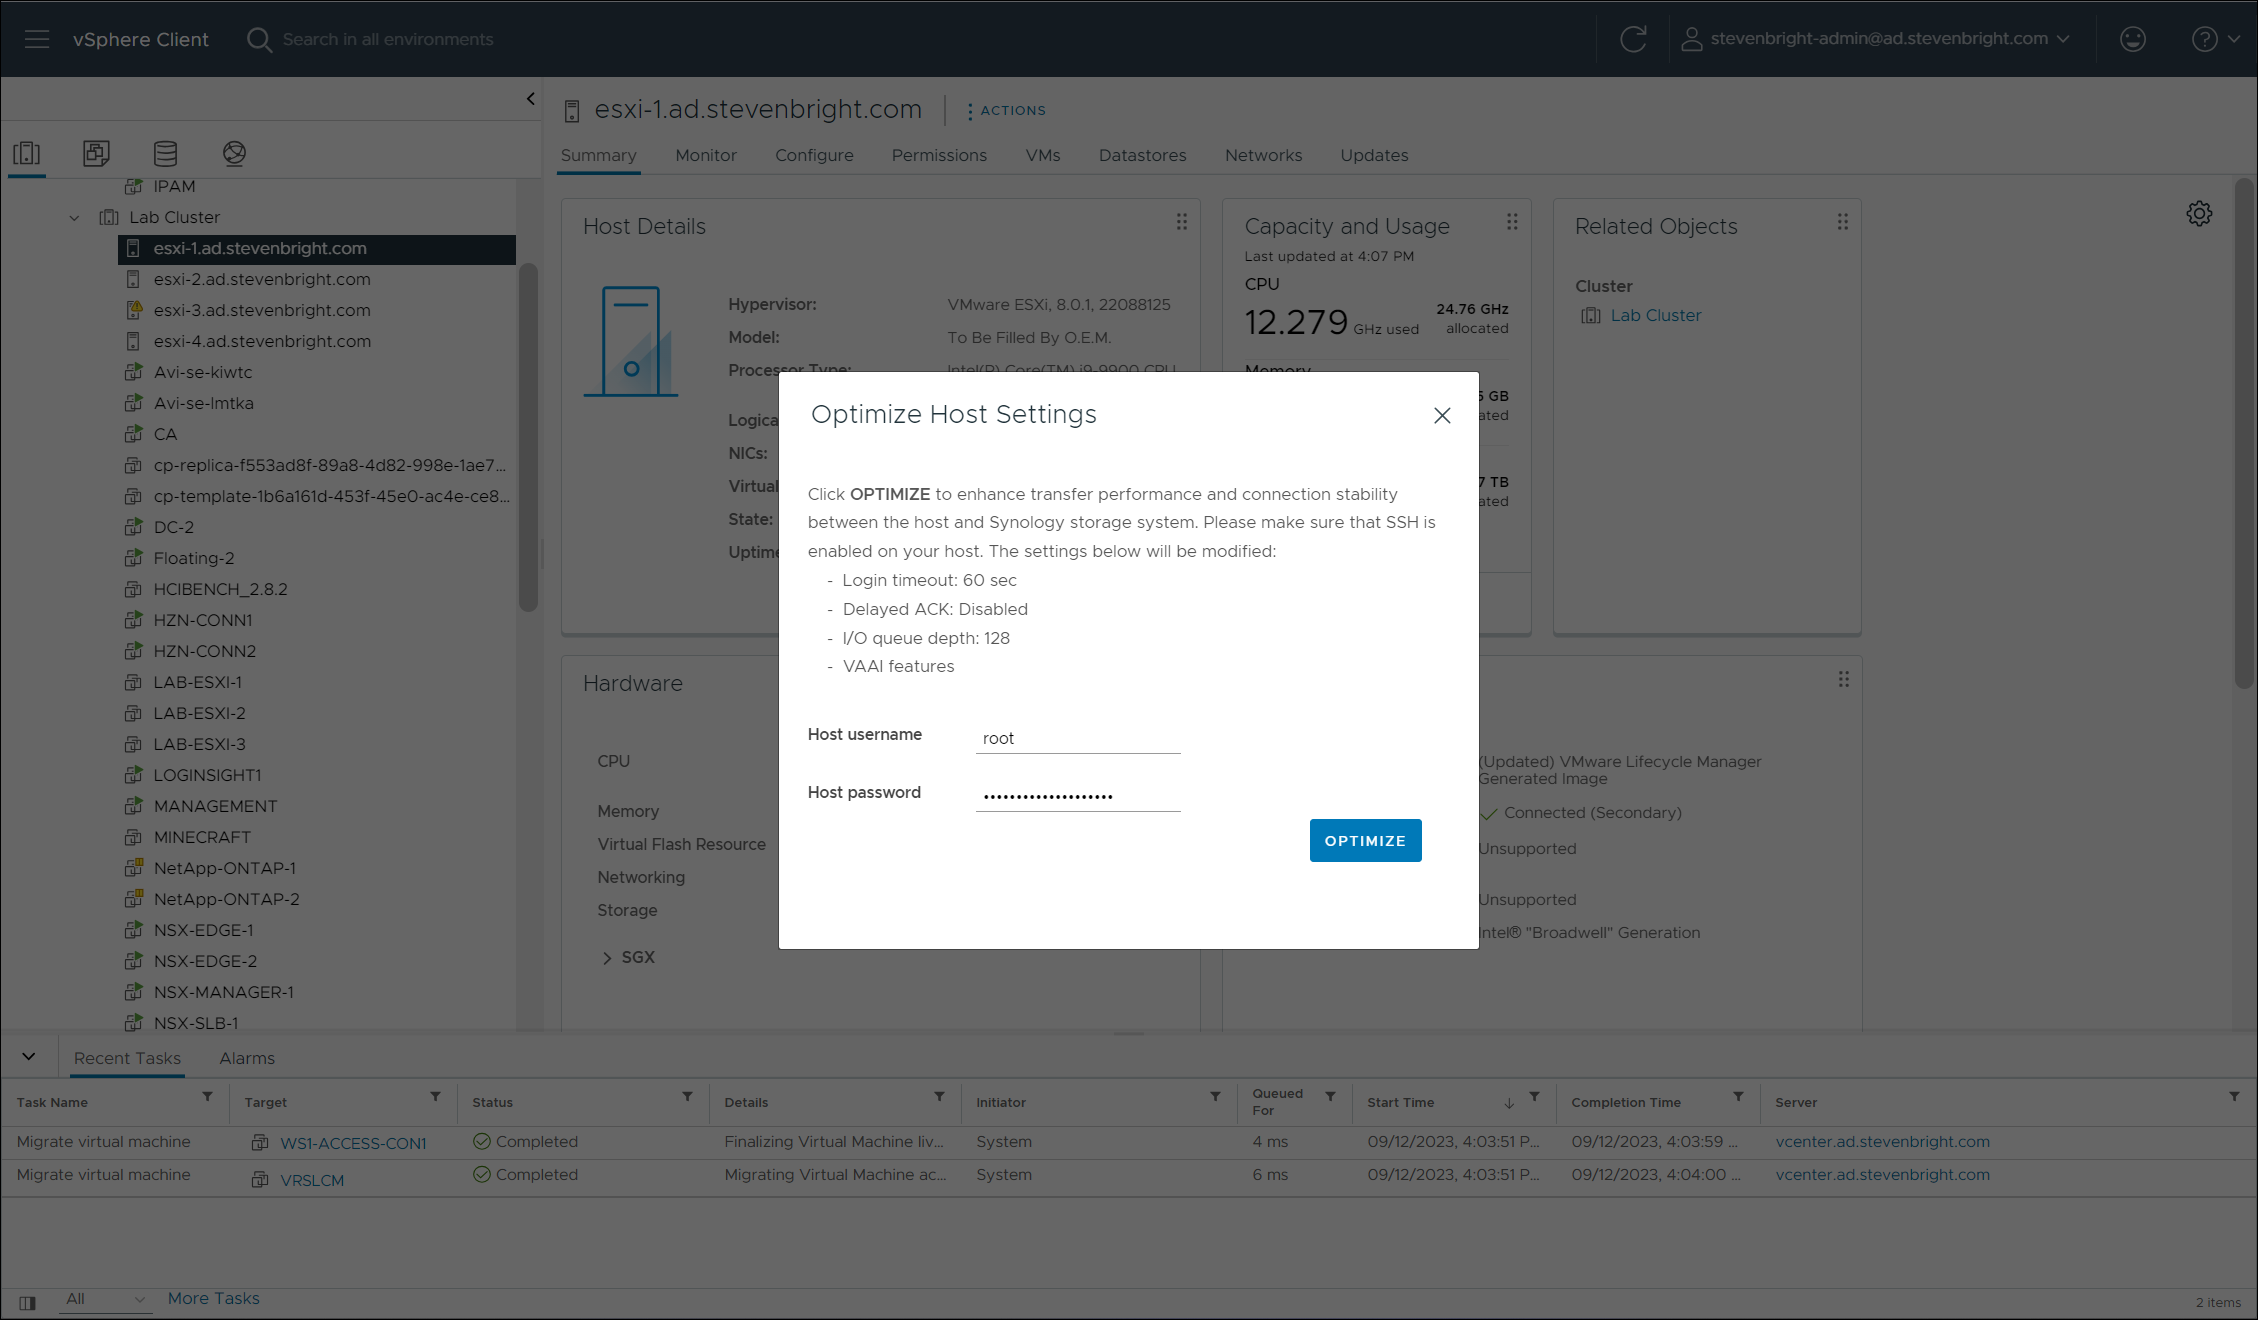
One of the first tasks you might want to complete after integrating the Synology Storage Console for VMware into your vSphere environment is to optime your VMware ESXi hosts’ iSCSI storage adapters for optimal performance and stability when connecting to your Synology storage system. Host optimization is a simple task that is executed on individual VMware ESXi hosts. This action implements the following settings on your iSCSI storage adapter/Synology iSCSI LUNs:
- Sets login timeout: 60 sec
- Sets delayed ACK: Disabled
- Sets I/O queue depth: 128
- Enabled VAAI features
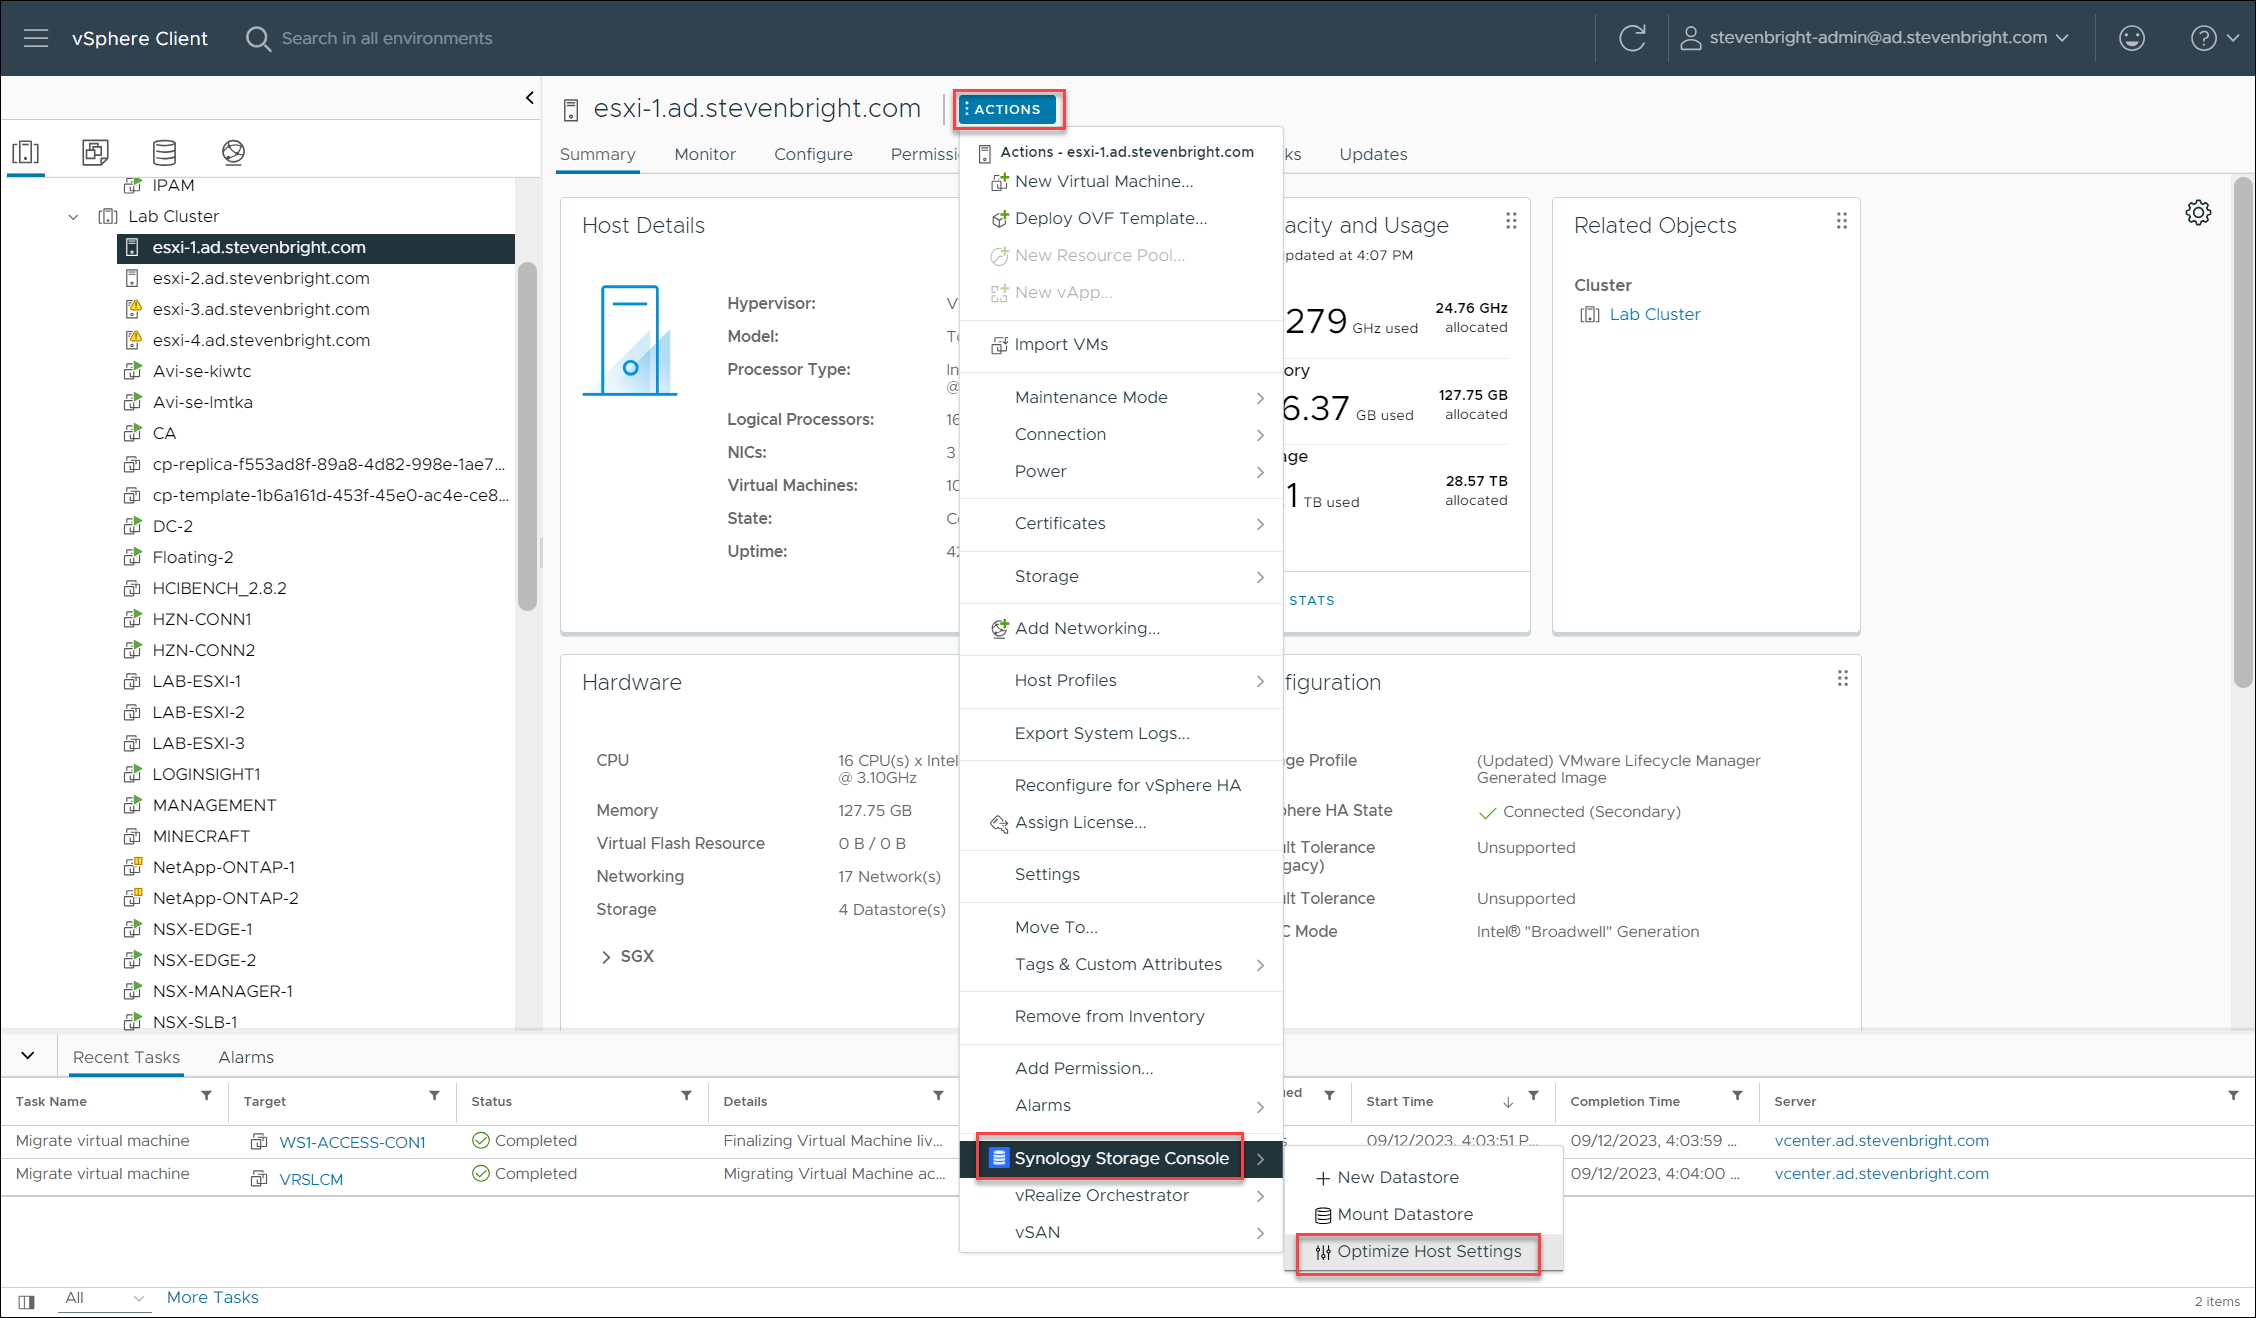
The only requirement for this operation is that the Synology Storage Console for VMware can open an SSH connection to our VMware ESXi host. With that requirement in mind, the first step is to enable the SSH service on the VMware ESXi host and disable Lockdown Mode. Next, from the ACTIONS menu for the VMware ESXi hosts, select the Synology Storage Console menu, then select the Optimize Host Settings option.
Enter a username and password with Administrator rights to the VMware ESXi host on the Optimize Host Settings screen.
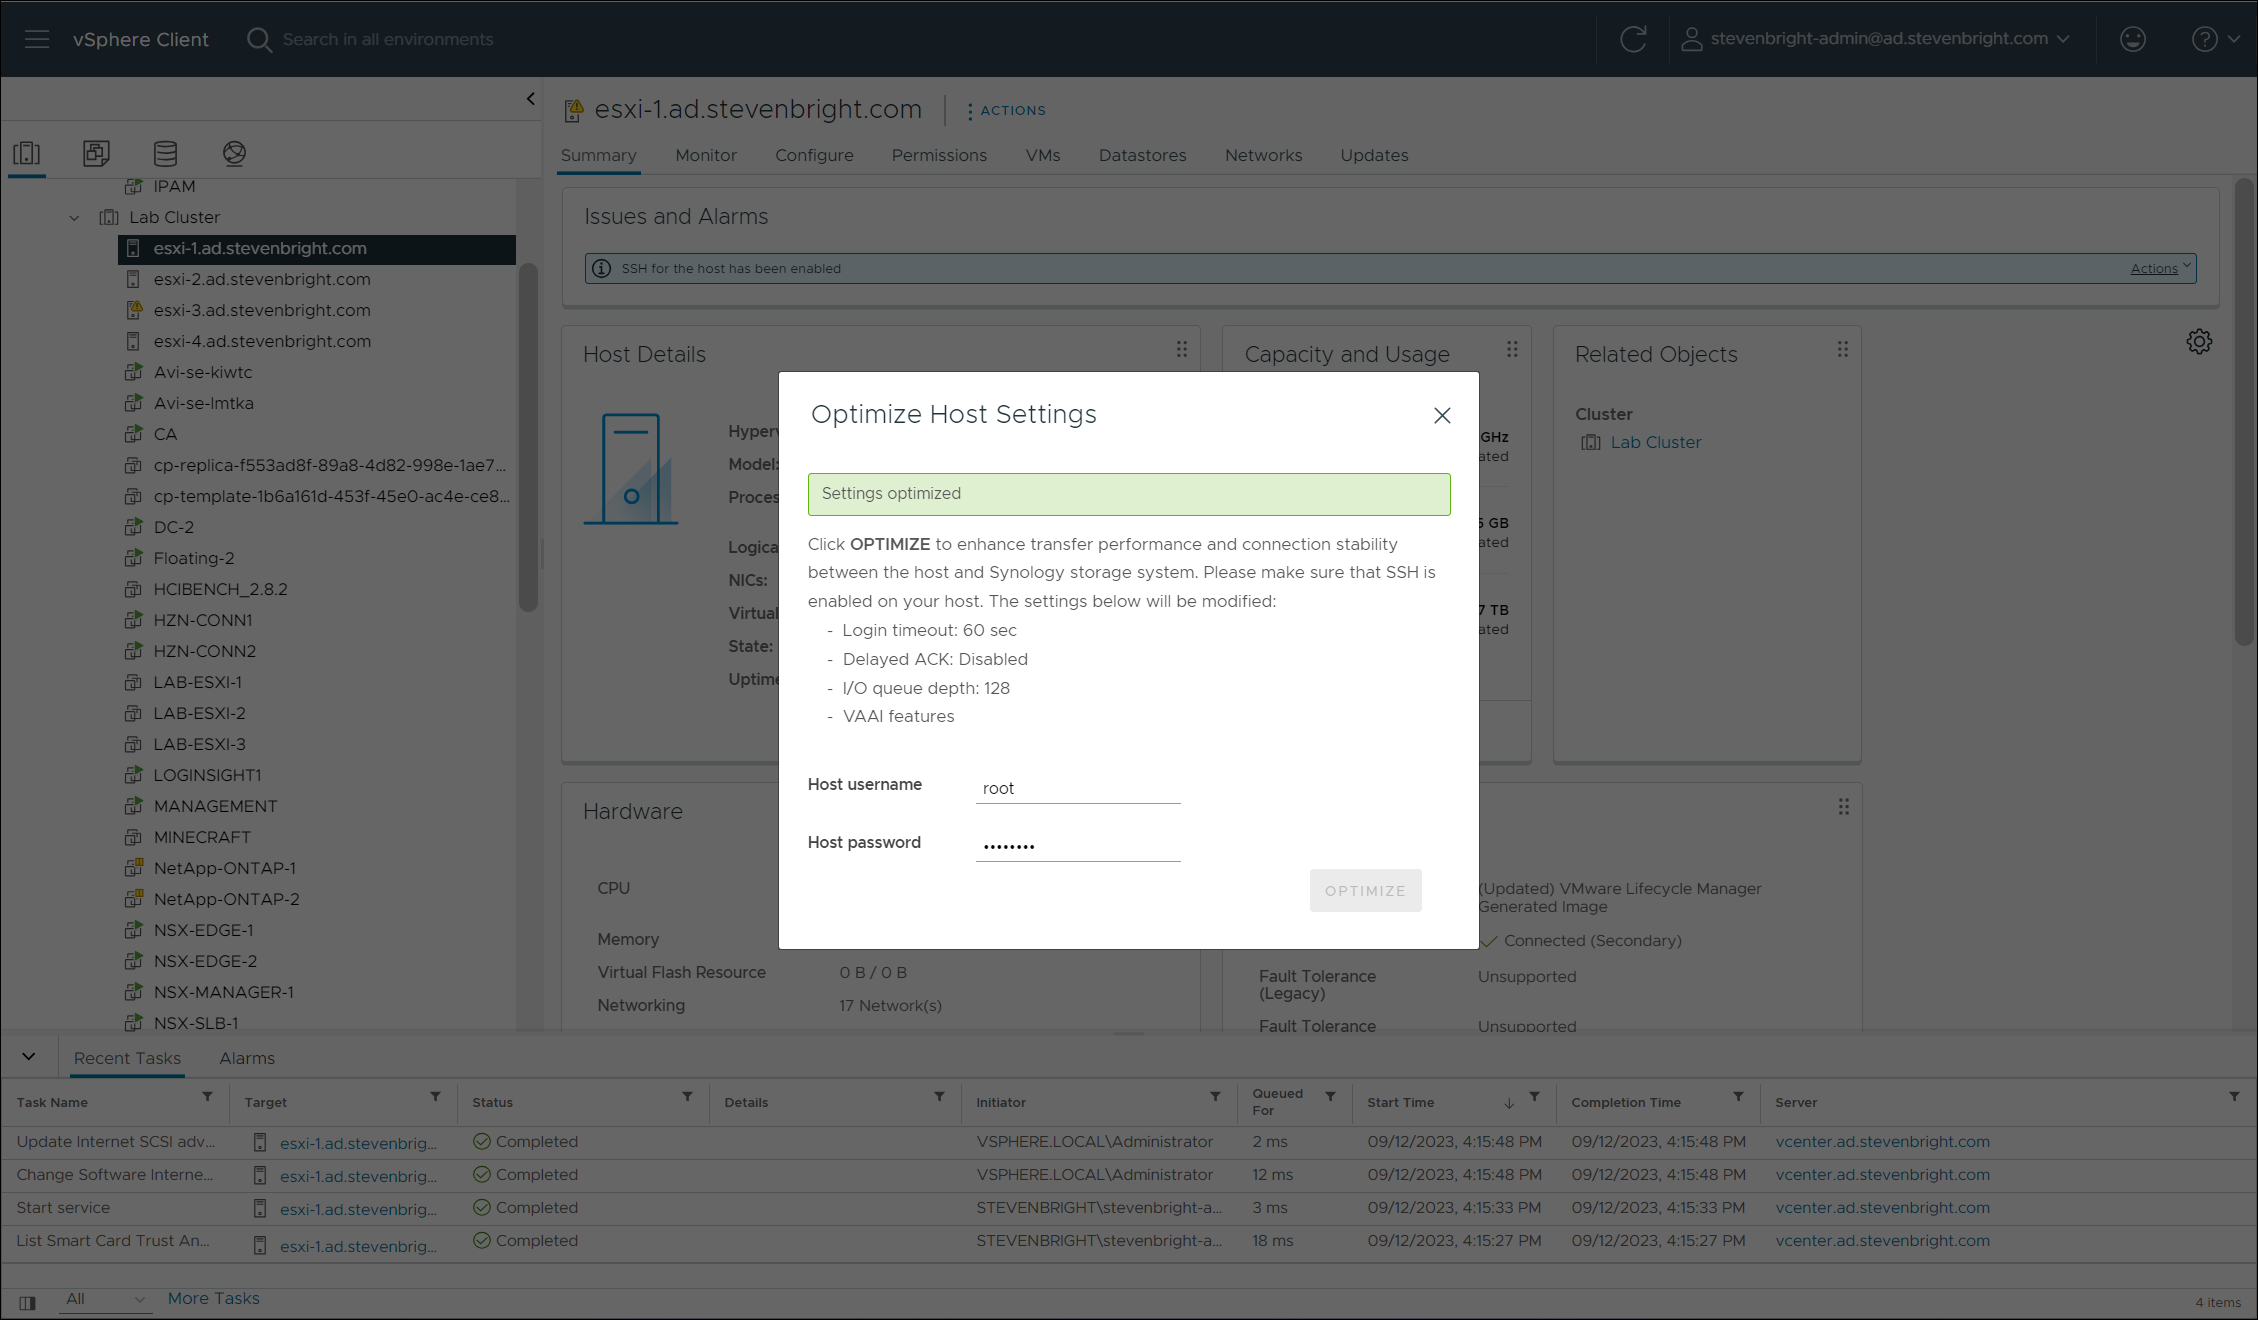
After clicking the OPTIMIZE button, a progress circle will spin on the display, indicating that the action is executing. If successful, you are provided a notification at the top of the dialog that states, “Settings Optimized.” Click on the X at the top right corner of the dialog to close it. Don’t forget to enable Lockdown Mode on the host and stop the SSH service. Repeat these steps for each additional host connected to your Synology system via iSCSI.
Provisioning New iSCSI LUNs or NFS Volumes
Provisioning new iSCSI LUNs of NFS volumes to existing VMware ESXi hosts is a multi-step process that first begins on your Synology storage system with the creation of the iSCSI LUN or a file share, configuring the export of the iSCSI LUN or NFS volume, and then connecting and configuring the new storage on your VMware ESXi hosts. The Synology Storage Console for VMware simplifies this process by automating the process end-to-end. The main requirement for this process to succeed is that you must have already configured your iSCSI storage adapter for connectivity to your storage network (if provisioning an iSCSI LUN) and that the NAS is reachable over the network from the VMware ESXi hosts.
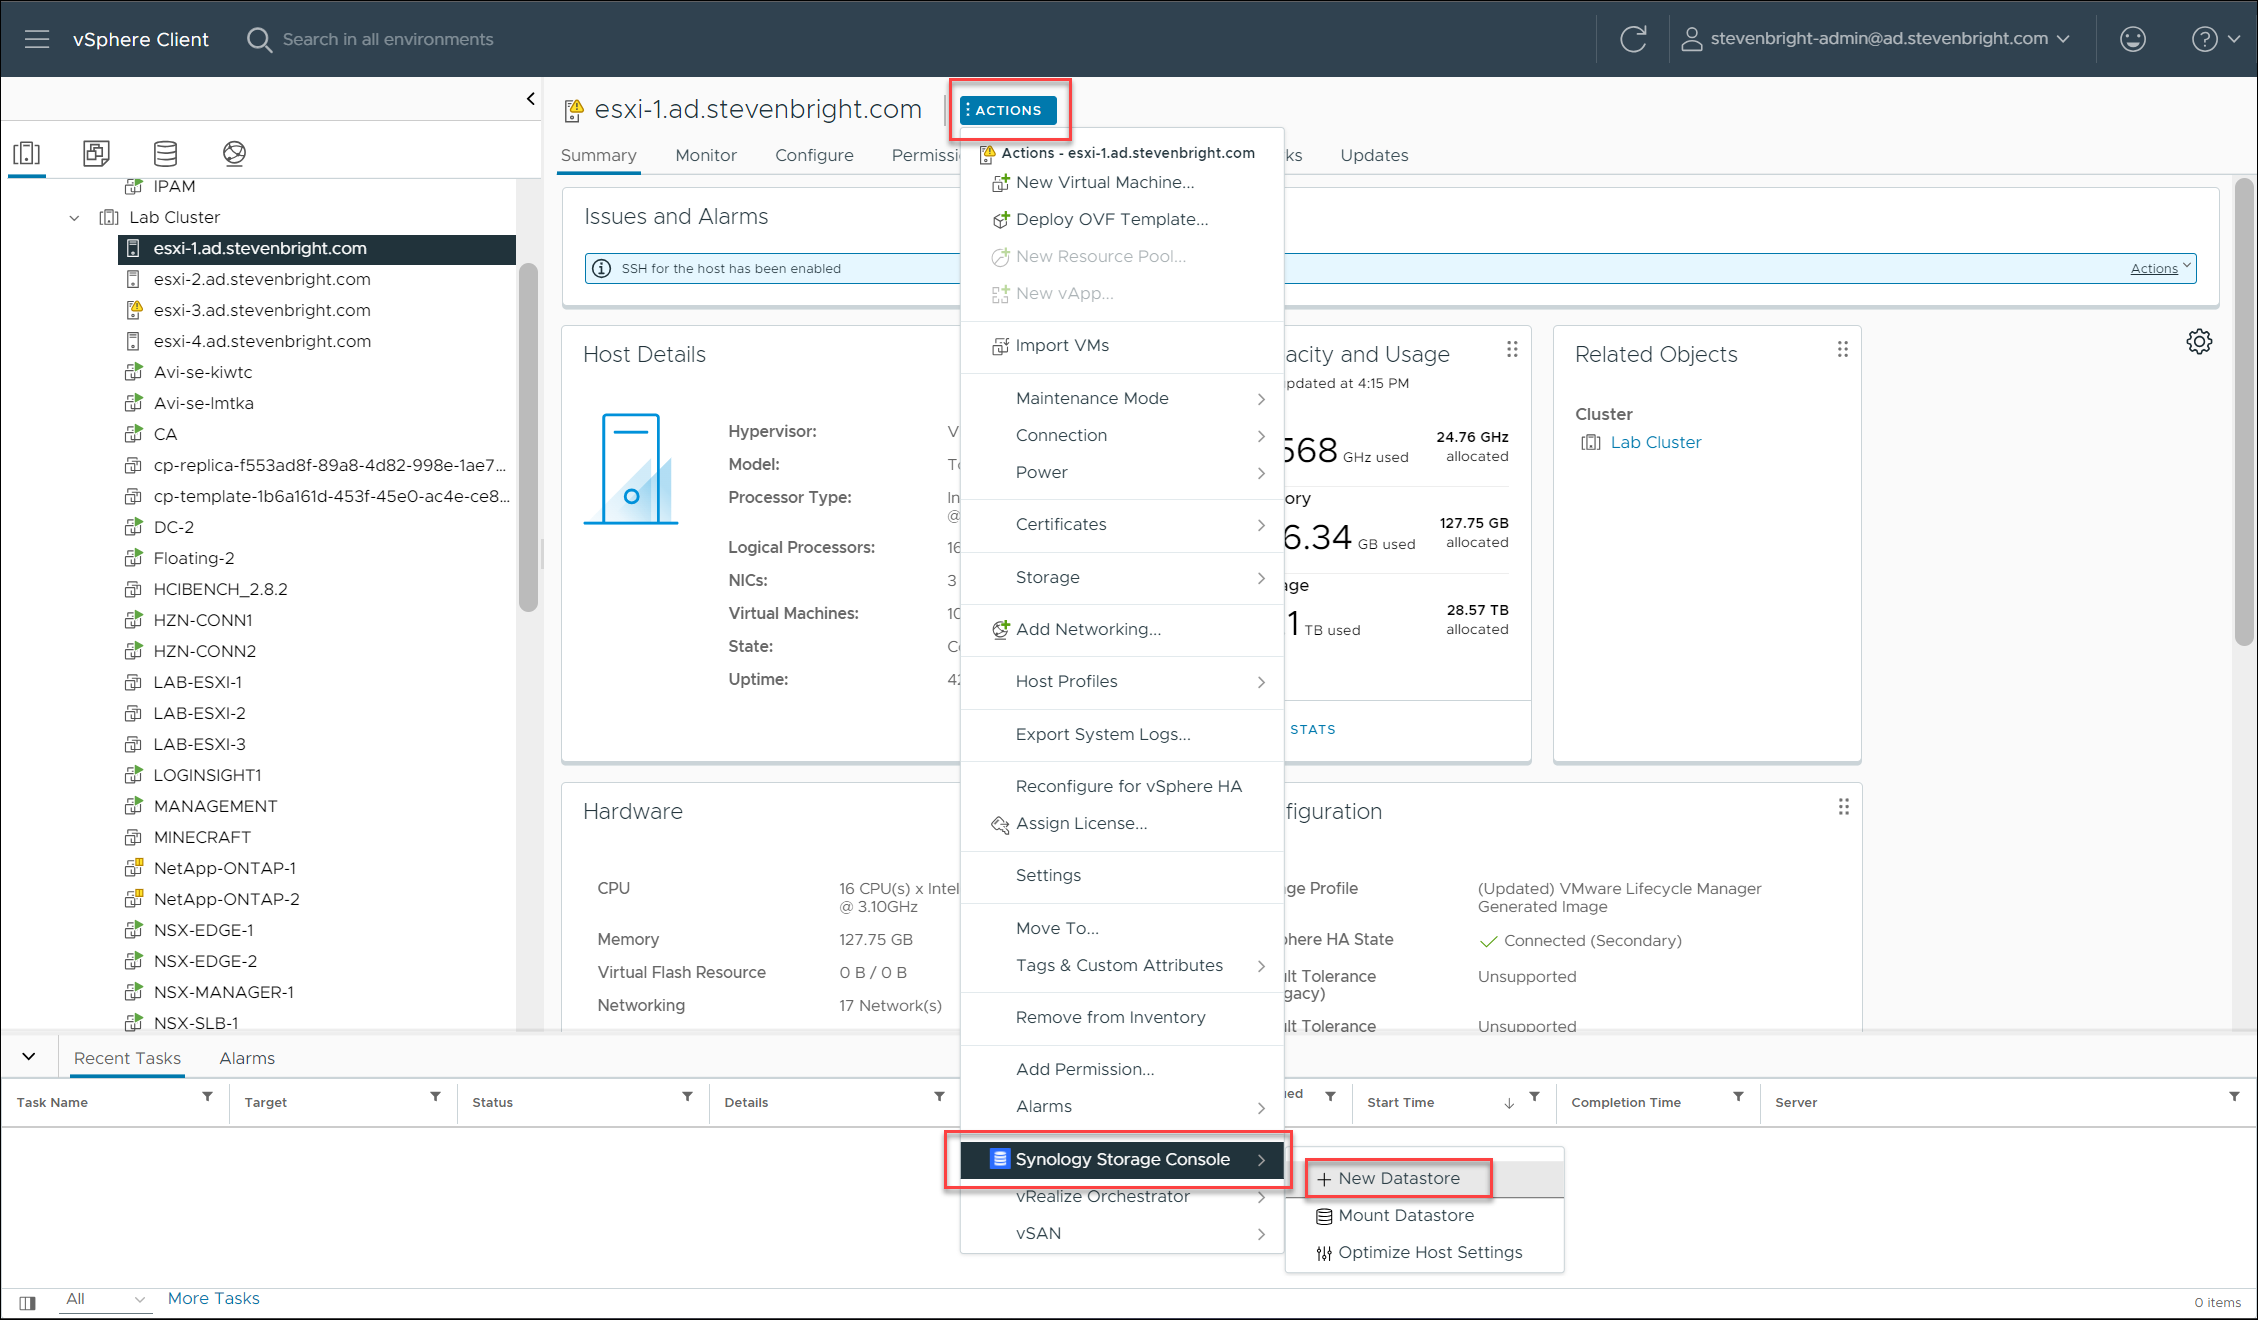
To start the process, select an VMware ESXi host from your inventory in the VMware vSphere Client, click the ACTIONS menu, select the Synology Storage Console option in the menu, and then select New Datastore.
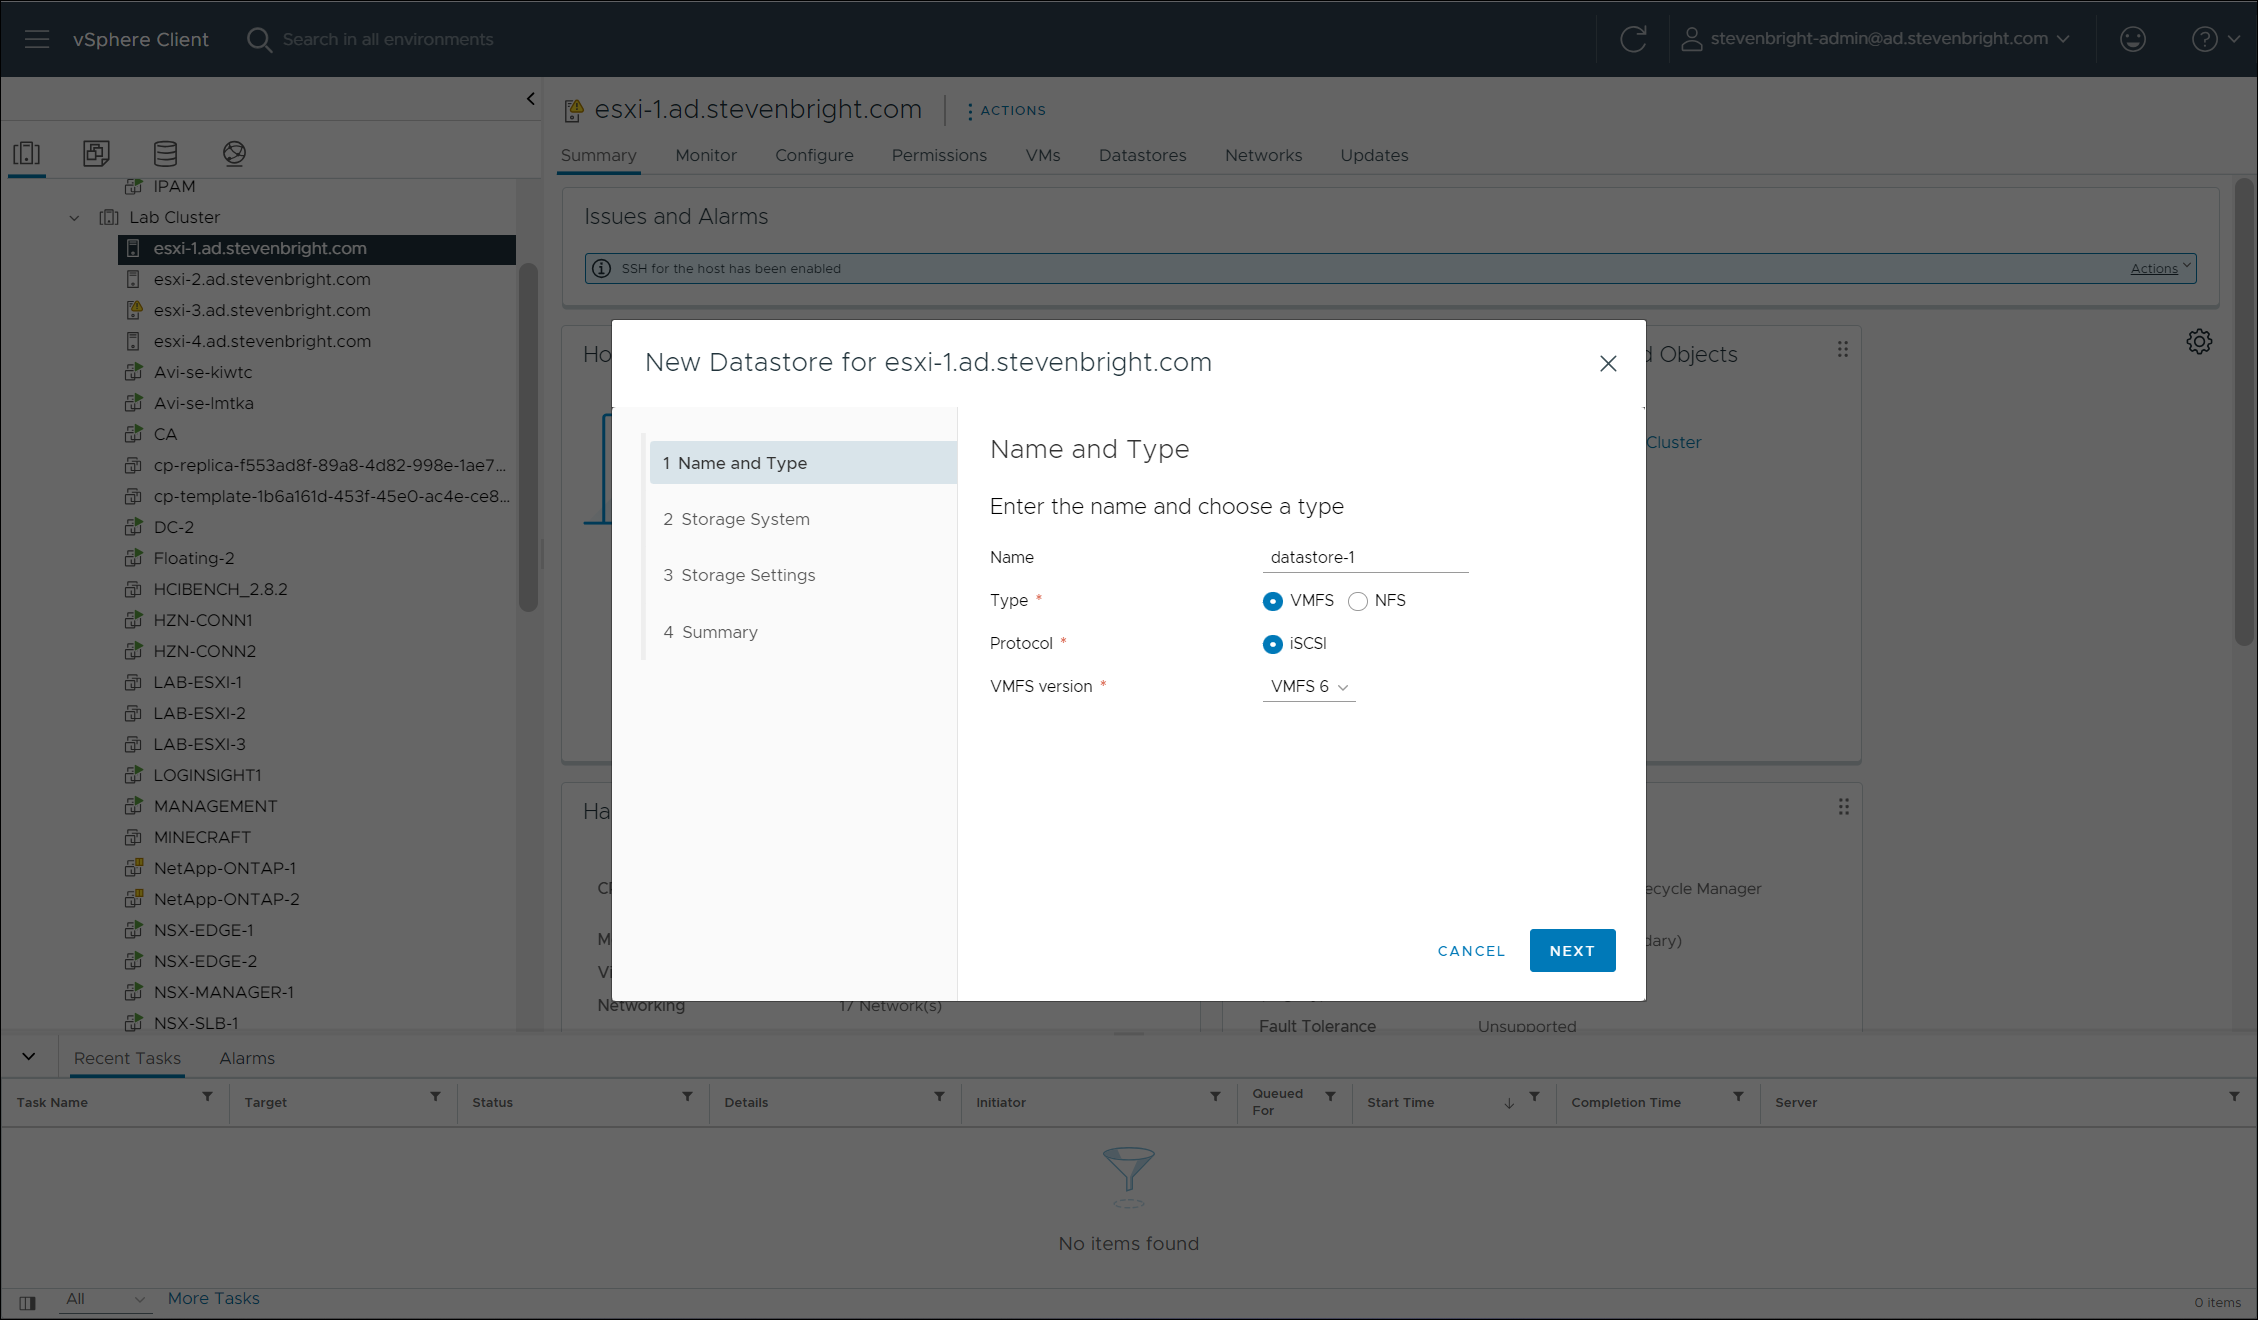
The resulting dialog box presented will walk you through creating the new datastore. On the wizard’s first screen, provide a Name for the new datastore and select if the datastore will be VMFS or NFS. If you choose VMFS , you are presented with a protocol selection (unless your Synology storage system supports fiber-channel, the only option will be iSCSI). You also are provided an opportunity to pick the VMFS version. If you select NFS, you are presented with the option to choose the NFS version. Click the NEXT button to continue to the next step in the process.
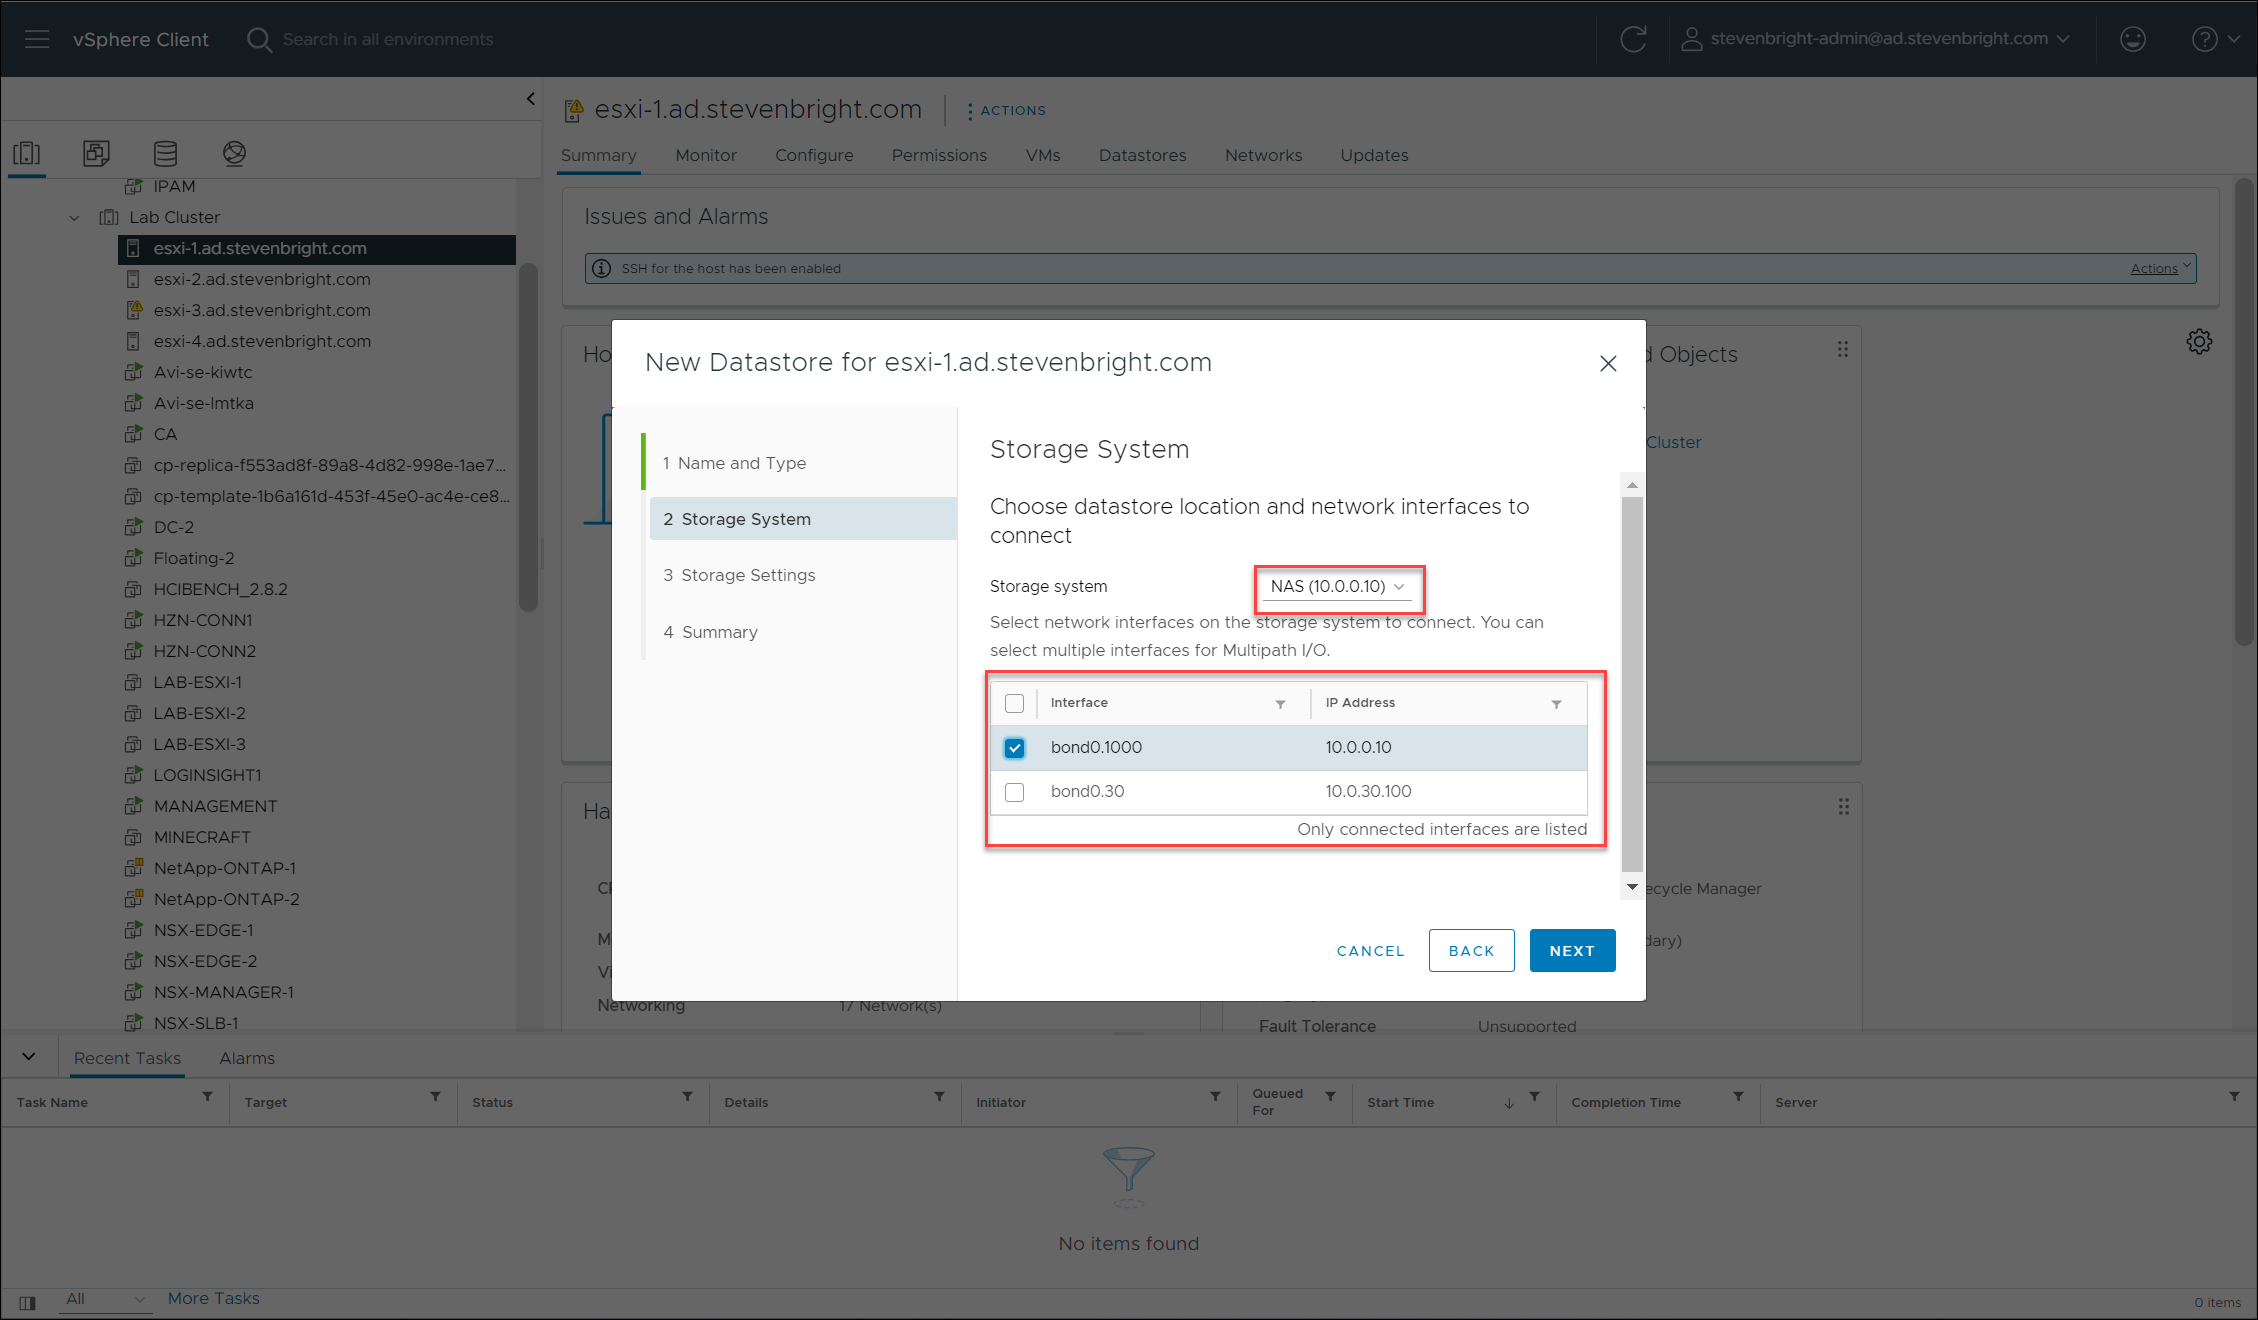
The next step in the wizard allows you to select the Synology storage system on which the new datastore will be created. After selecting your desired storage system, you are presented with a list of network interfaces on the Synology storage system. Select which interfaces should be utilized. In the case of iSCSI, you can select multiple network interfaces to configure multipathing. Click the NEXT button to continue.
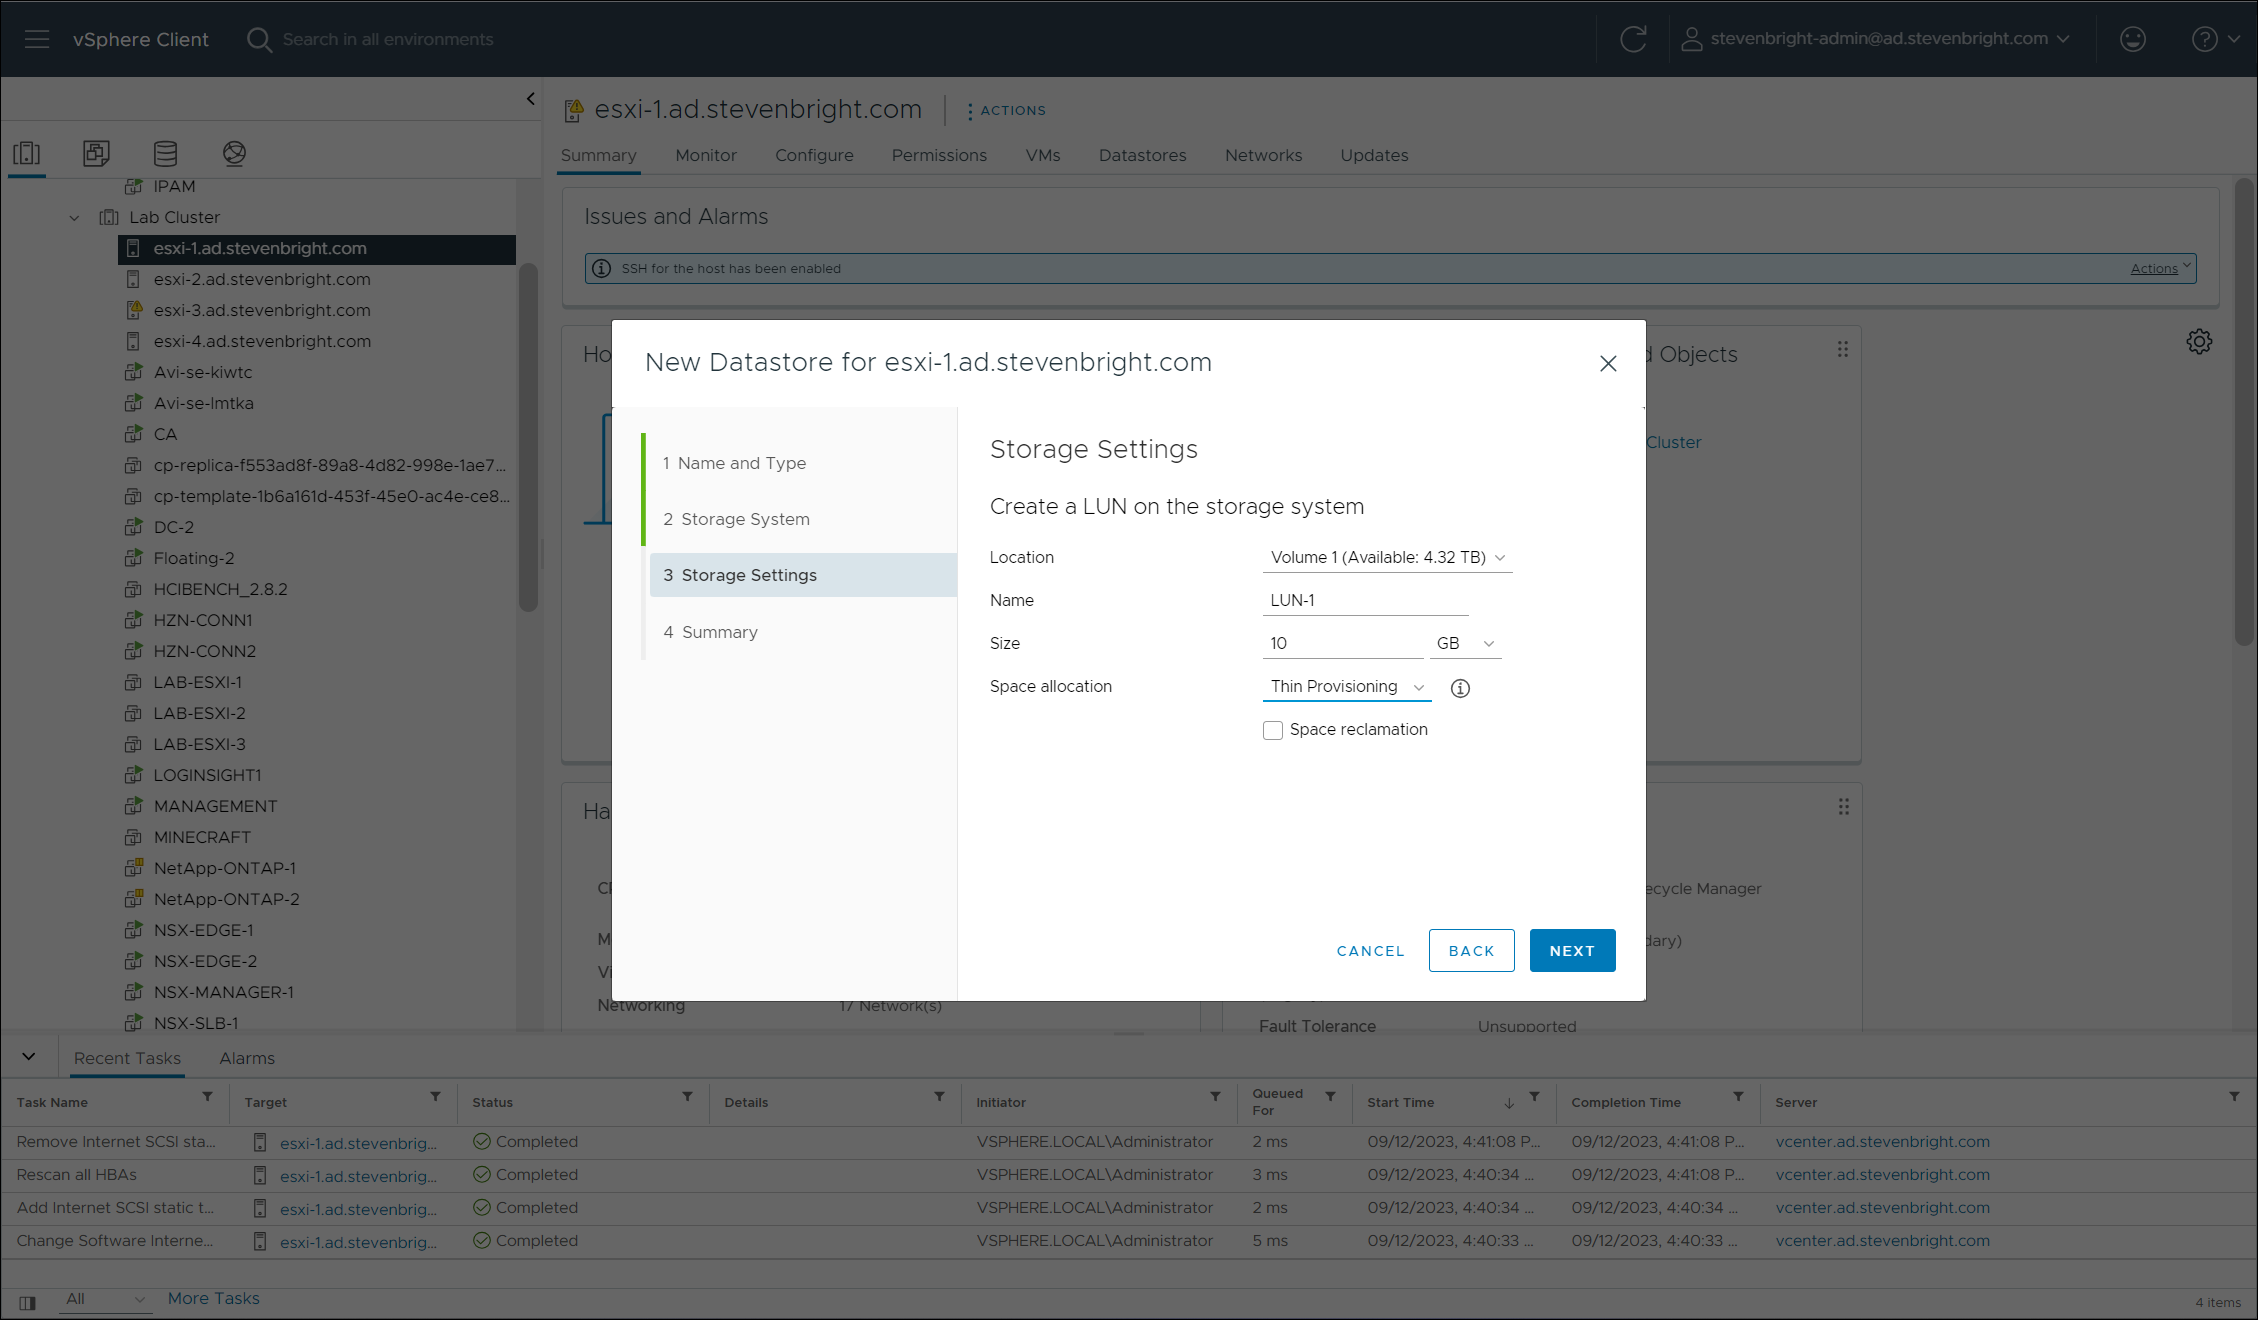
If you are configuring a new iSCSI datastore, the wizard will initiate a rescan of the VMware ESXi host’s HBAs. Once this rescan is complete, the wizard will prompt you to select the Synology storage system’s volume where the new iSCSI LUN should be created. Selecting a volume will load additional options depending on whether you are configuring a new iSCSI or NFS datastore. For iSCSI, you are prompted to provide a name for the iSCSI LUN, the size of the iSCSI LUN, and the space allocation method (thick or thin) for the iSCSI LUN. If you select Thin Provisioning, you can enable Space reclamation capabilities.
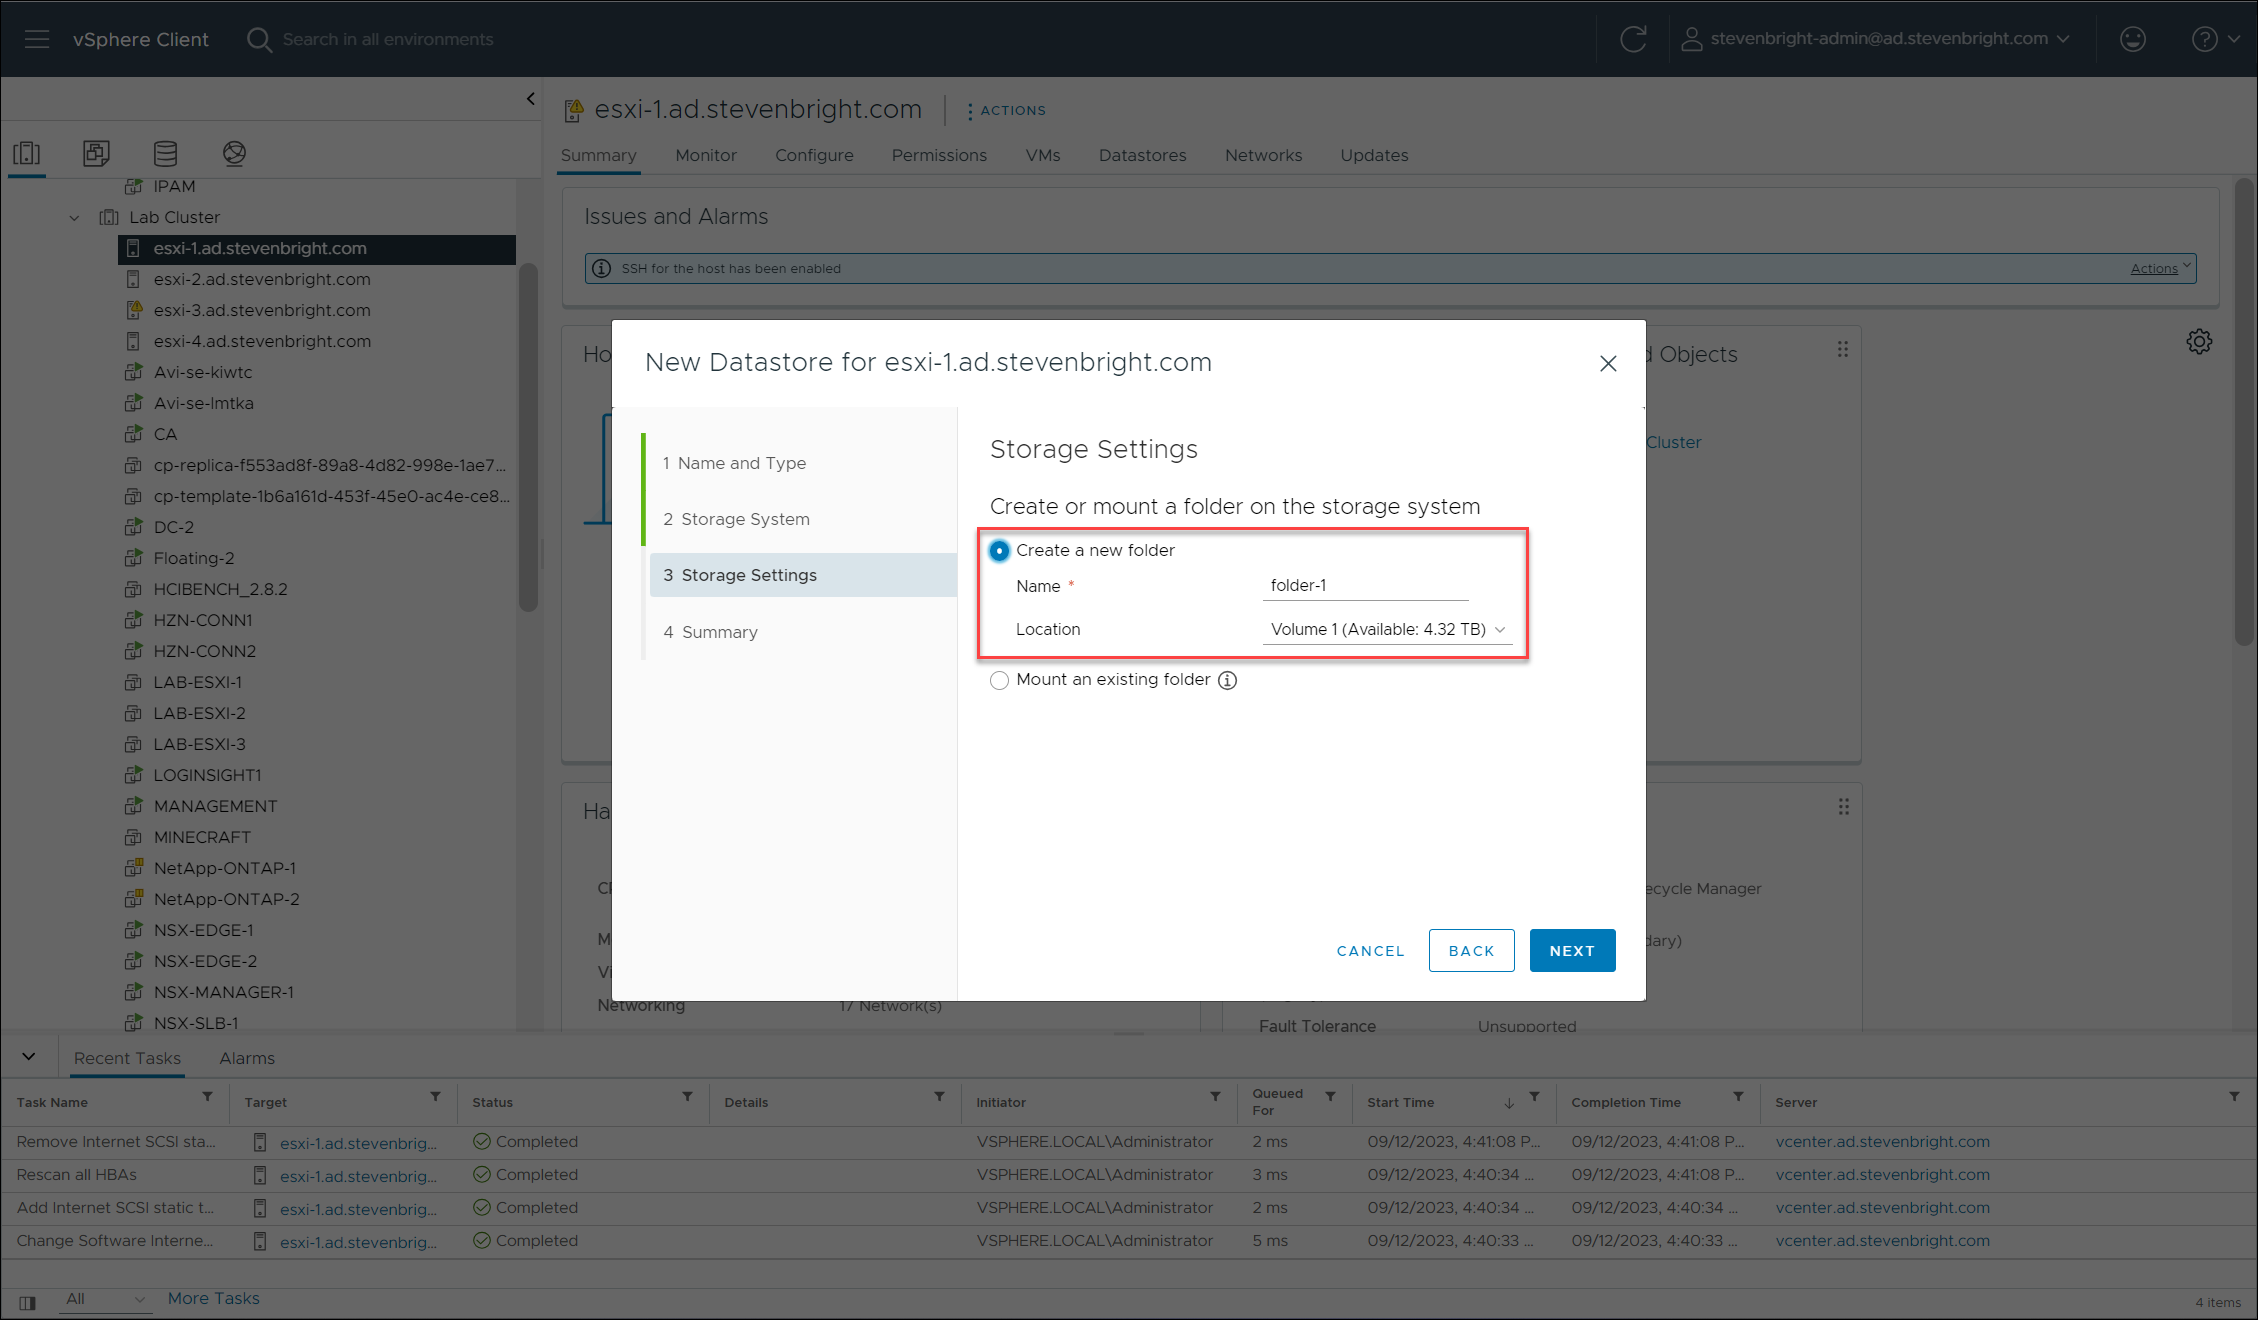
If you are instead creating a new NFS datastore, the wizard prompts you to decide if a new folder should be made or if an existing folder should be used. If you select the new folder option, you are prompted to provide a name for the new folder created on the Synology storage system and the volume.
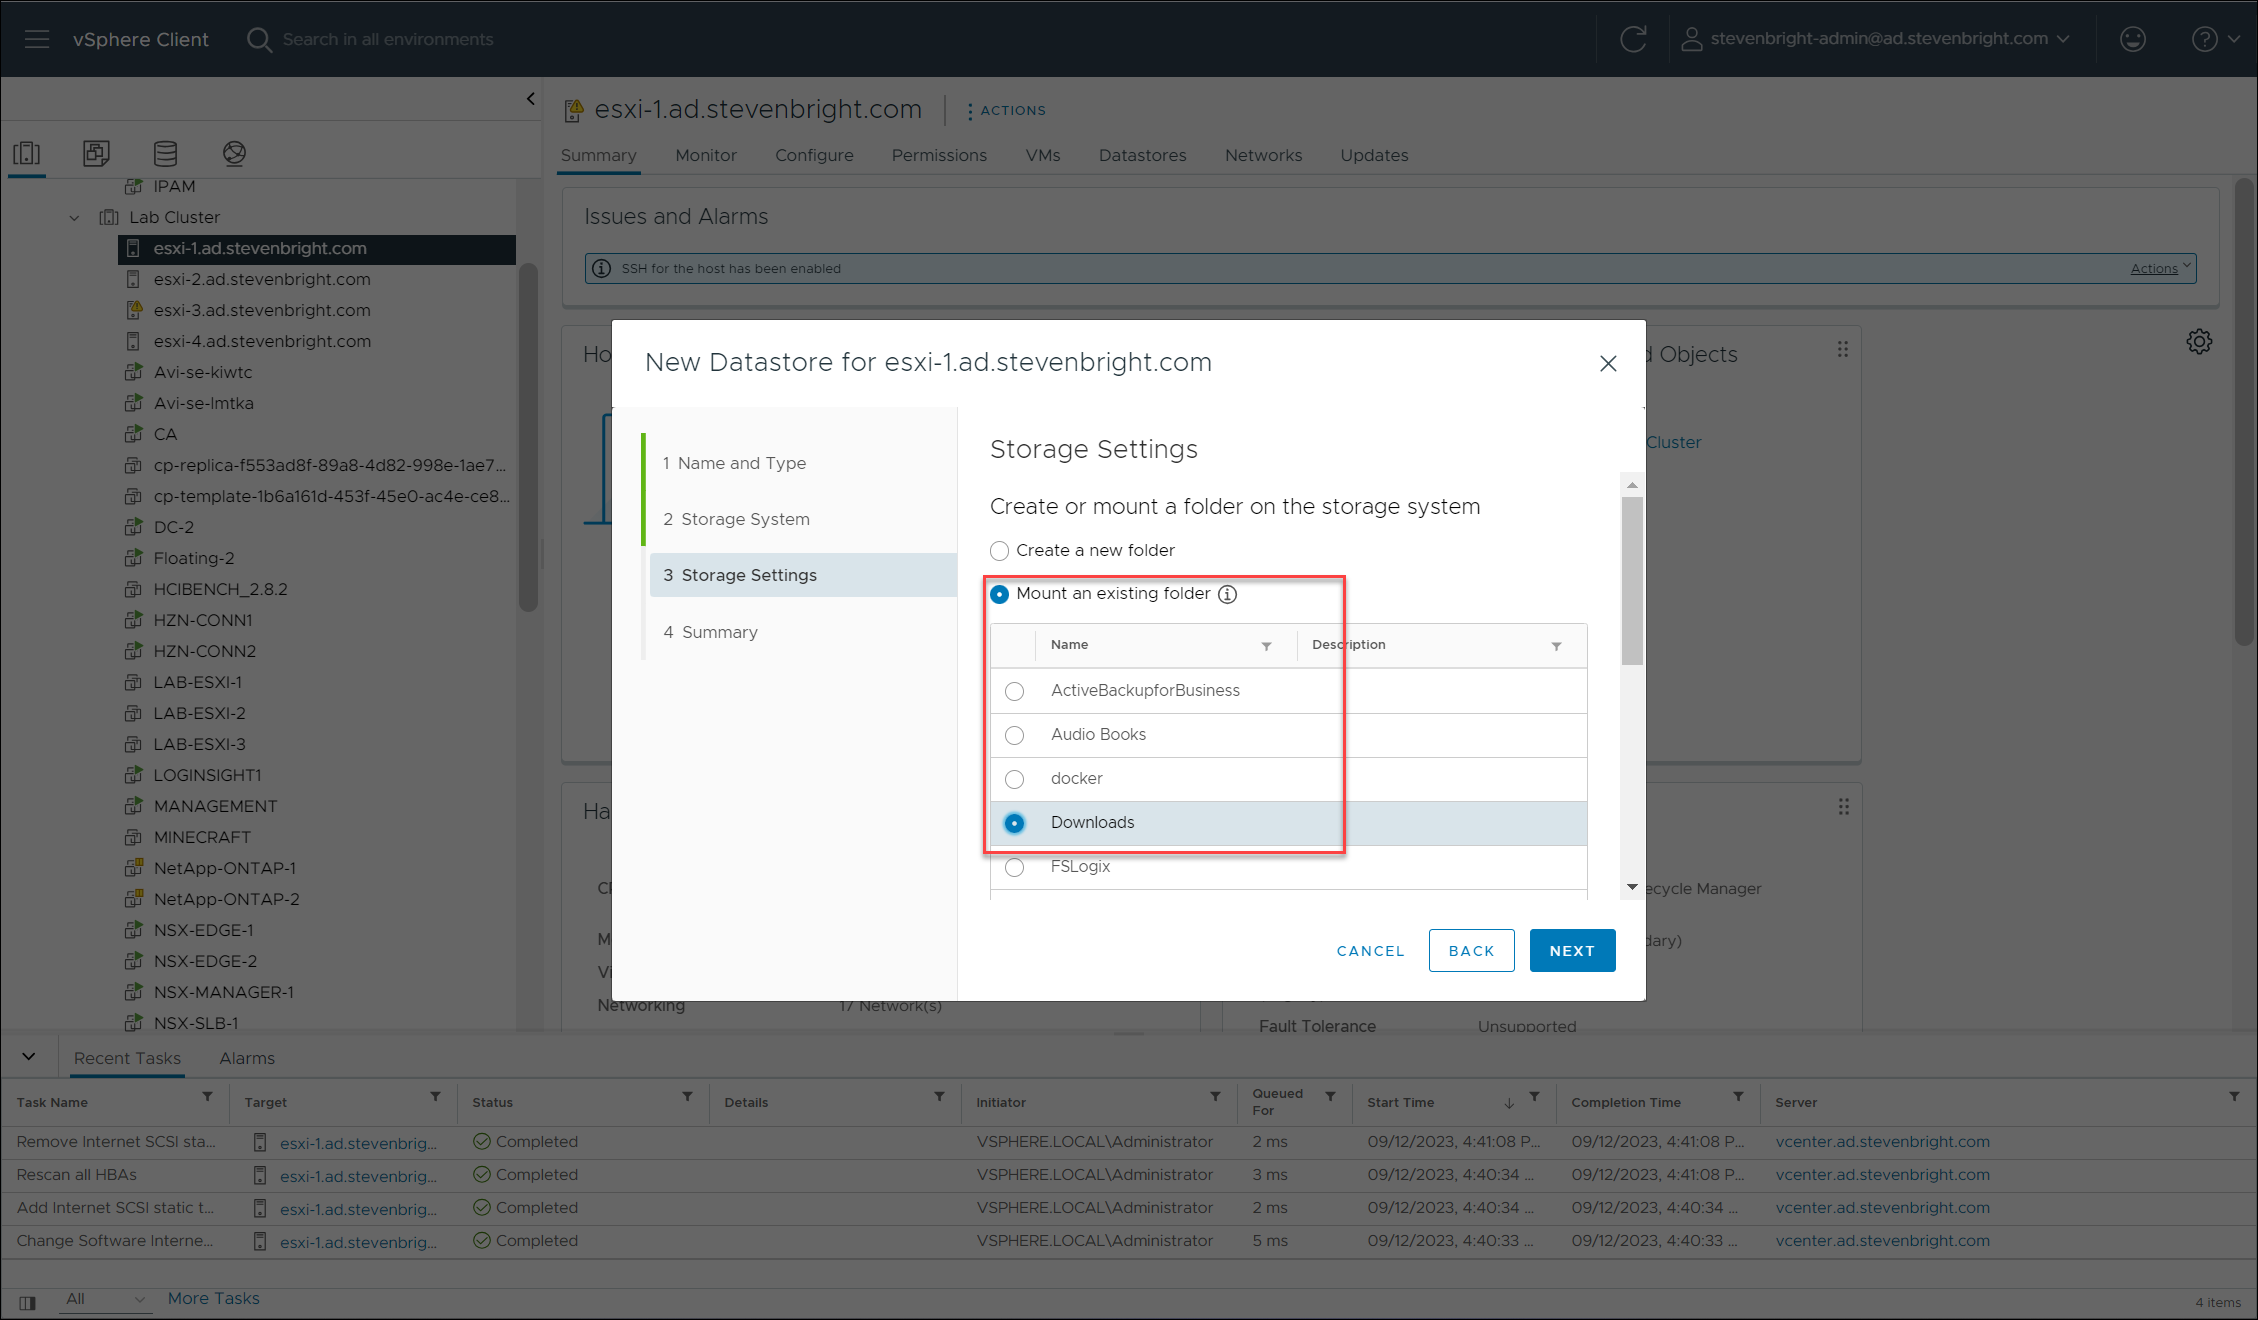
If you choose to use an existing folder on your Synology storage system, you are prompted to select an existing shared folder from your Synology storage system.
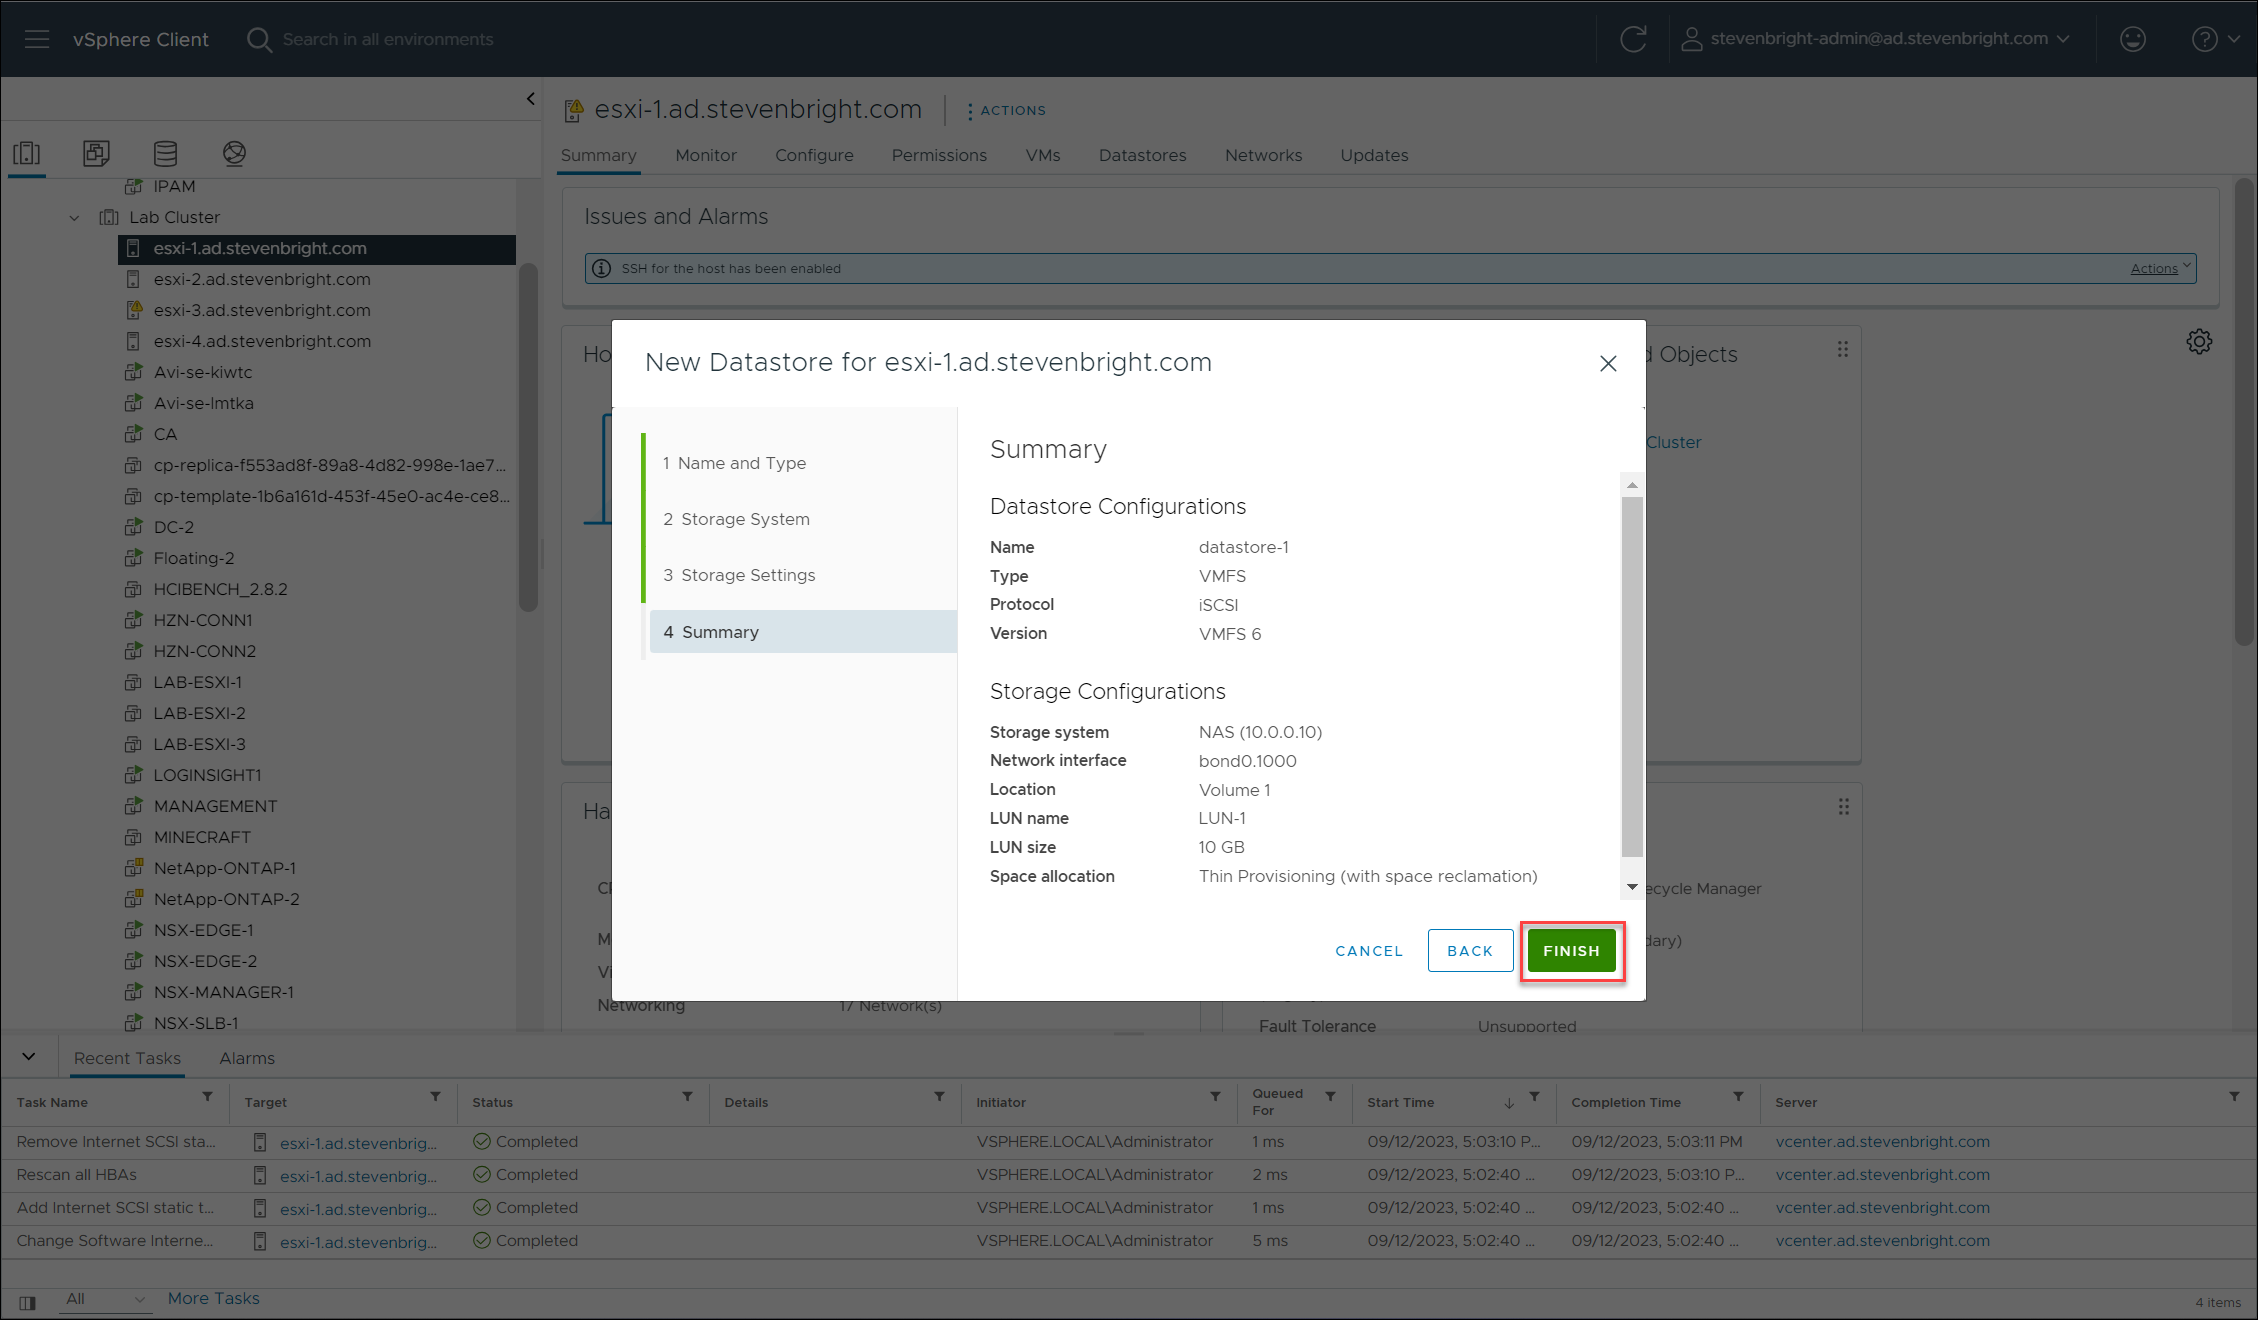
After clicking NEXT, the wizard gives you a summary of your chosen configuration options. Click the FINISH button to begin creating the new datastore.
Depending on whether you are adding a new iSCSI LUN or an NFS volume, the wizard will first apply configuration changes to your Synology storage system and then add the new iSCSI LUN or NFS volume to your VMware ESXi host.
With a new iSCSI LUN, the wizard will create a new LUN and iSCSI Target on your Synology storage system. It will configure the iSCSI target with network bindings based on your selections during the creation process and will configure the target to allow multiple sessions. Unfortunately, iSCSI CHAP settings are not included in the configuration and must be configured manually. Additionally, the iSCSI storage device is added to the VMware ESXi host using the multipathing policy of Most Recent Used instead of the preferred Round Robin policy.
For a new NFS volume, the wizard will create a new shared folder on the Synology storage system. Unfortunately, the NFS share permissions will be configured to allow any host or IP address to connect. I feel that this should not be the default setting and that the configuration should limit the NFS mount to the IP address of the VMware ESXi host to ensure a secure environment. Additionally, the wizard will leave the Recycle Bin enabled on the shared folder, which could cause unexpected disk utilization on the Synology storage system if the NFS volume experiences the creation and destruction of many VMs without emptying the Recycle Bin.
Mount Existing iSCSI LUNs or NFS Volumes
Now that we have created our new datastores on one of our VMware ESXi hosts, we need to mount the new datastore to the rest of our VMware ESXi hosts. In the case of an NFS volume, this can be easy to accomplish within the VMware vSphere Client utilizing the native client capabilities. However, if you created a new iSCSI LUN/datastore, additional configuration steps must be completed on each VMware ESXi host.
Mount an Existing NFS Volume to Additional Hosts Using the Native VMware vSphere Client Process
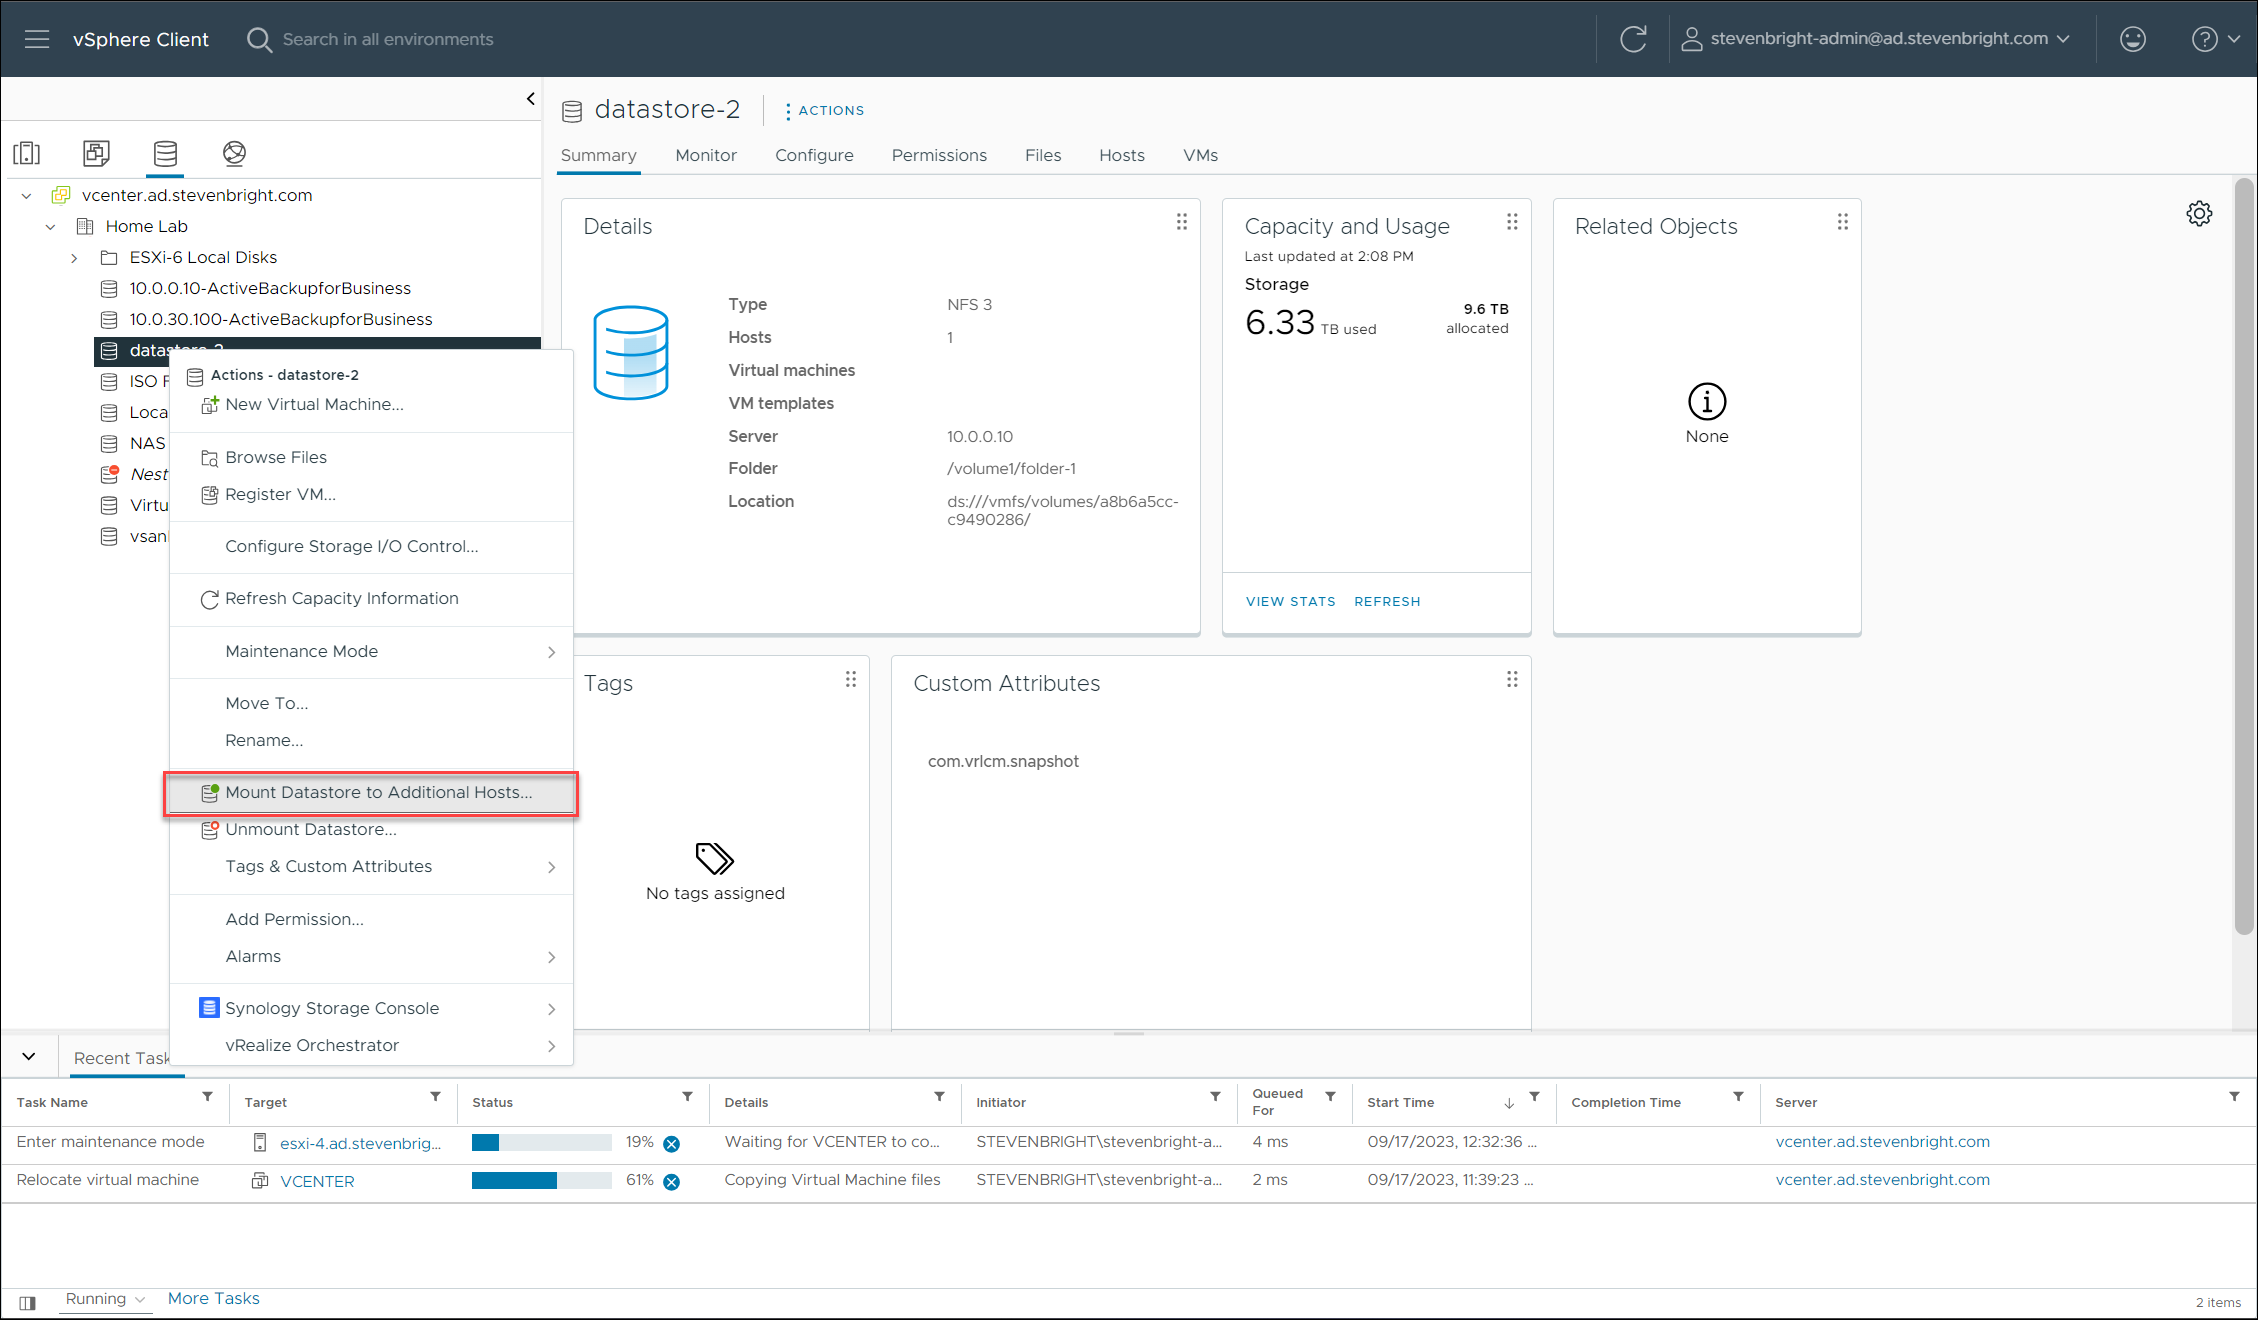
Let’s start out with mounting an NFS mount to our remaining VMware ESXi hosts using the VMware vSphere Client. This is accomplished by selecting the datastores within the VMware vSphere Client’s inventory. Right-click on the datastores, then select Mount Datastores to Additional Hosts.
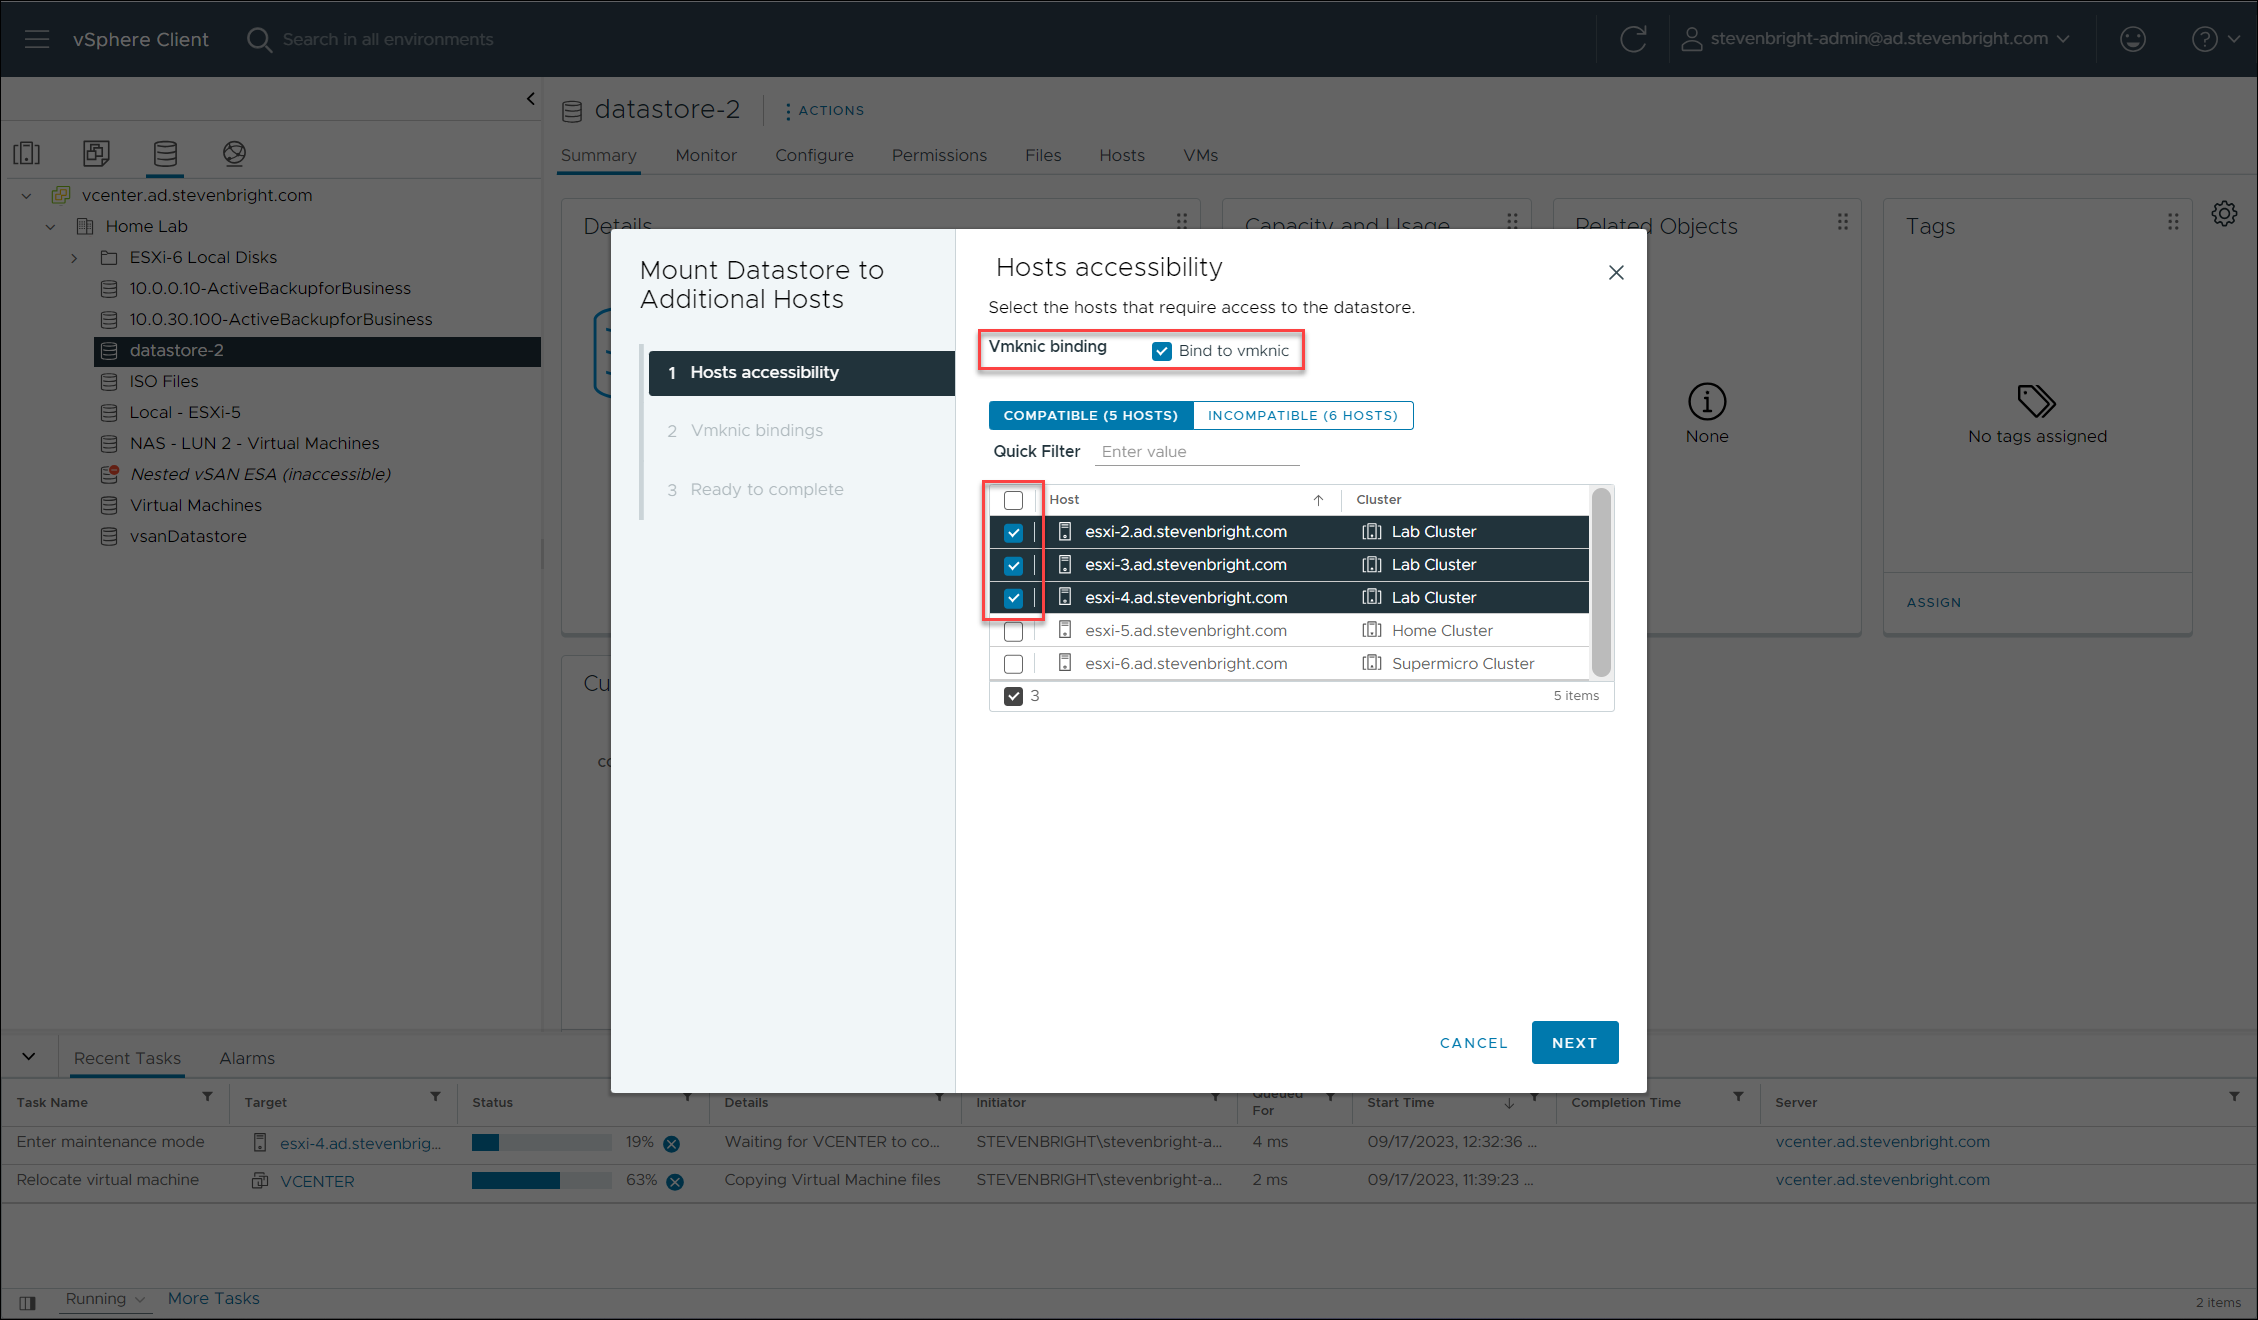
The Mount Datastore to Additional Hosts wizard will launch. The first screen of the wizard requests that we specify the additional VMware ESXi hosts that the NFS volume should be mounted to. If you are using vSphere 8.0 Update 1, you will also have the option of specifying that you wish to bind the NFS volume to a specific vmknic. In my example, I will be mounting the volume to three additional hosts and will be binding it to a specific vmknic. After selecting the desired hosts and options, click NEXT to continue to the next screen in the wizard.
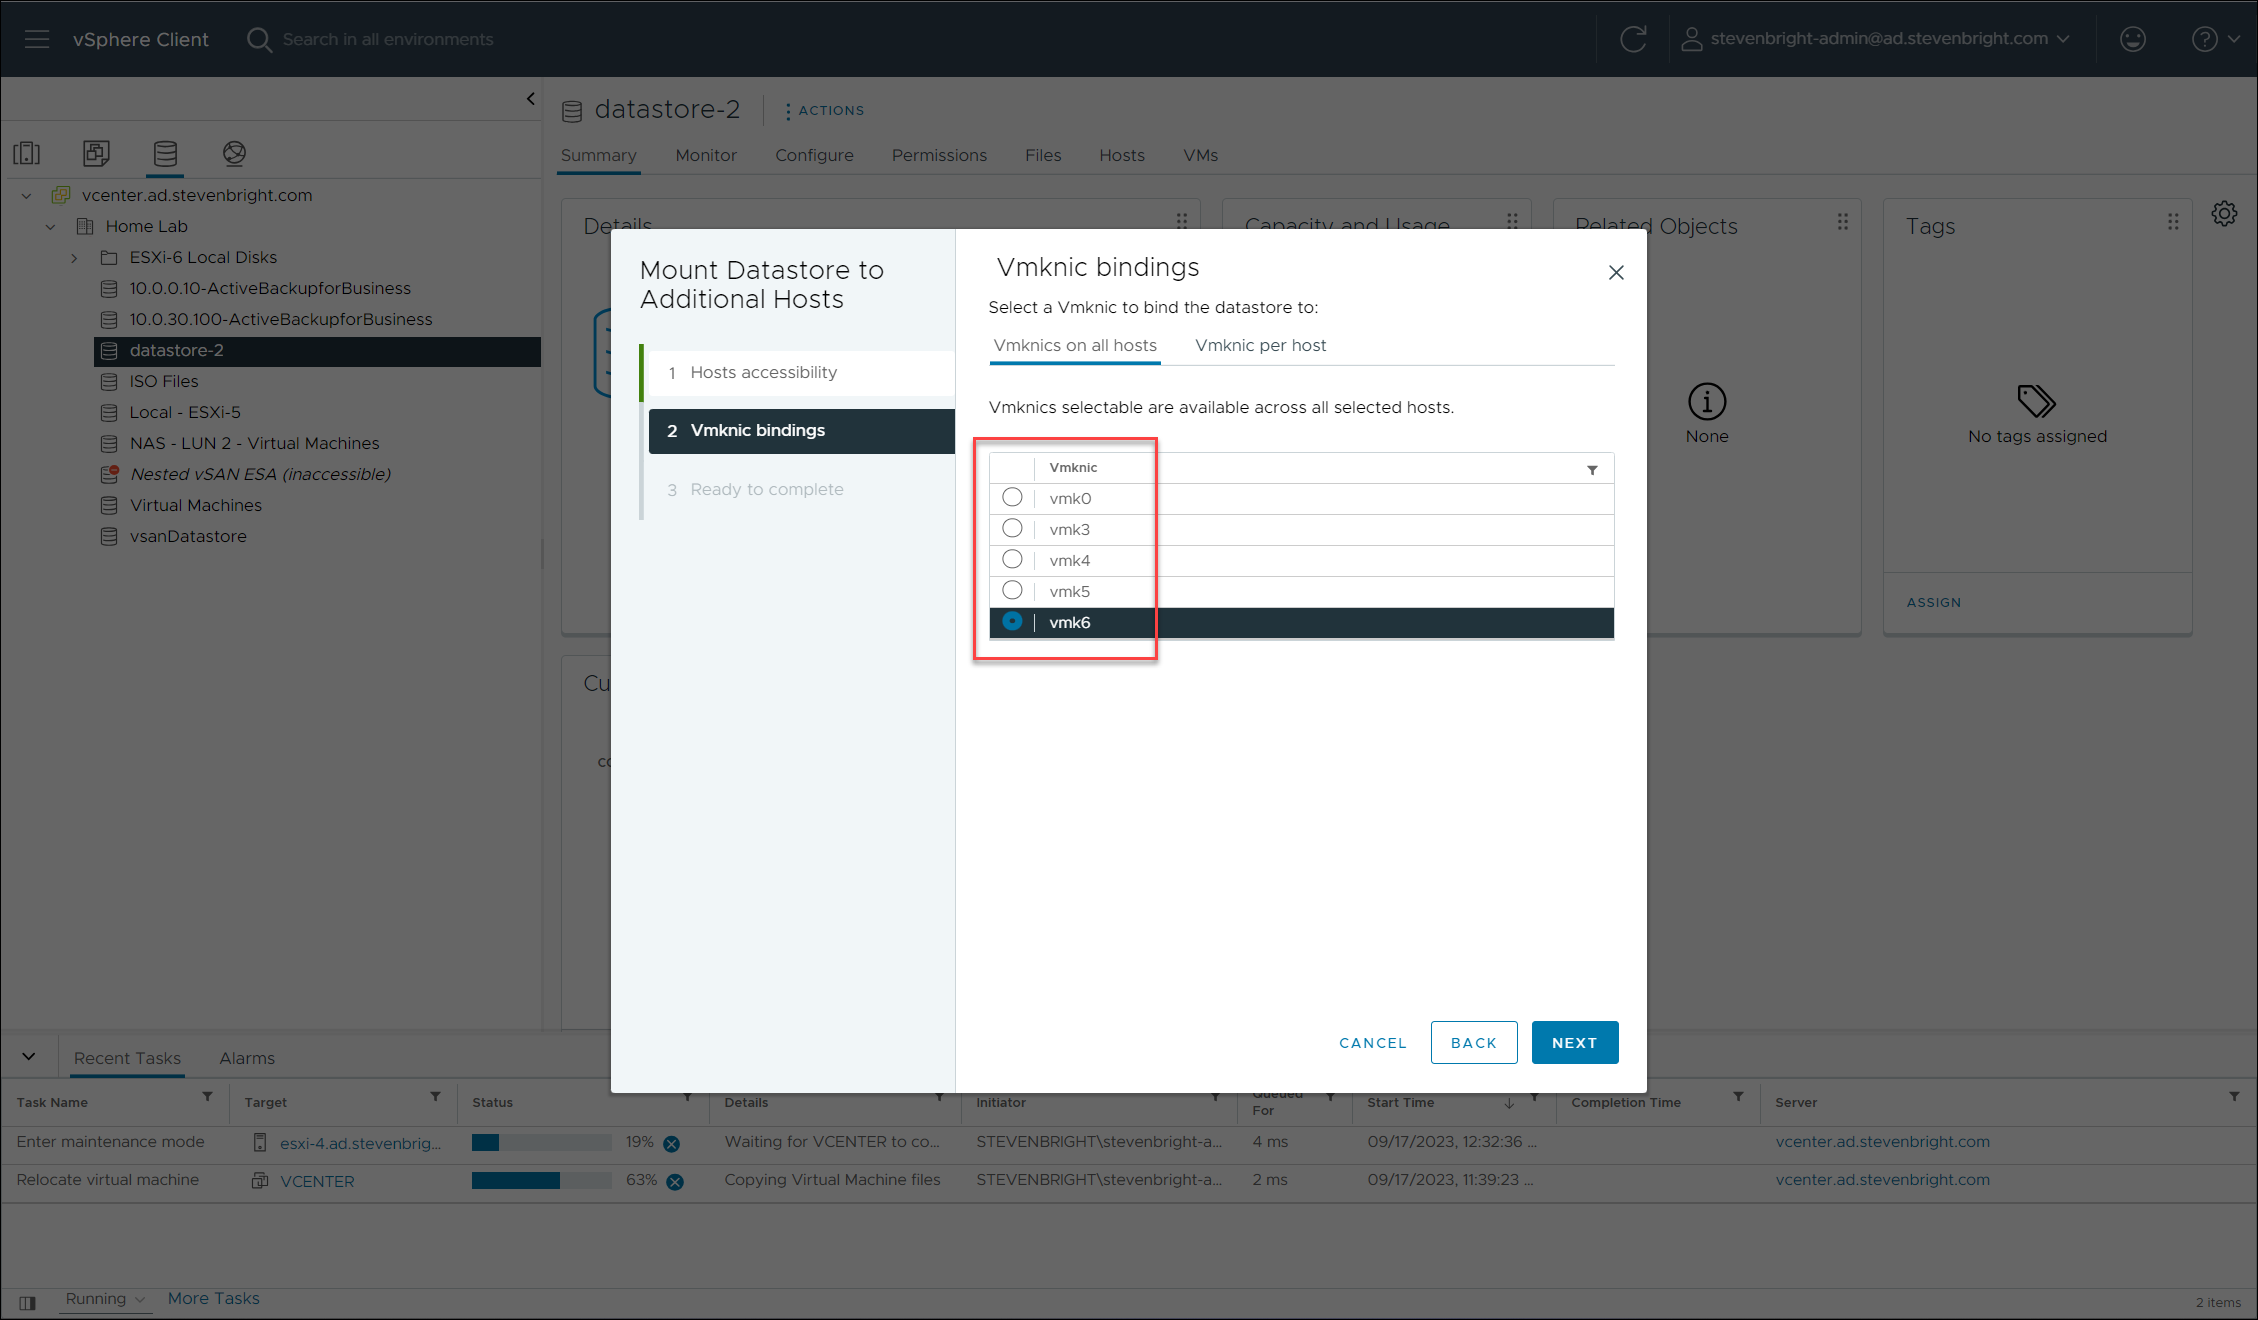
Because I selected the option to bind the NFS volume to a specific vmknic, the next screen in the wizard requests that I specify which vmknic should be used for binding to the NFS volume. I’ll select the applicable vmknic and click the NEXT button to continue.
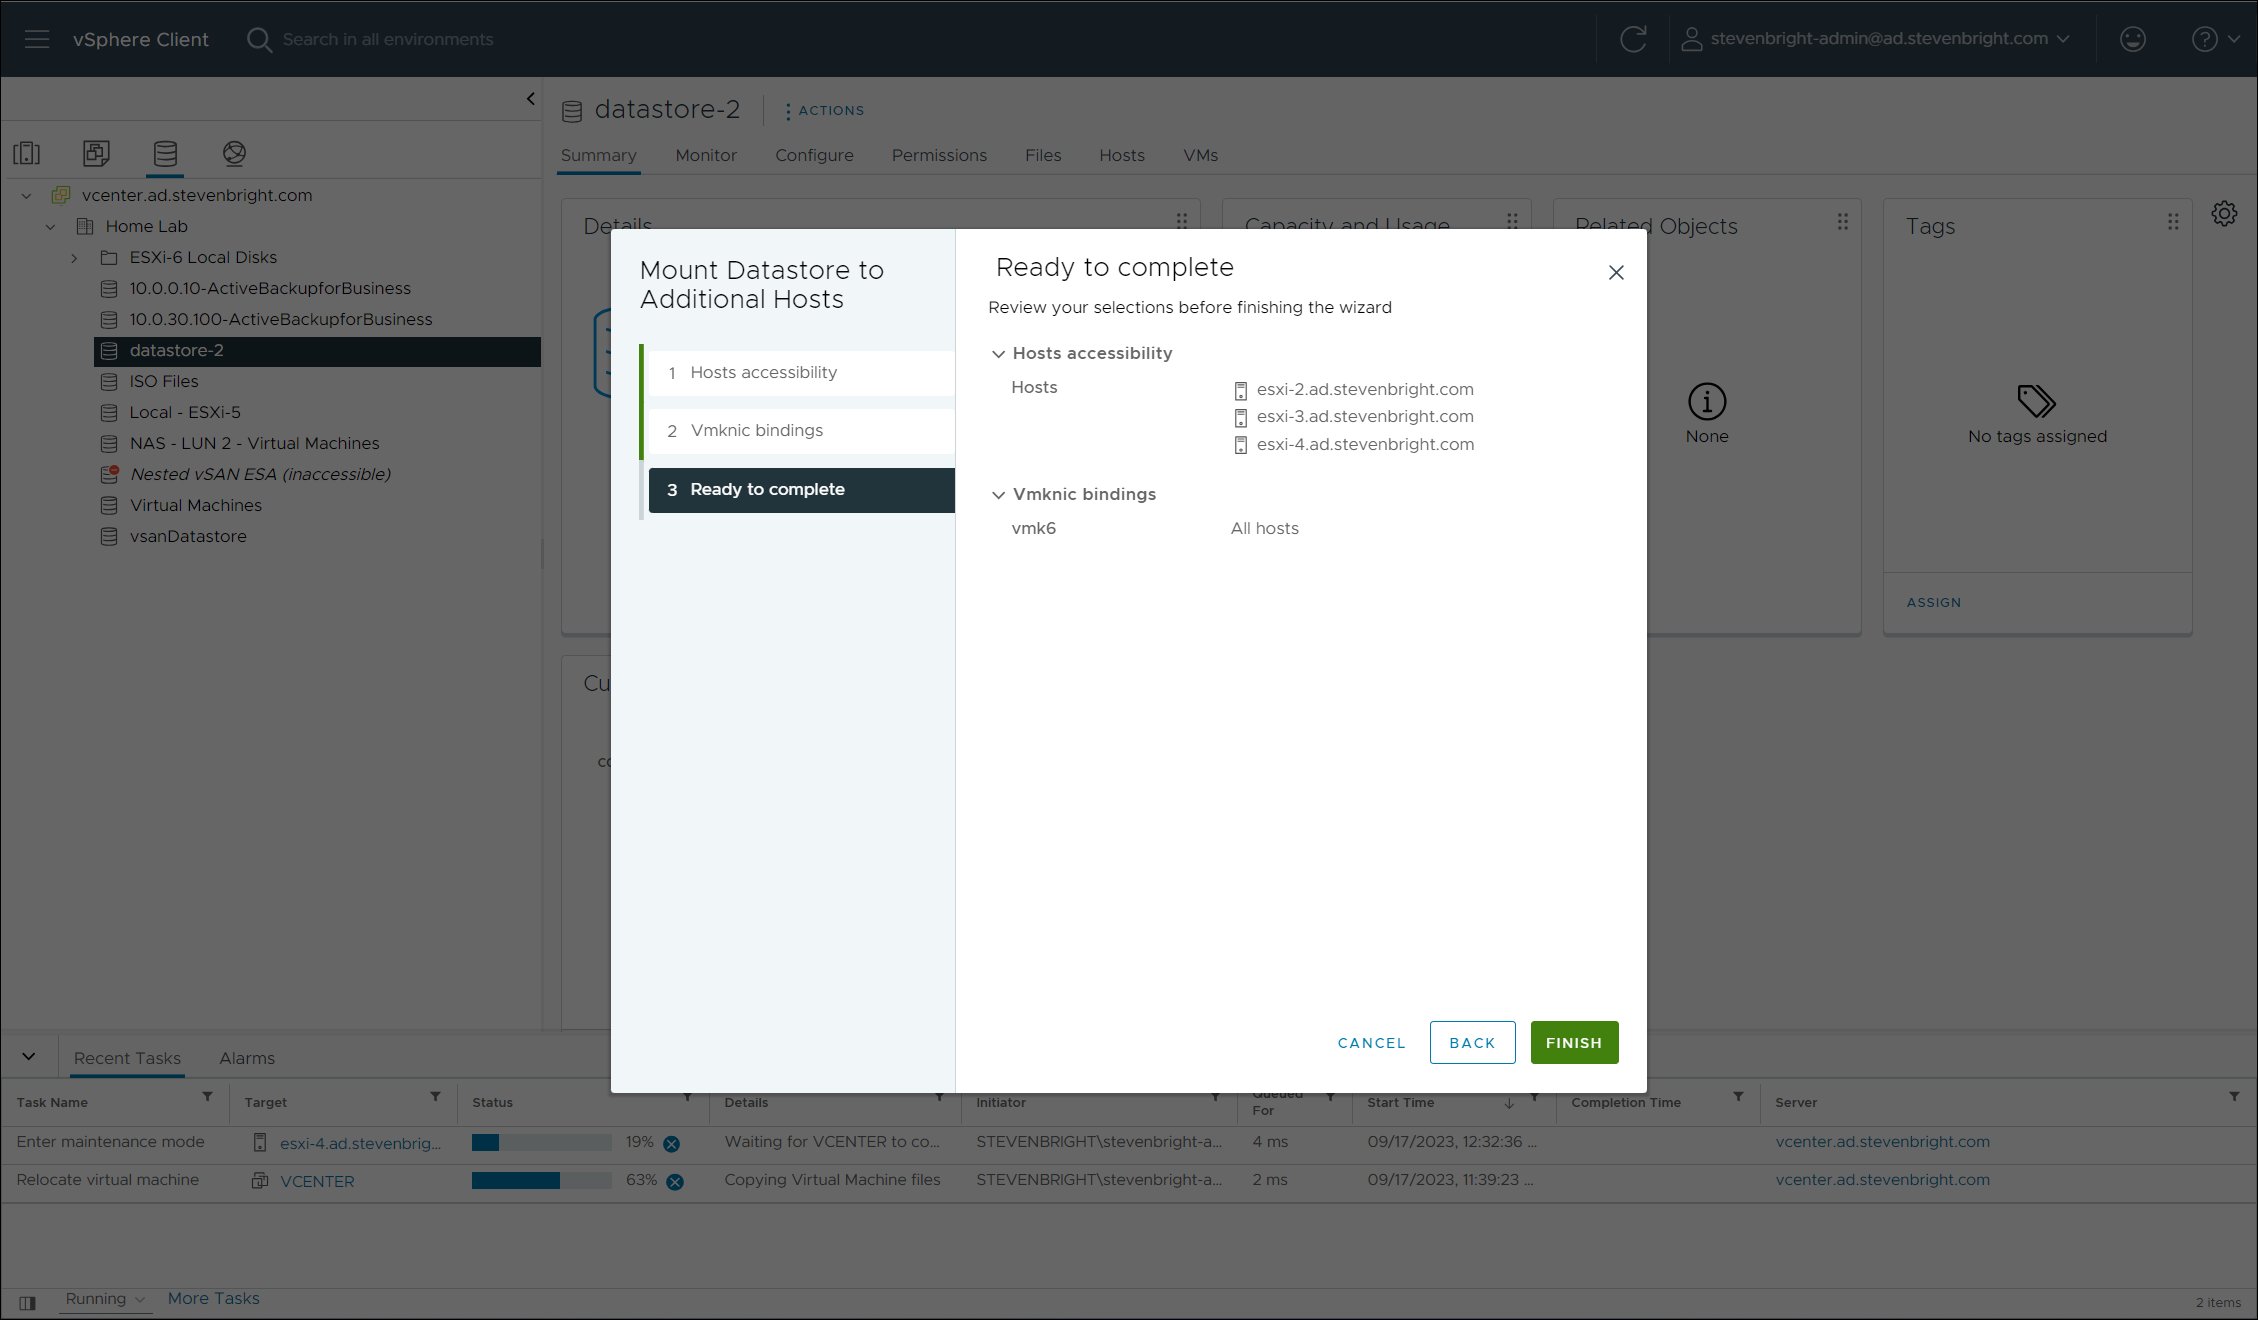
The last screen in the wizard is a summary of the selected options. Review the selected options, then click the FINISH button to begin mounting the NFS volume to the selected hosts.
Mount an Existing Datastore to Additional Hosts Using the Synology Storage Console for VMware
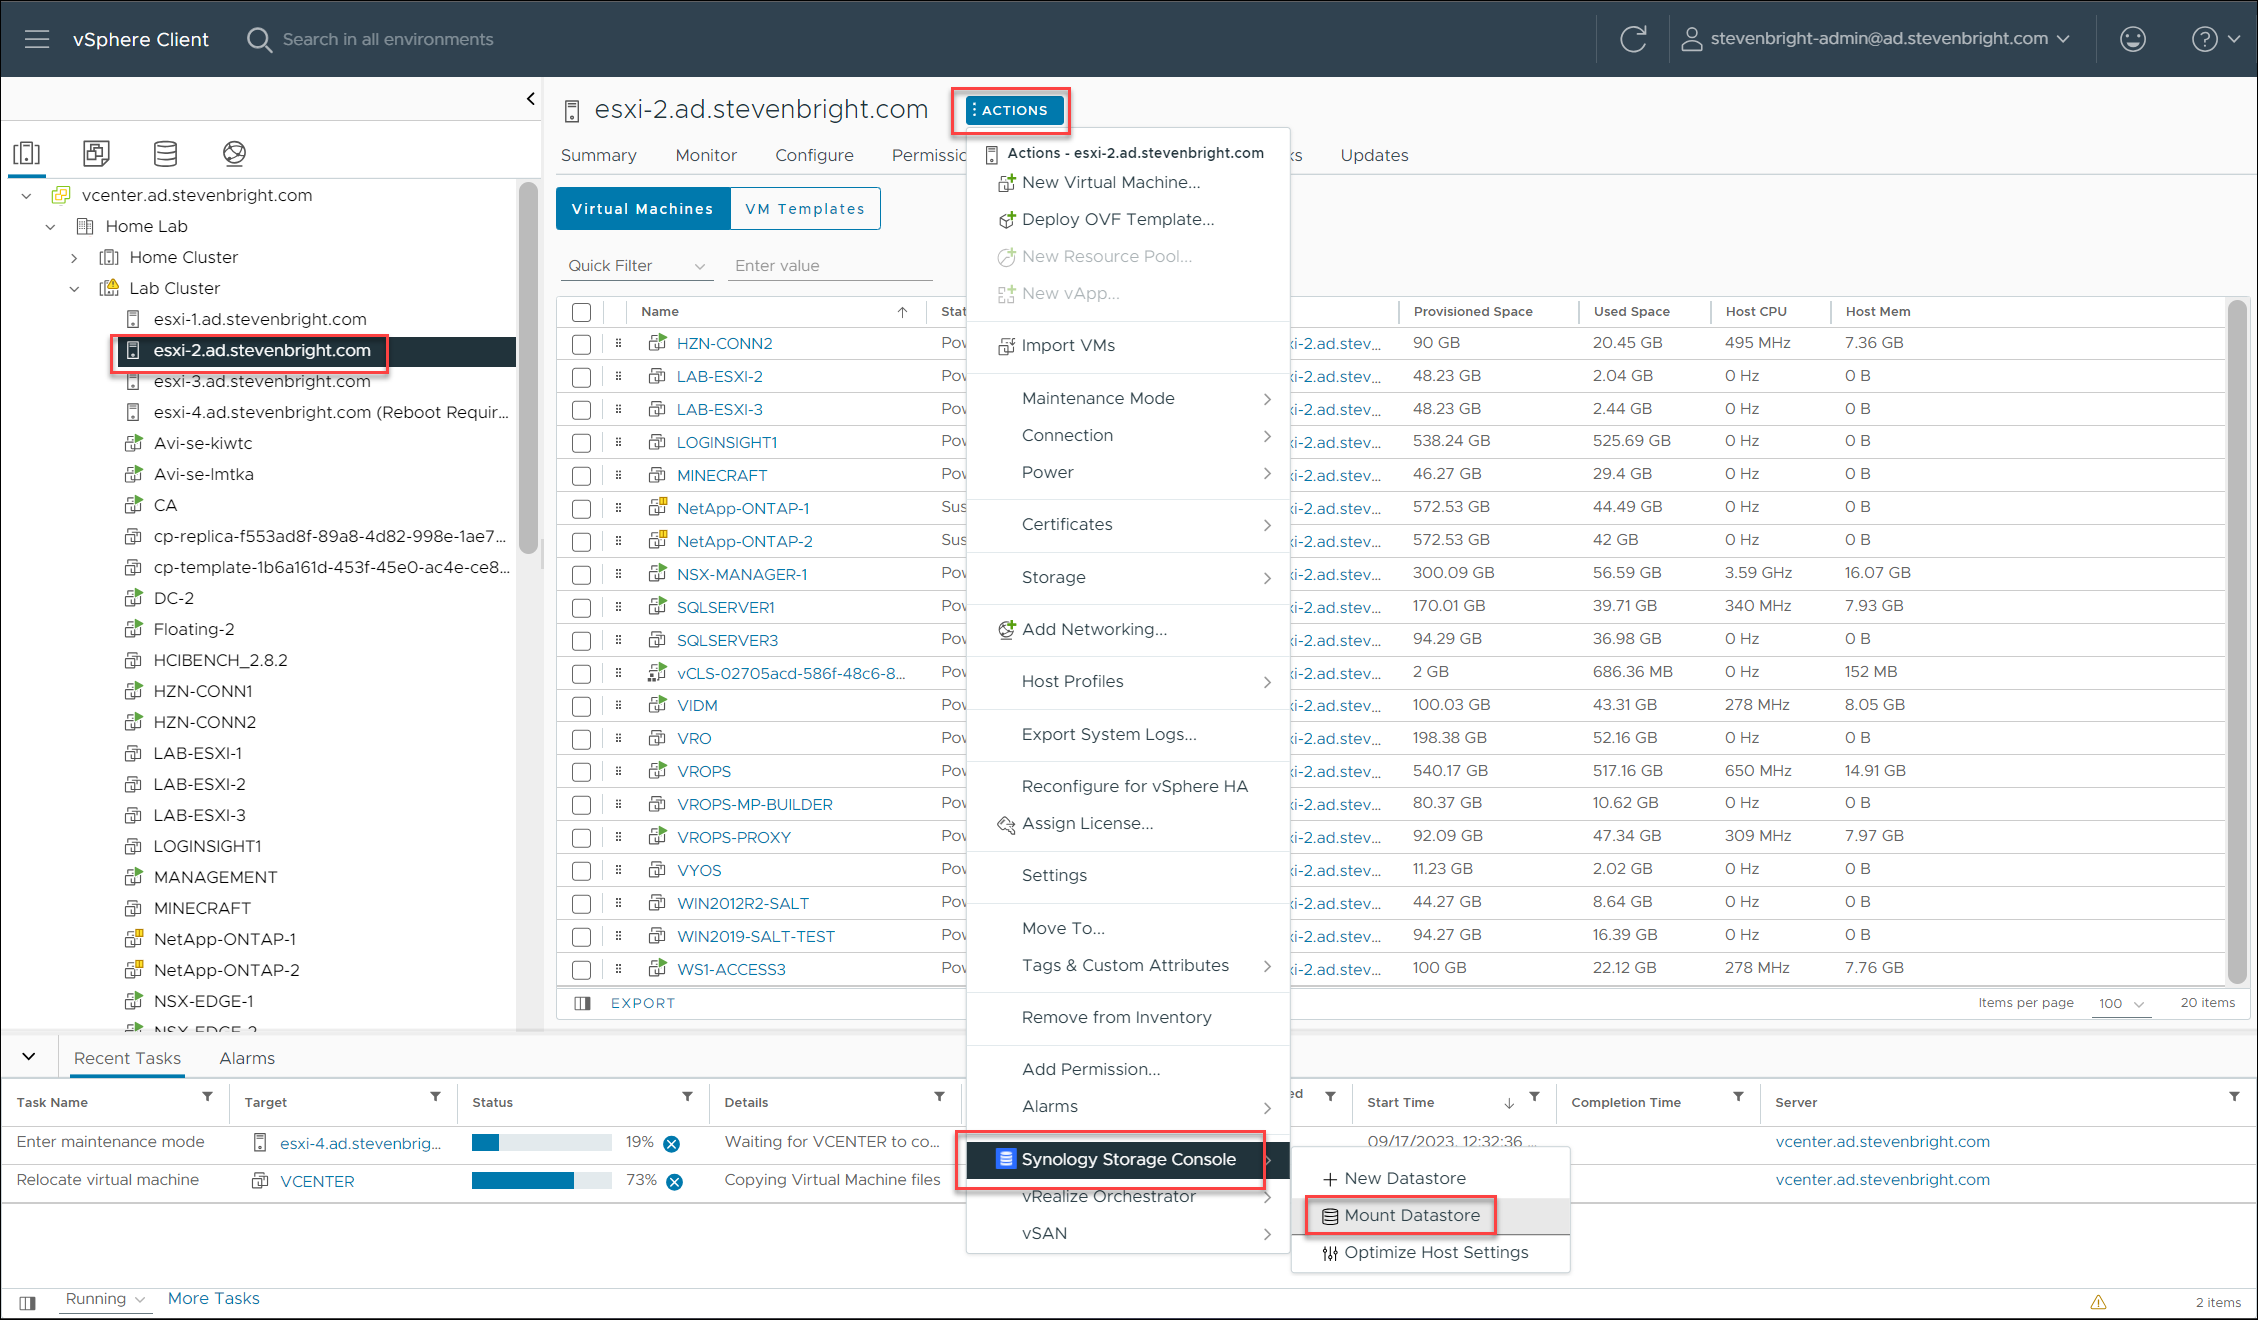
Synology provides an alternate means of mounting an existing NFS volume to additional hosts. This process starts by selecting an existing VMware ESXi host within the VMware vSphere Client inventory, selecting the ACTIONS menu, selecting Synology Storage Console , and choosing Mount Datastore.
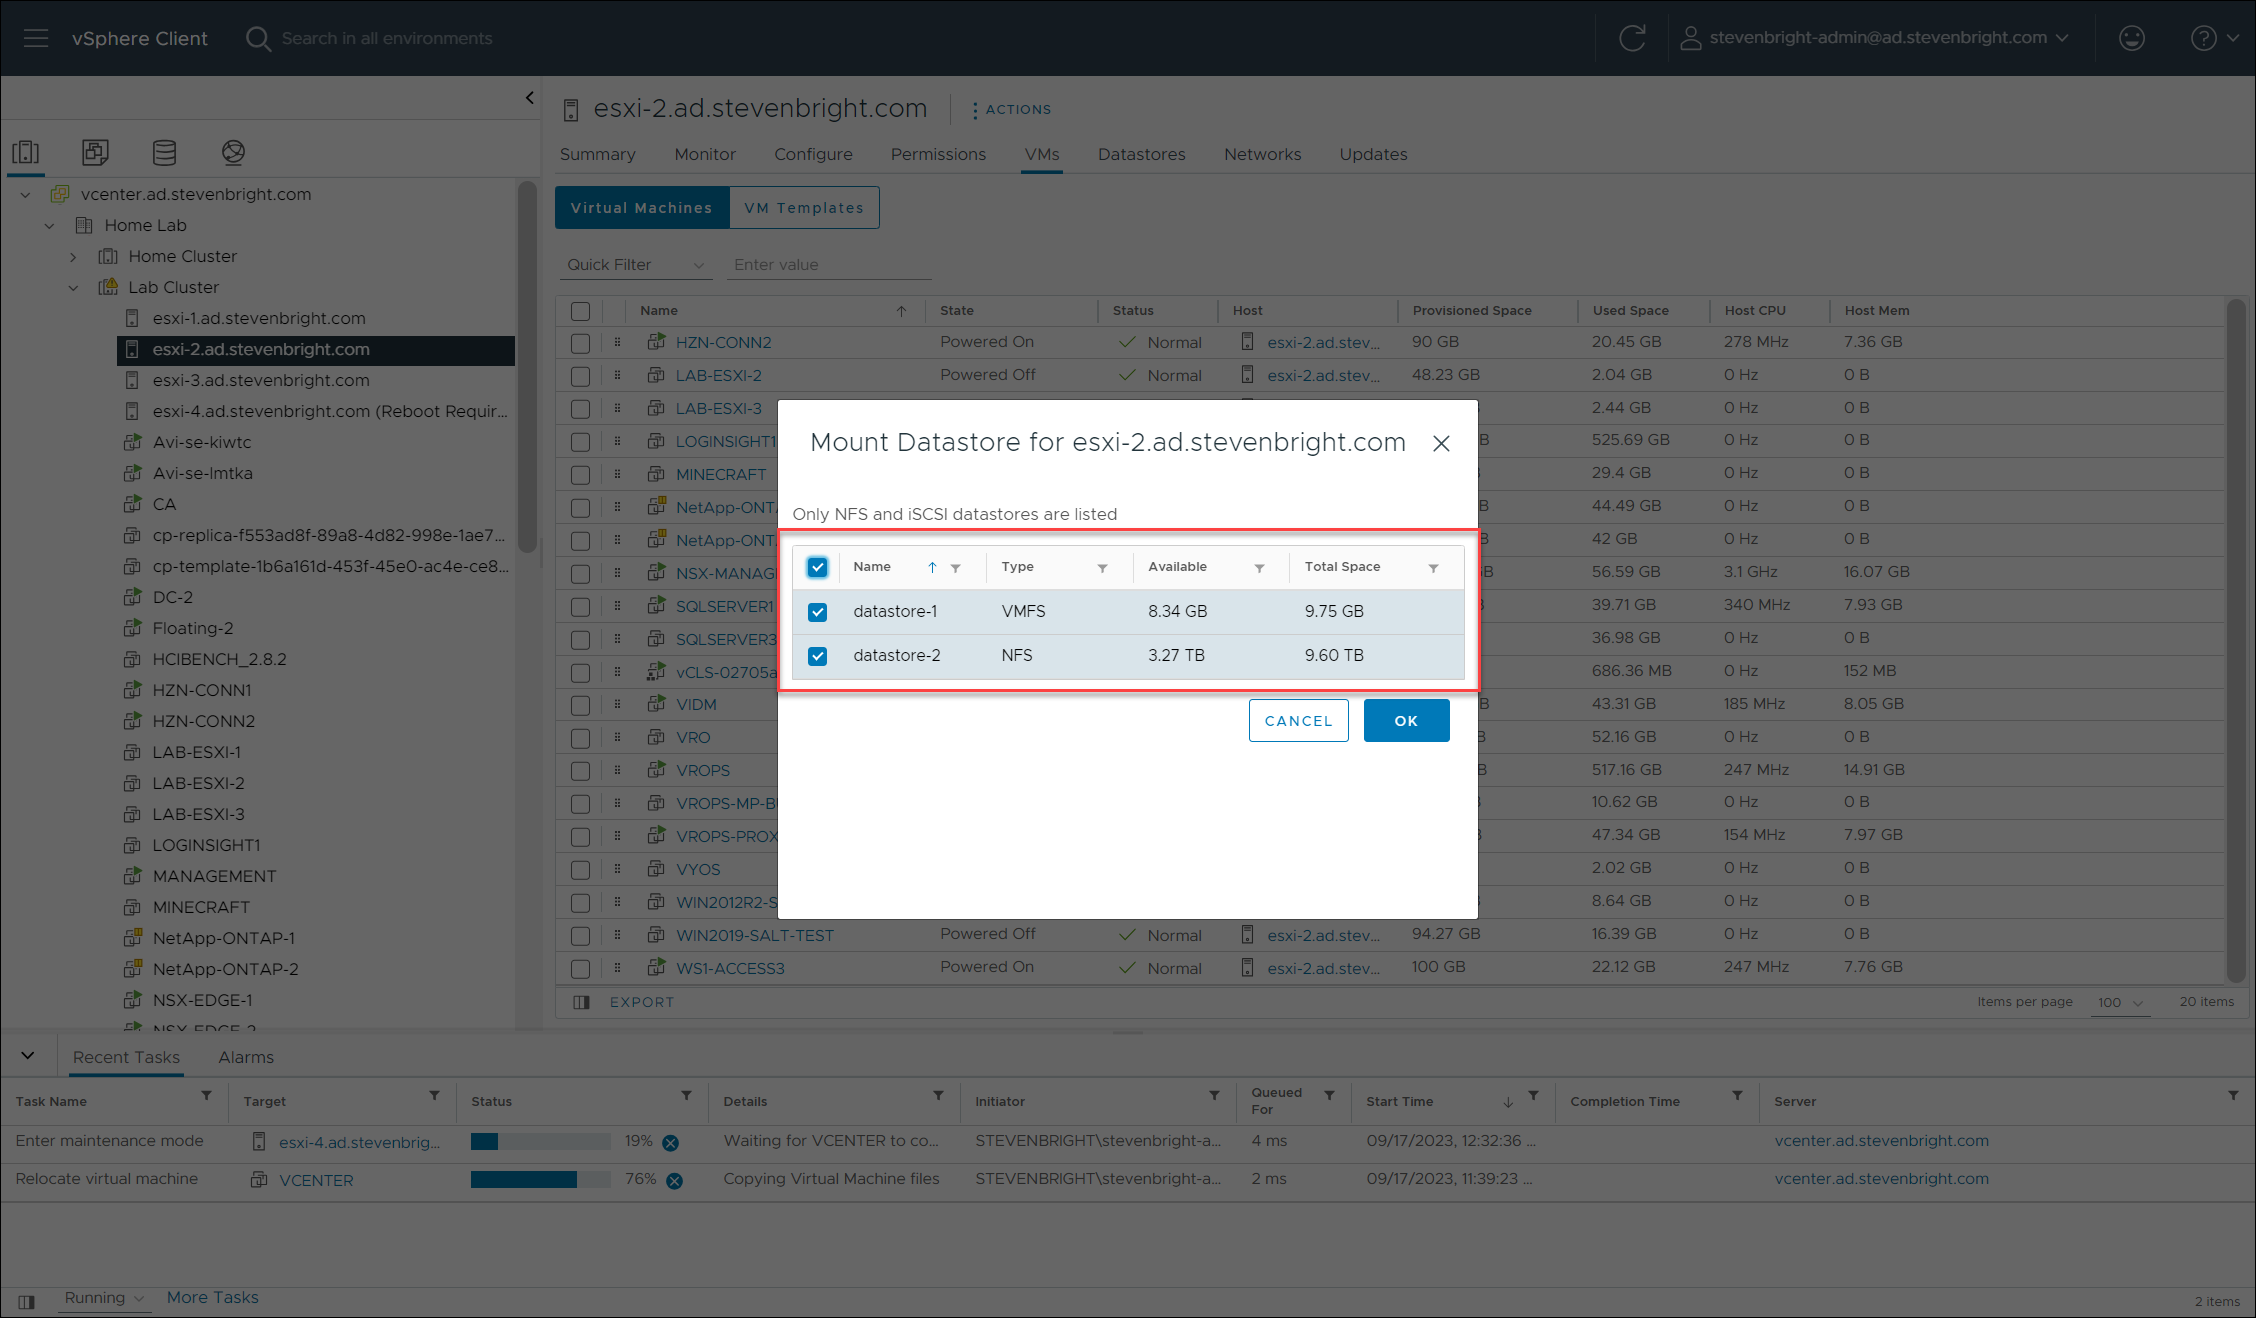
The Mount Datastore wizard launches and lists all iSCSI and NFS datastores that Synology Storage Console knows are not already mounted to the VMware ESXi hosts. You are provided a table listing all datastores that allows you to select the ones you wish to mount to the VMware ESXi host. As you can see from the screenshot below, both NFS and iSCSI datastores are listed.
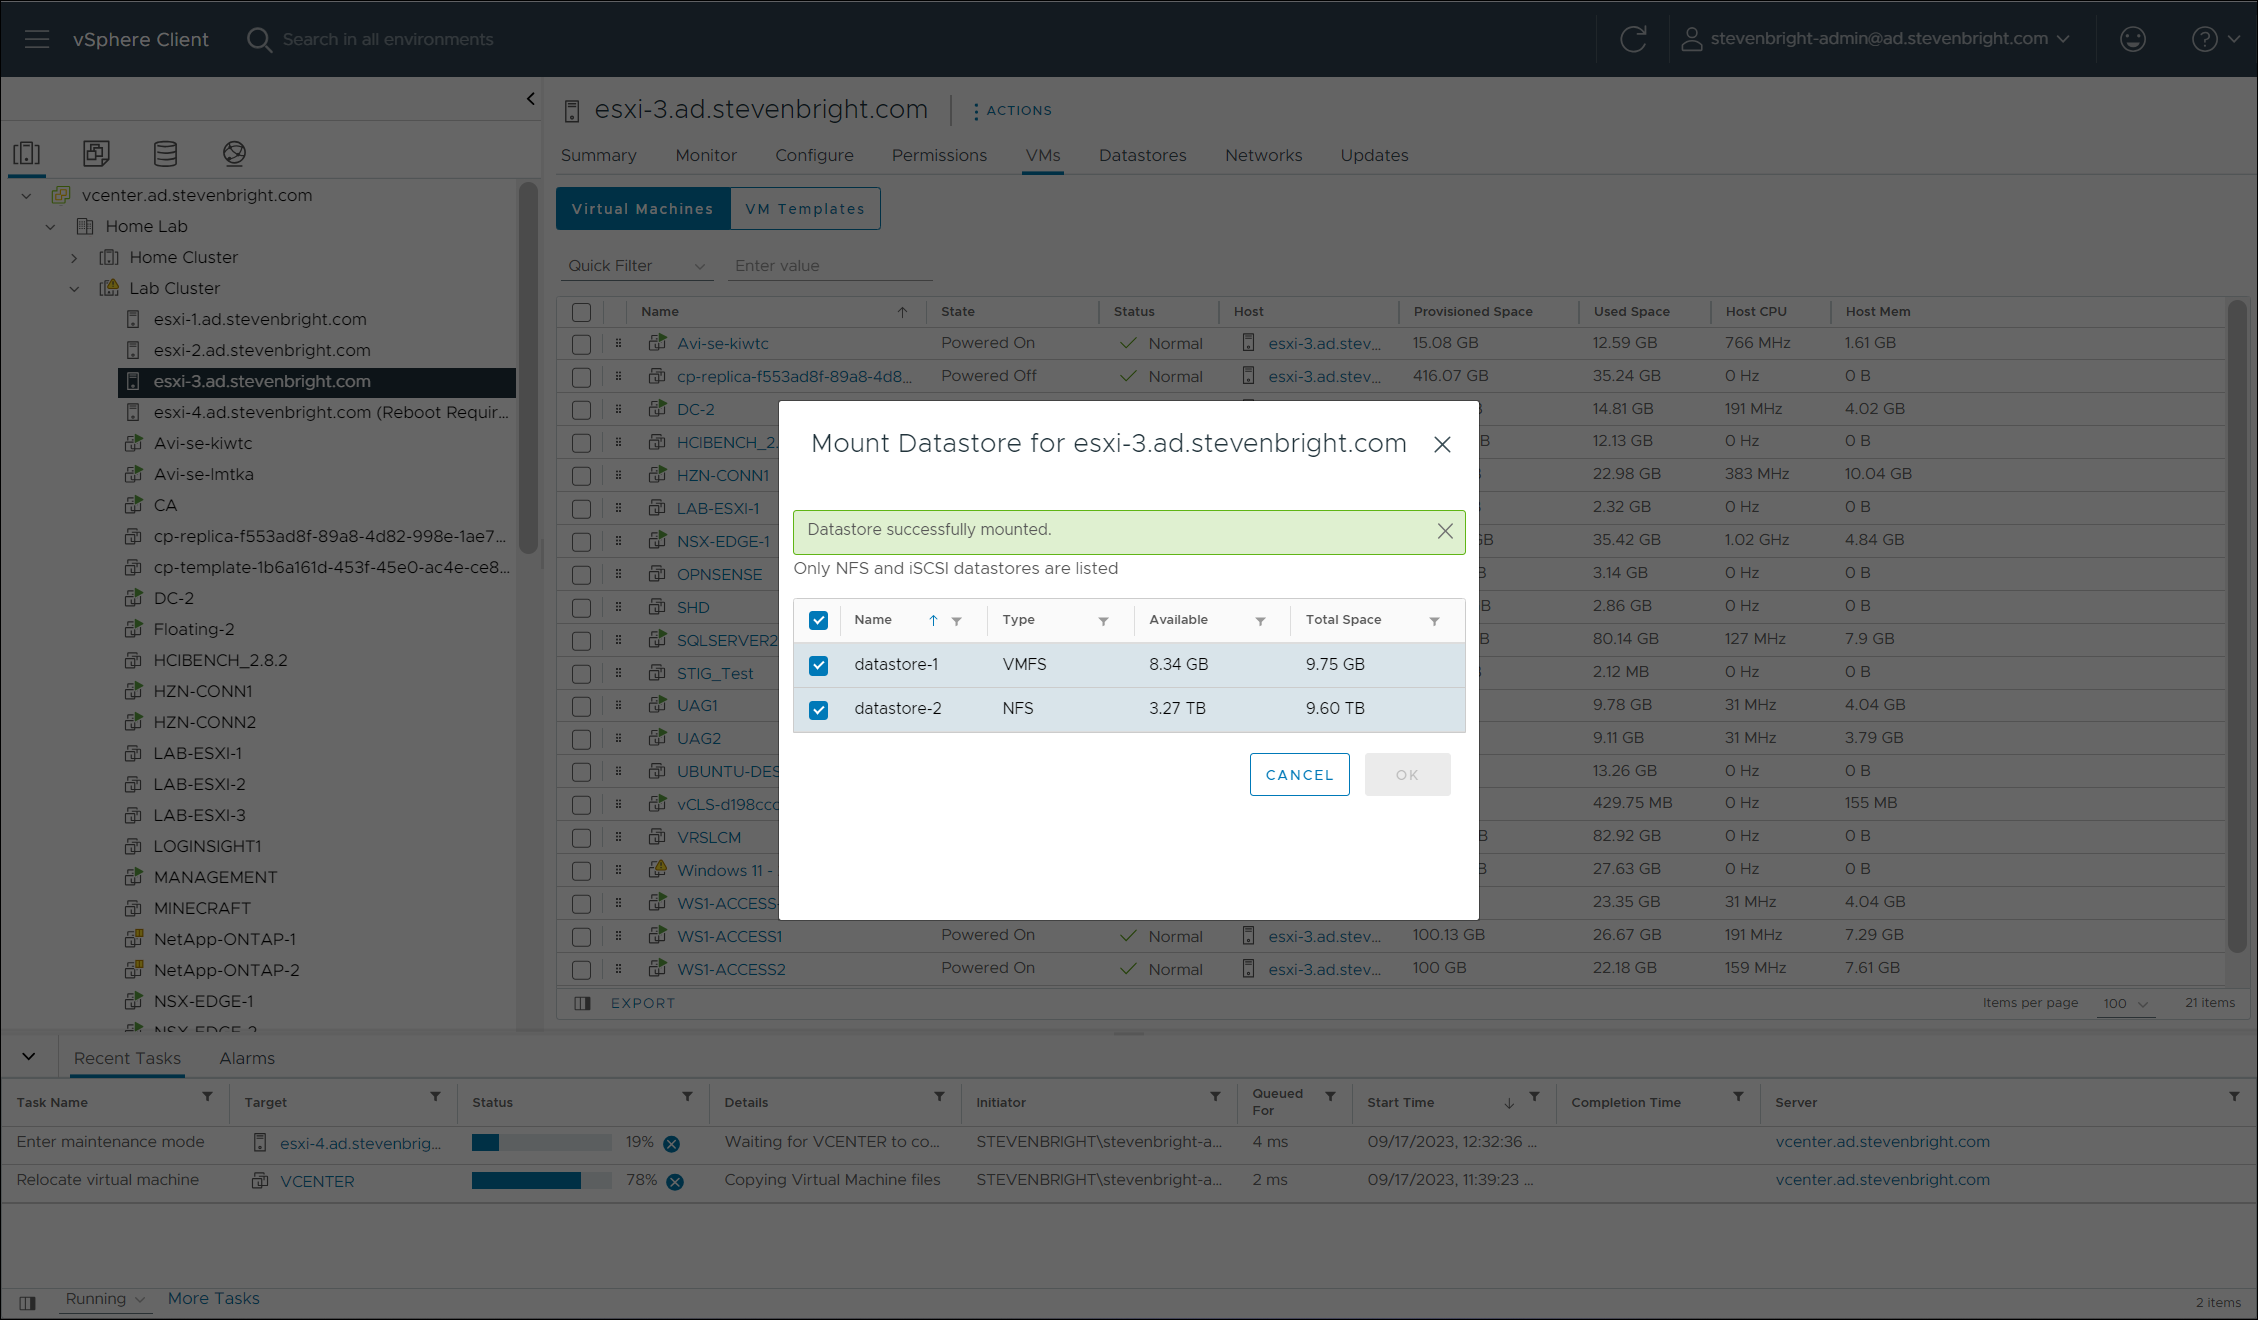
Select the desired datastores you wish to mount to the VMware ESXi hosts, then click the OK button to mount the datastores to the VMware ESXi host. A spinning icon will appear at the top of the dialog, indicating that work is being completed. If successful, a green banner will display at the top of the dialog stating that the datastores were successfully mounted.
Expanding Existing iSCSI LUNs
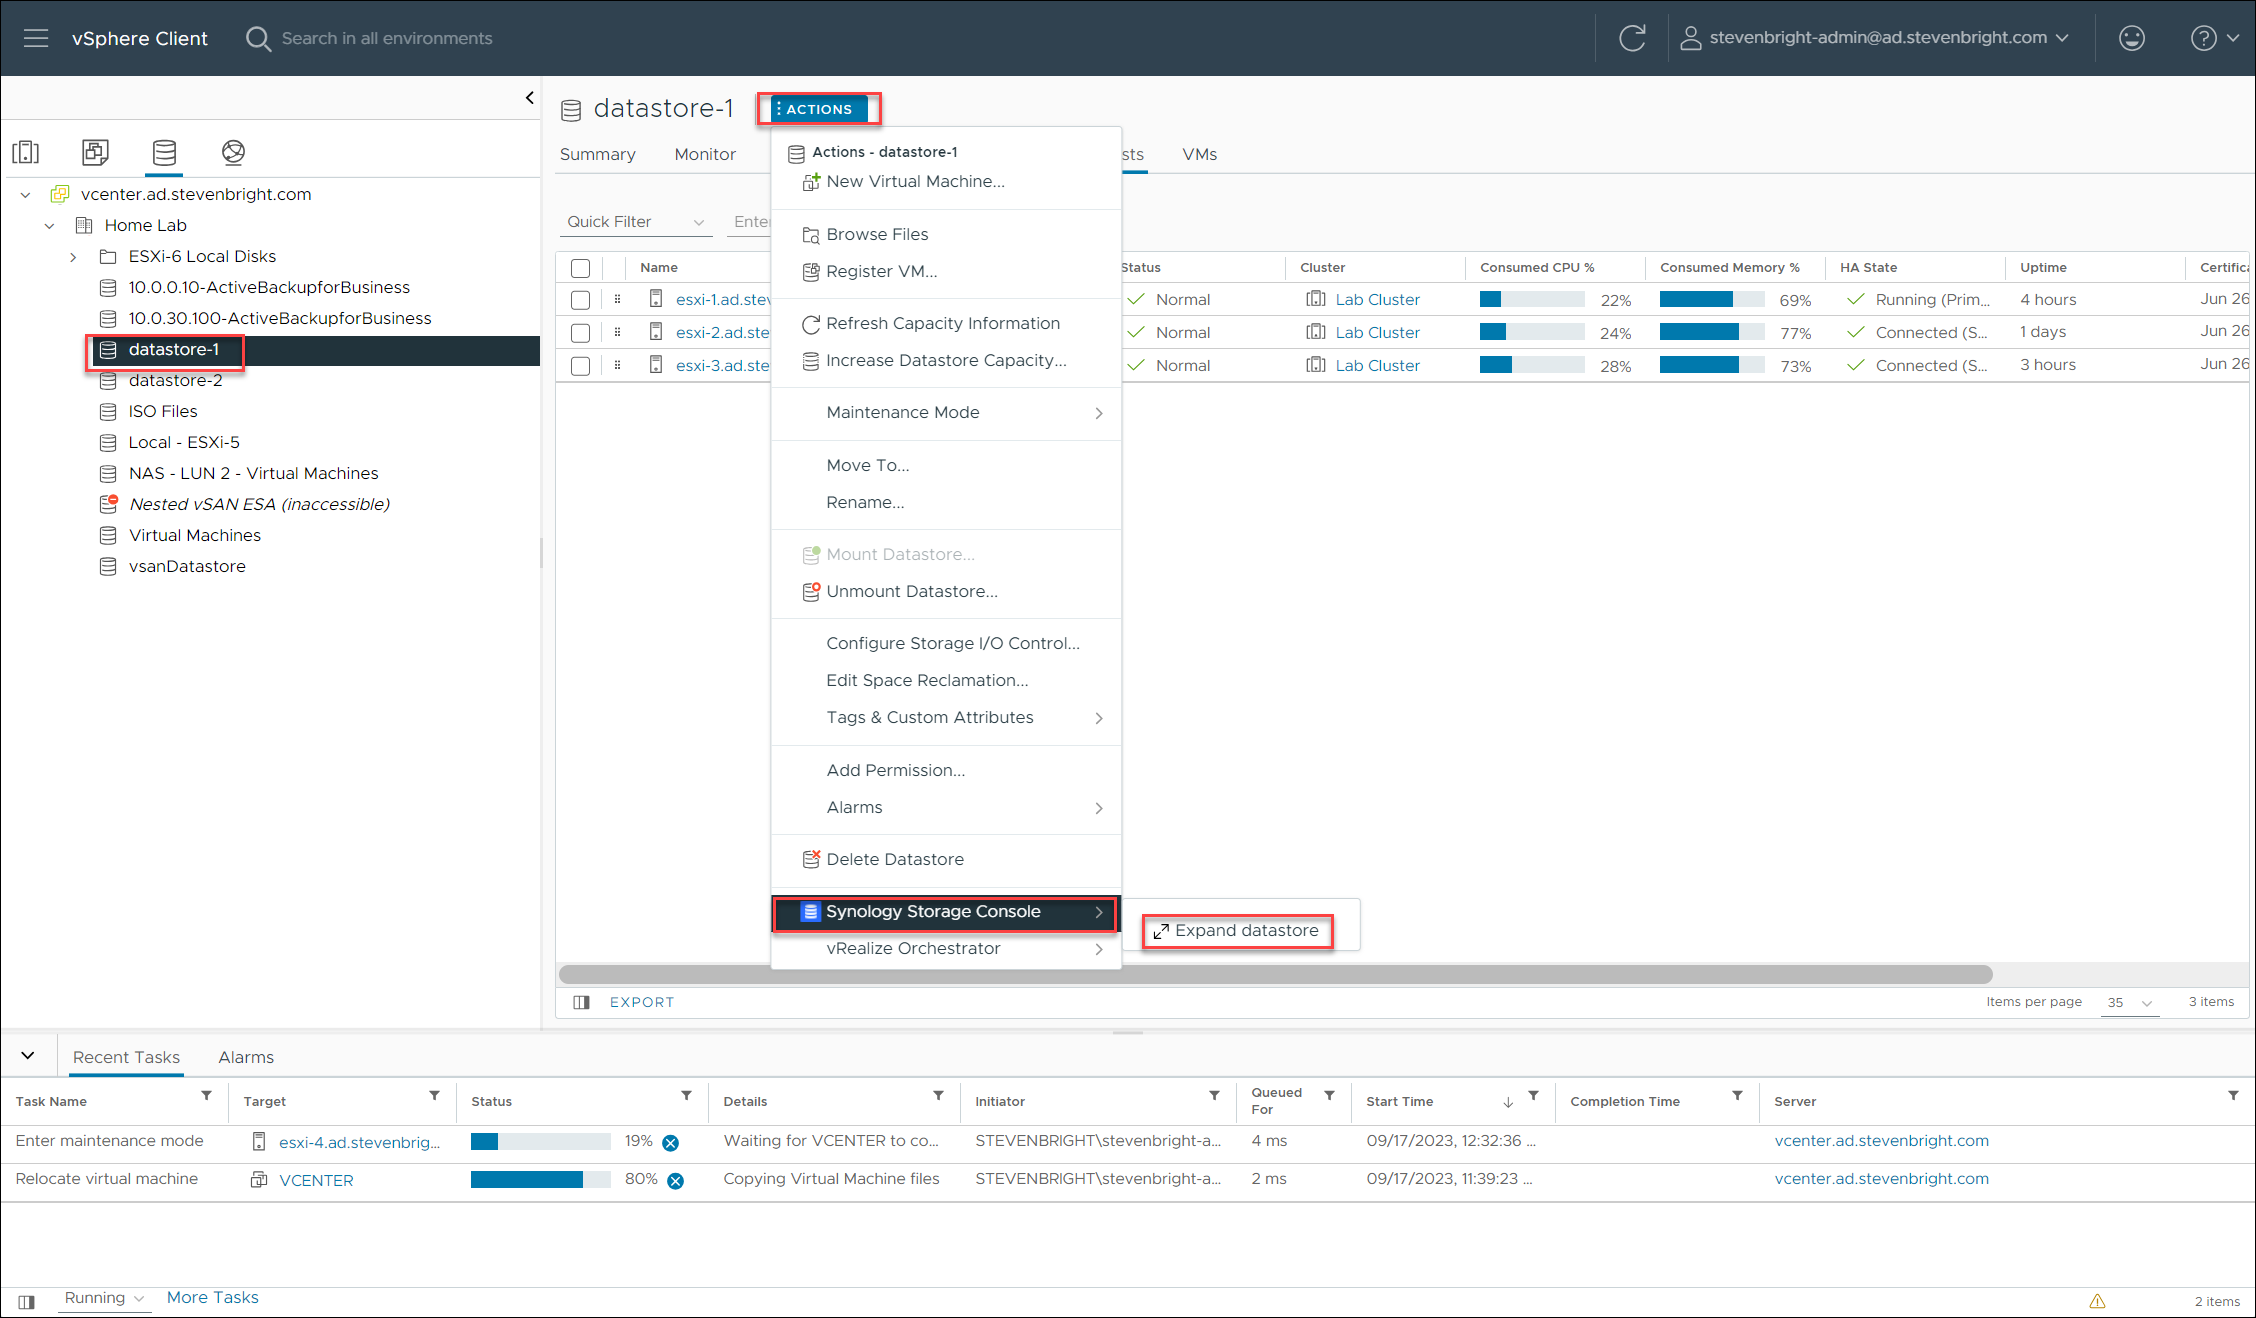
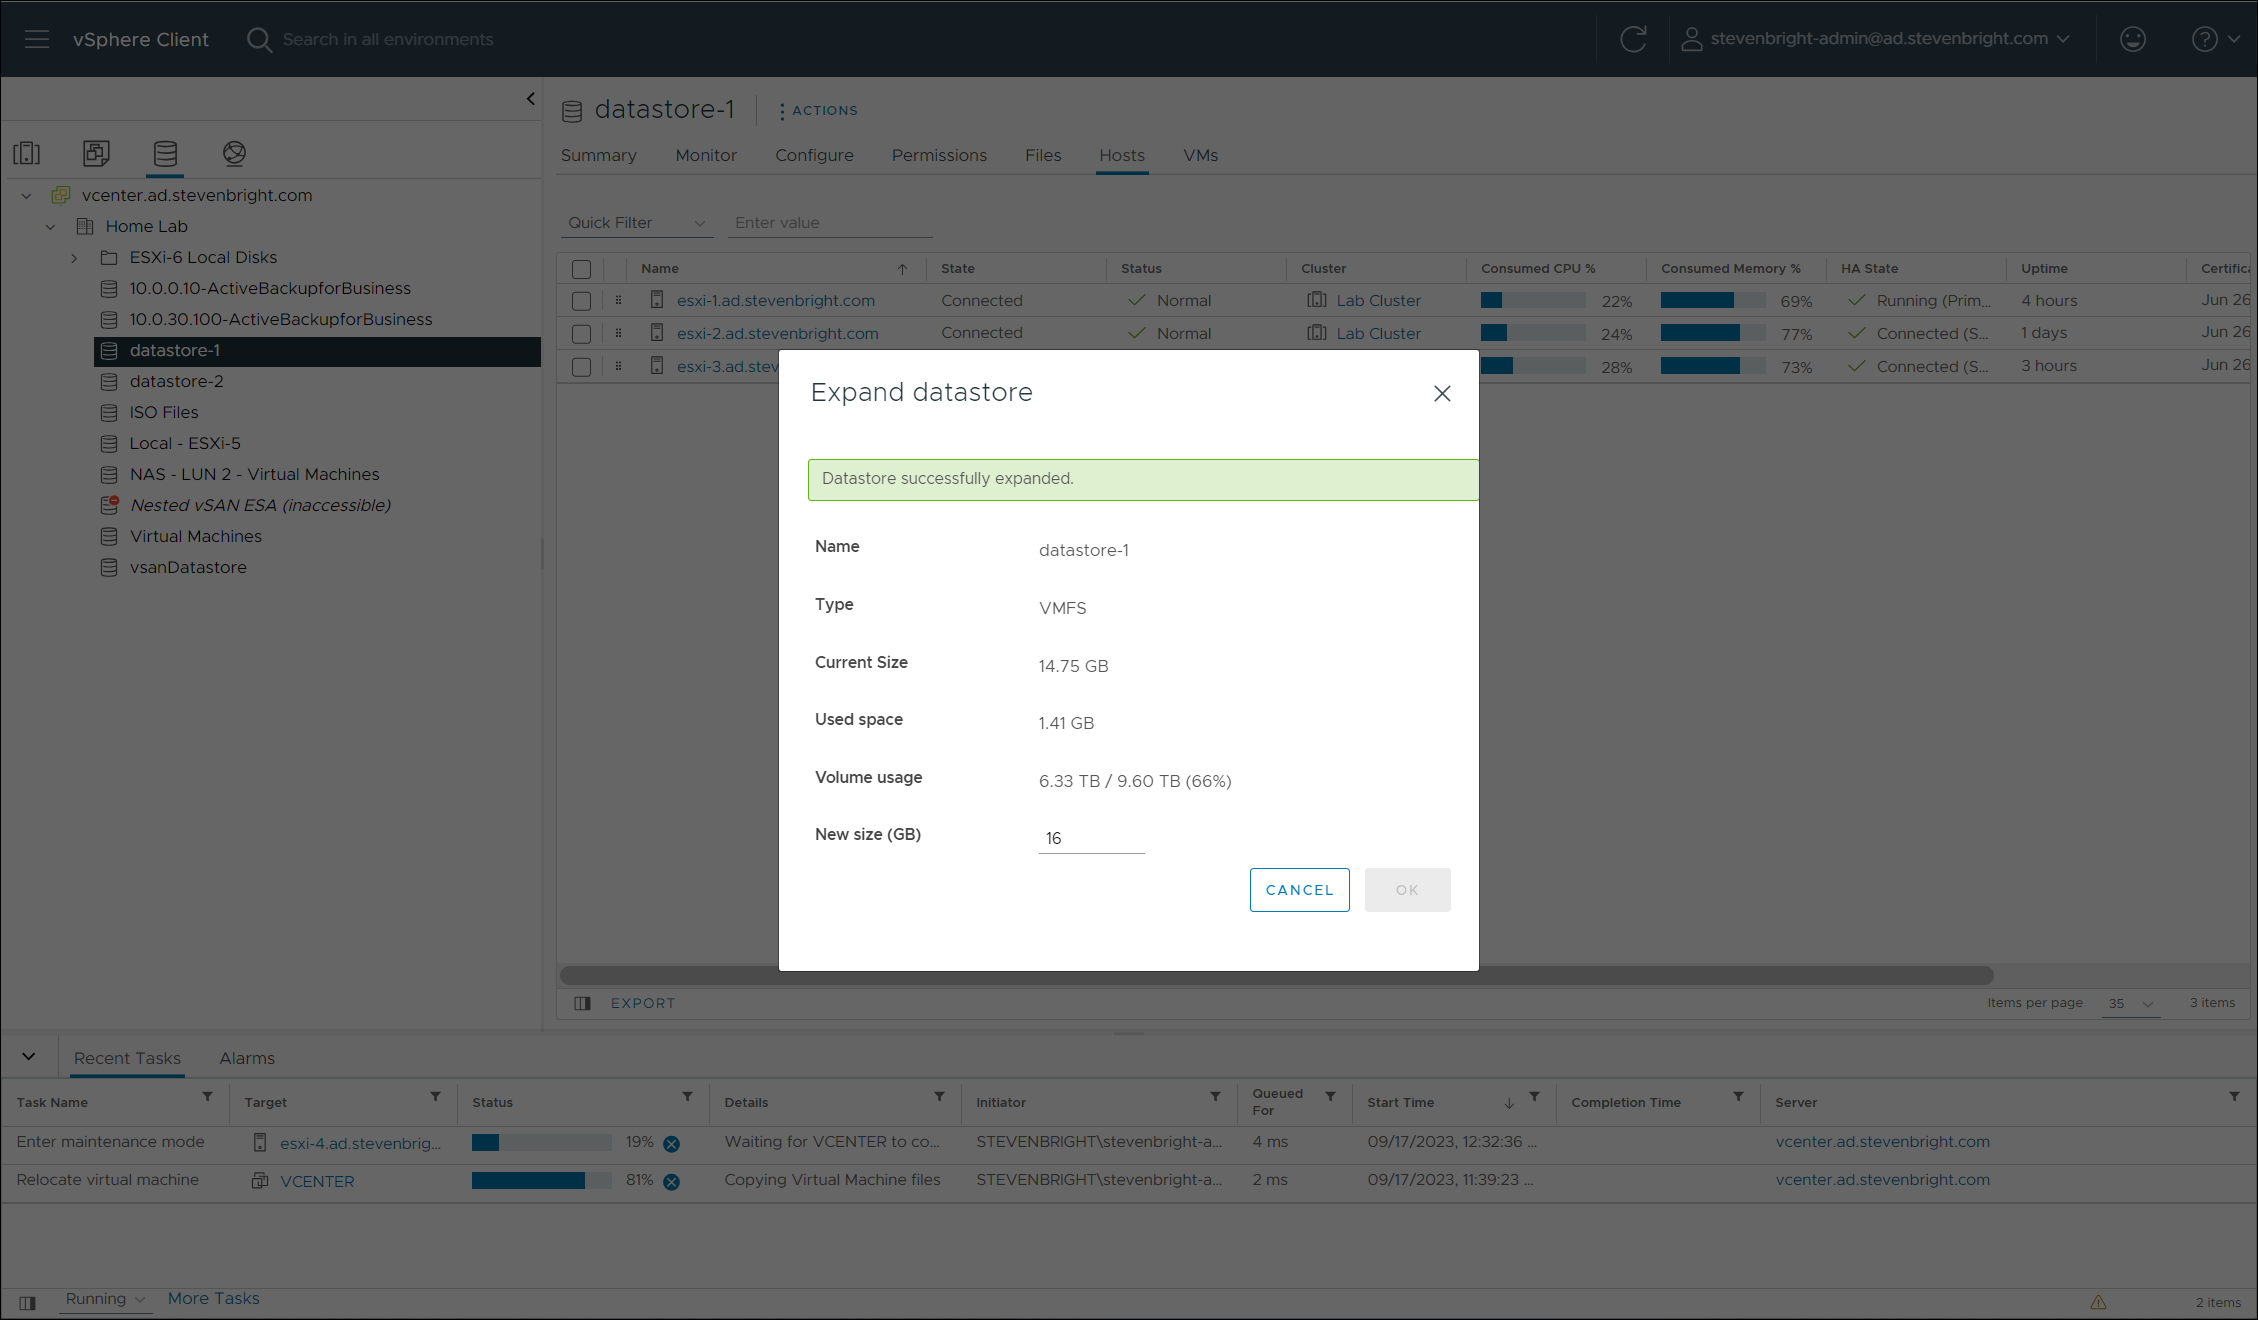
Now that we have created our iSCSI LUNs, NFS datastores, and have mounted them to all of our VMware ESXi hosts, we might find that our iSCSI LUNs are running out of space and need to be expanded. Luckily, the Synology Storage Console for VMware makes this task quite easy to accomplish from within the VMware vSphere Client. Note that this process does not apply to NFS volumes as they can take advantage of all available disk space on the Synology storage volume by the nature of NFS being a folder on the NAS. To get started with resizing our iSCSI LUN, select the datastore from the VMware vSphere Client inventory, select the ACTIONS menu, select Synology Storage Console , and choose Expand datastore.
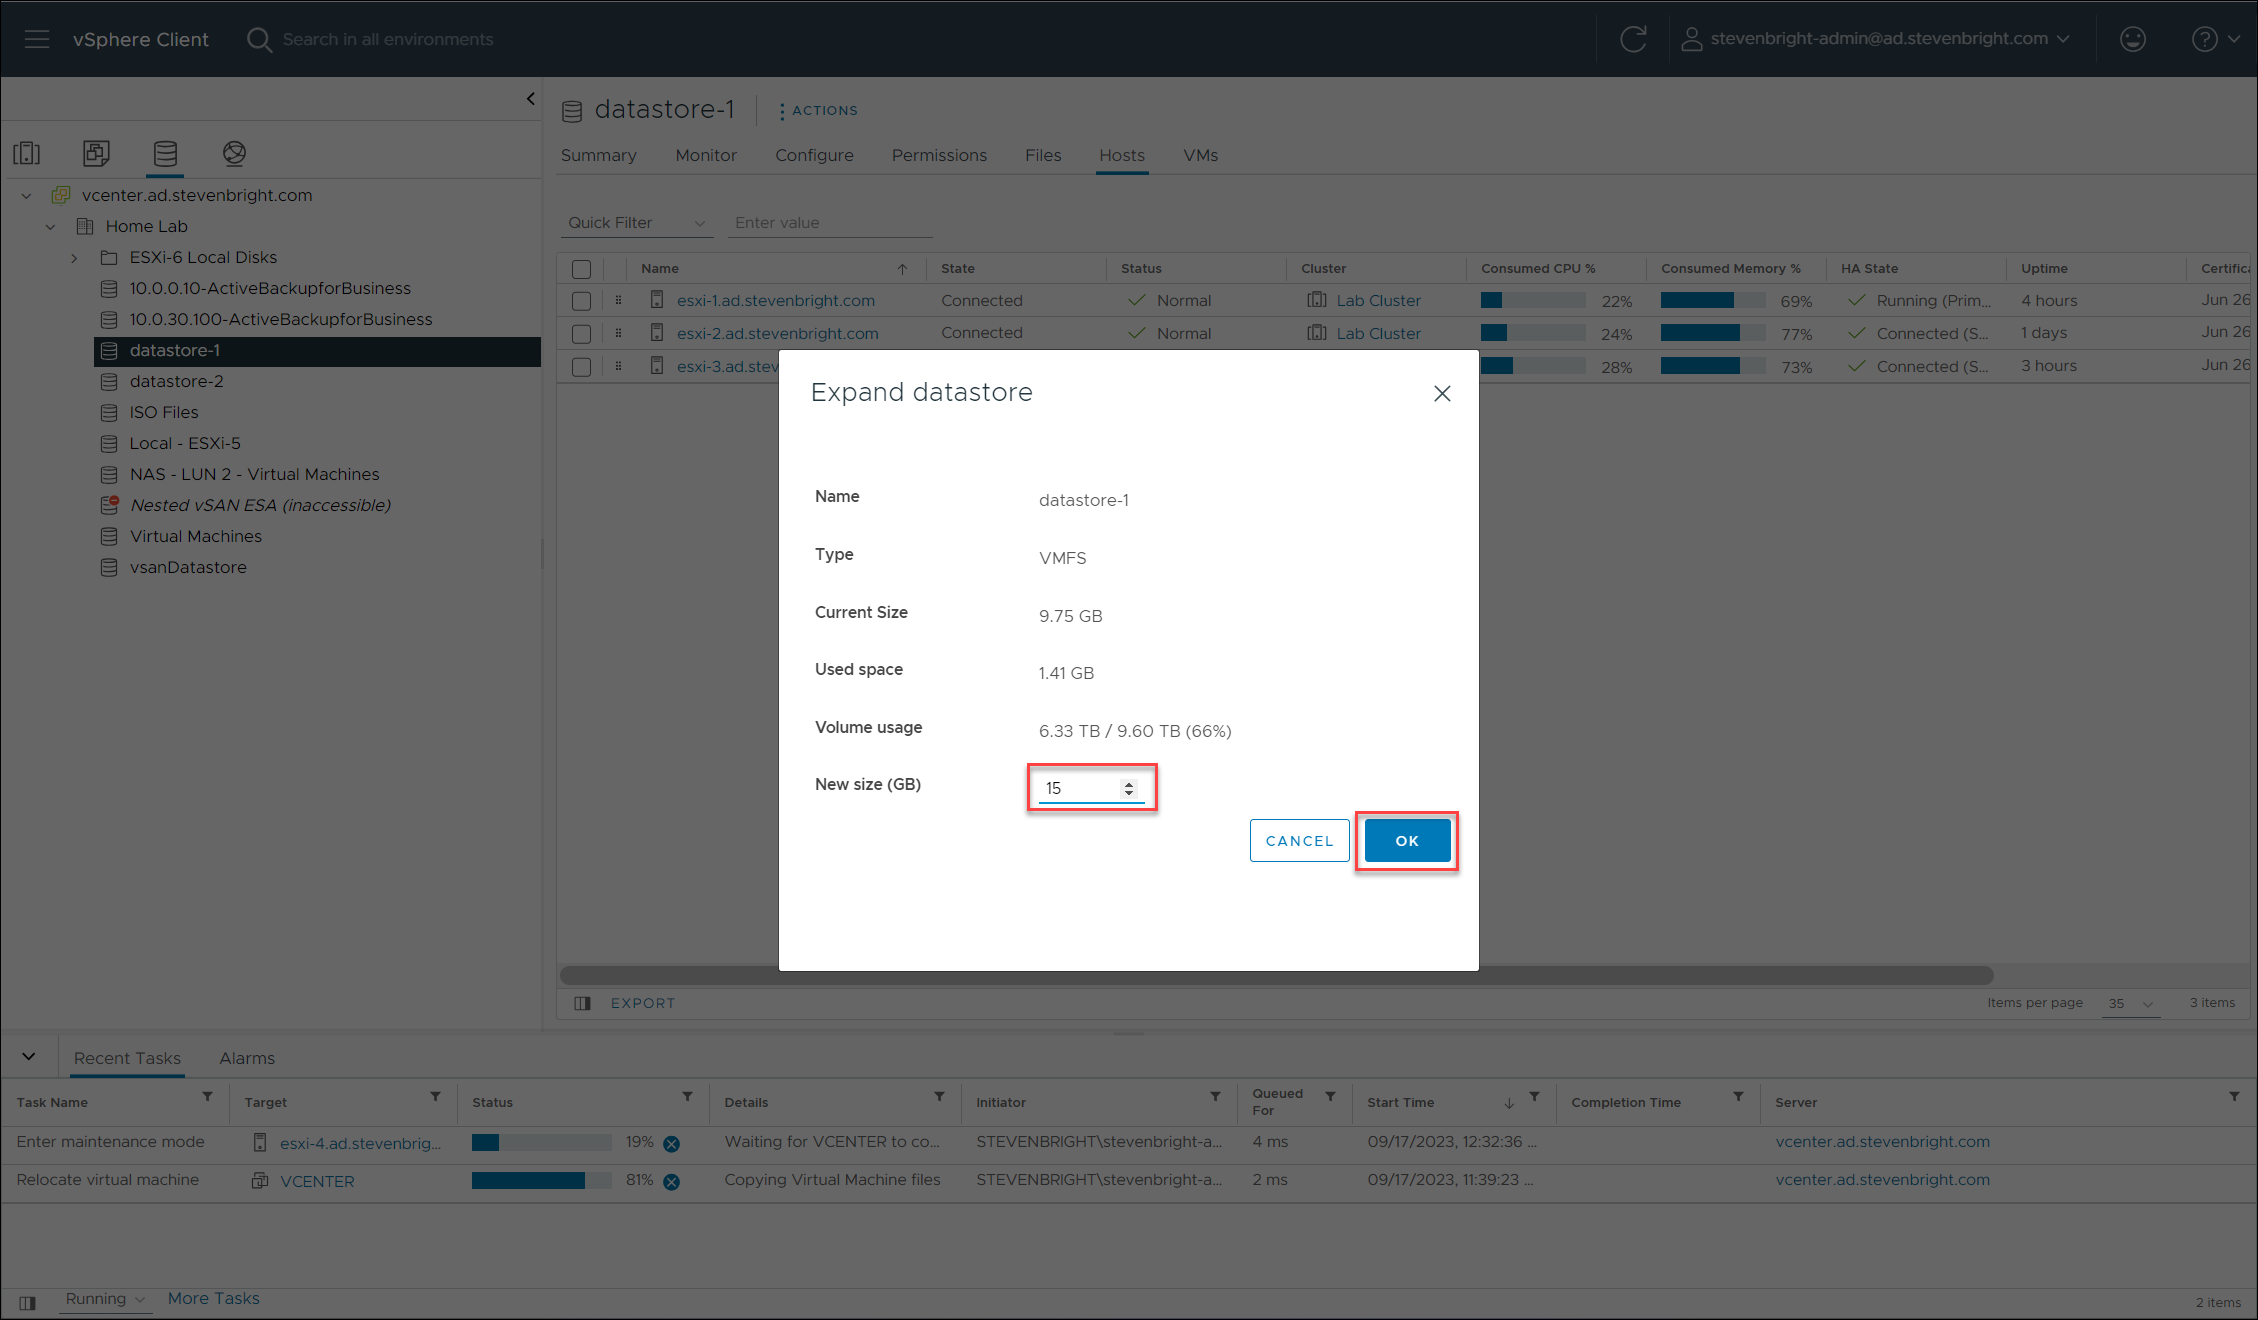
The Expand datastore dialog launches with a simple one step process for expanding the datastore. The dialog will display the details for the existing iSCSI LUN and provides a text box for entering a new size. Provide the new size in GBs and click the OK button to resize the iSCSI LUN.
Upon completion of the resize operation, a green banner will be displayed at the top of the dialog stating that the action was successful.
Adding the Synology Storage Console for VMware’s VASA Provider to VMware vCenter Server
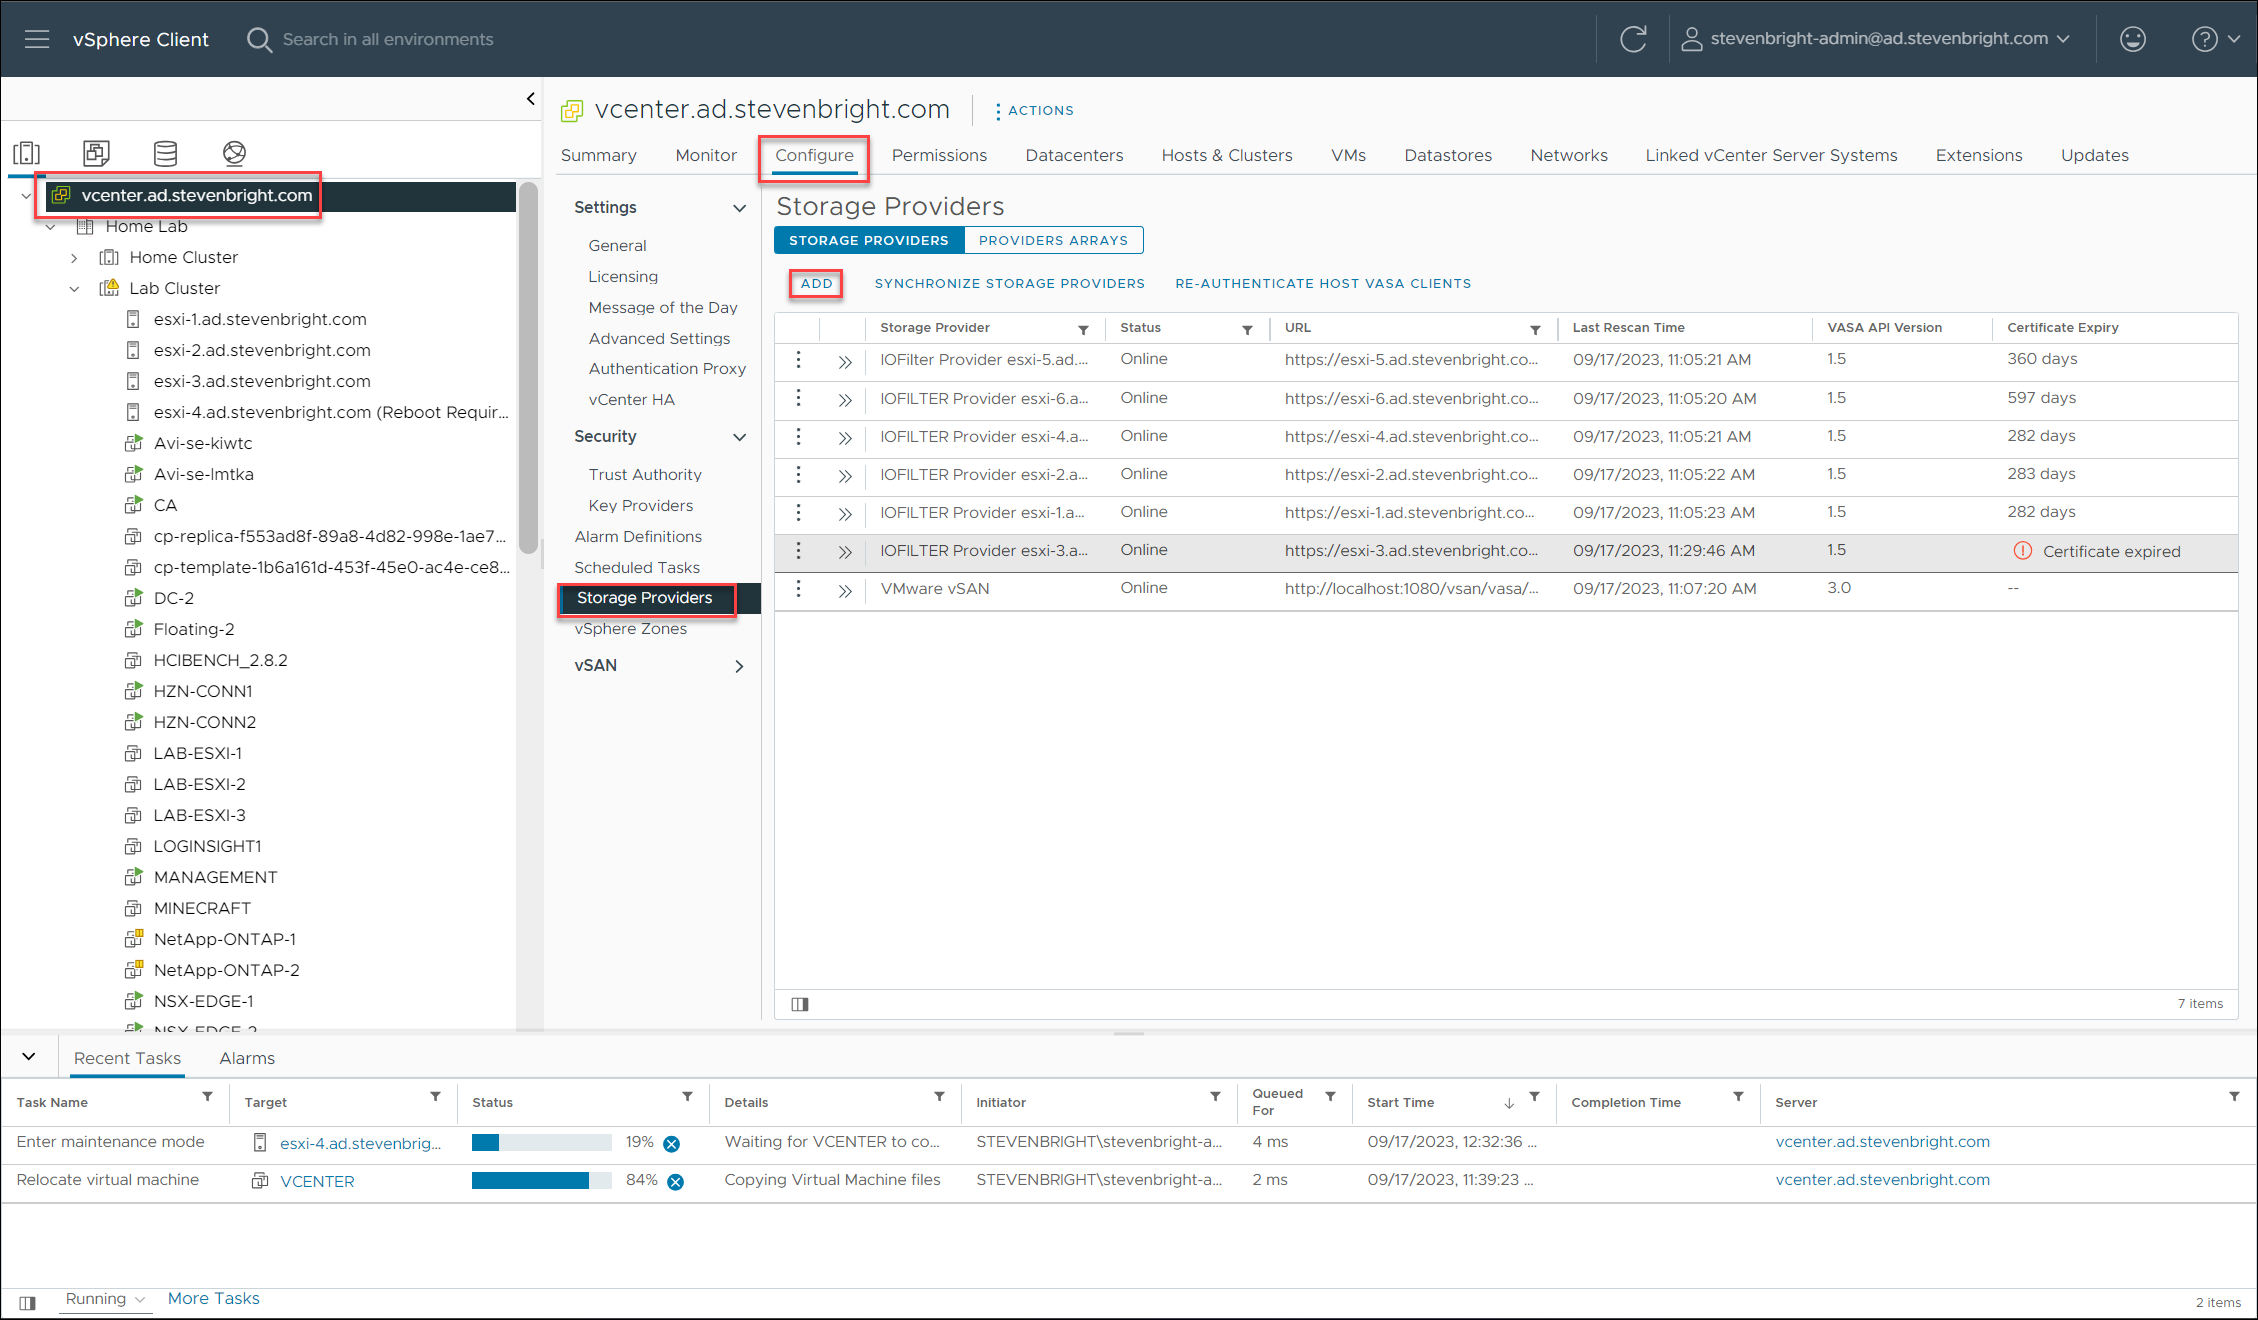
The Synology Storage Console for VMware includes a VMware VASA Provider (VASA 1.0) that provides the VMware vCenter with information regarding the capabilities of the iSCSI LUNs presented to the VMware ESXi hosts. With this knowledge, you can build storage profiles using those characteristics and assign them to VMs based on requirements. To add the VASA provider to the VMware vCenter Server, select the VMware vCenter Server within the VMware vSphere Client, then select the Configure tab. Under the listing of various settings, select Storage Providers. Click the ADD button to begin the process of adding the VASA provider.
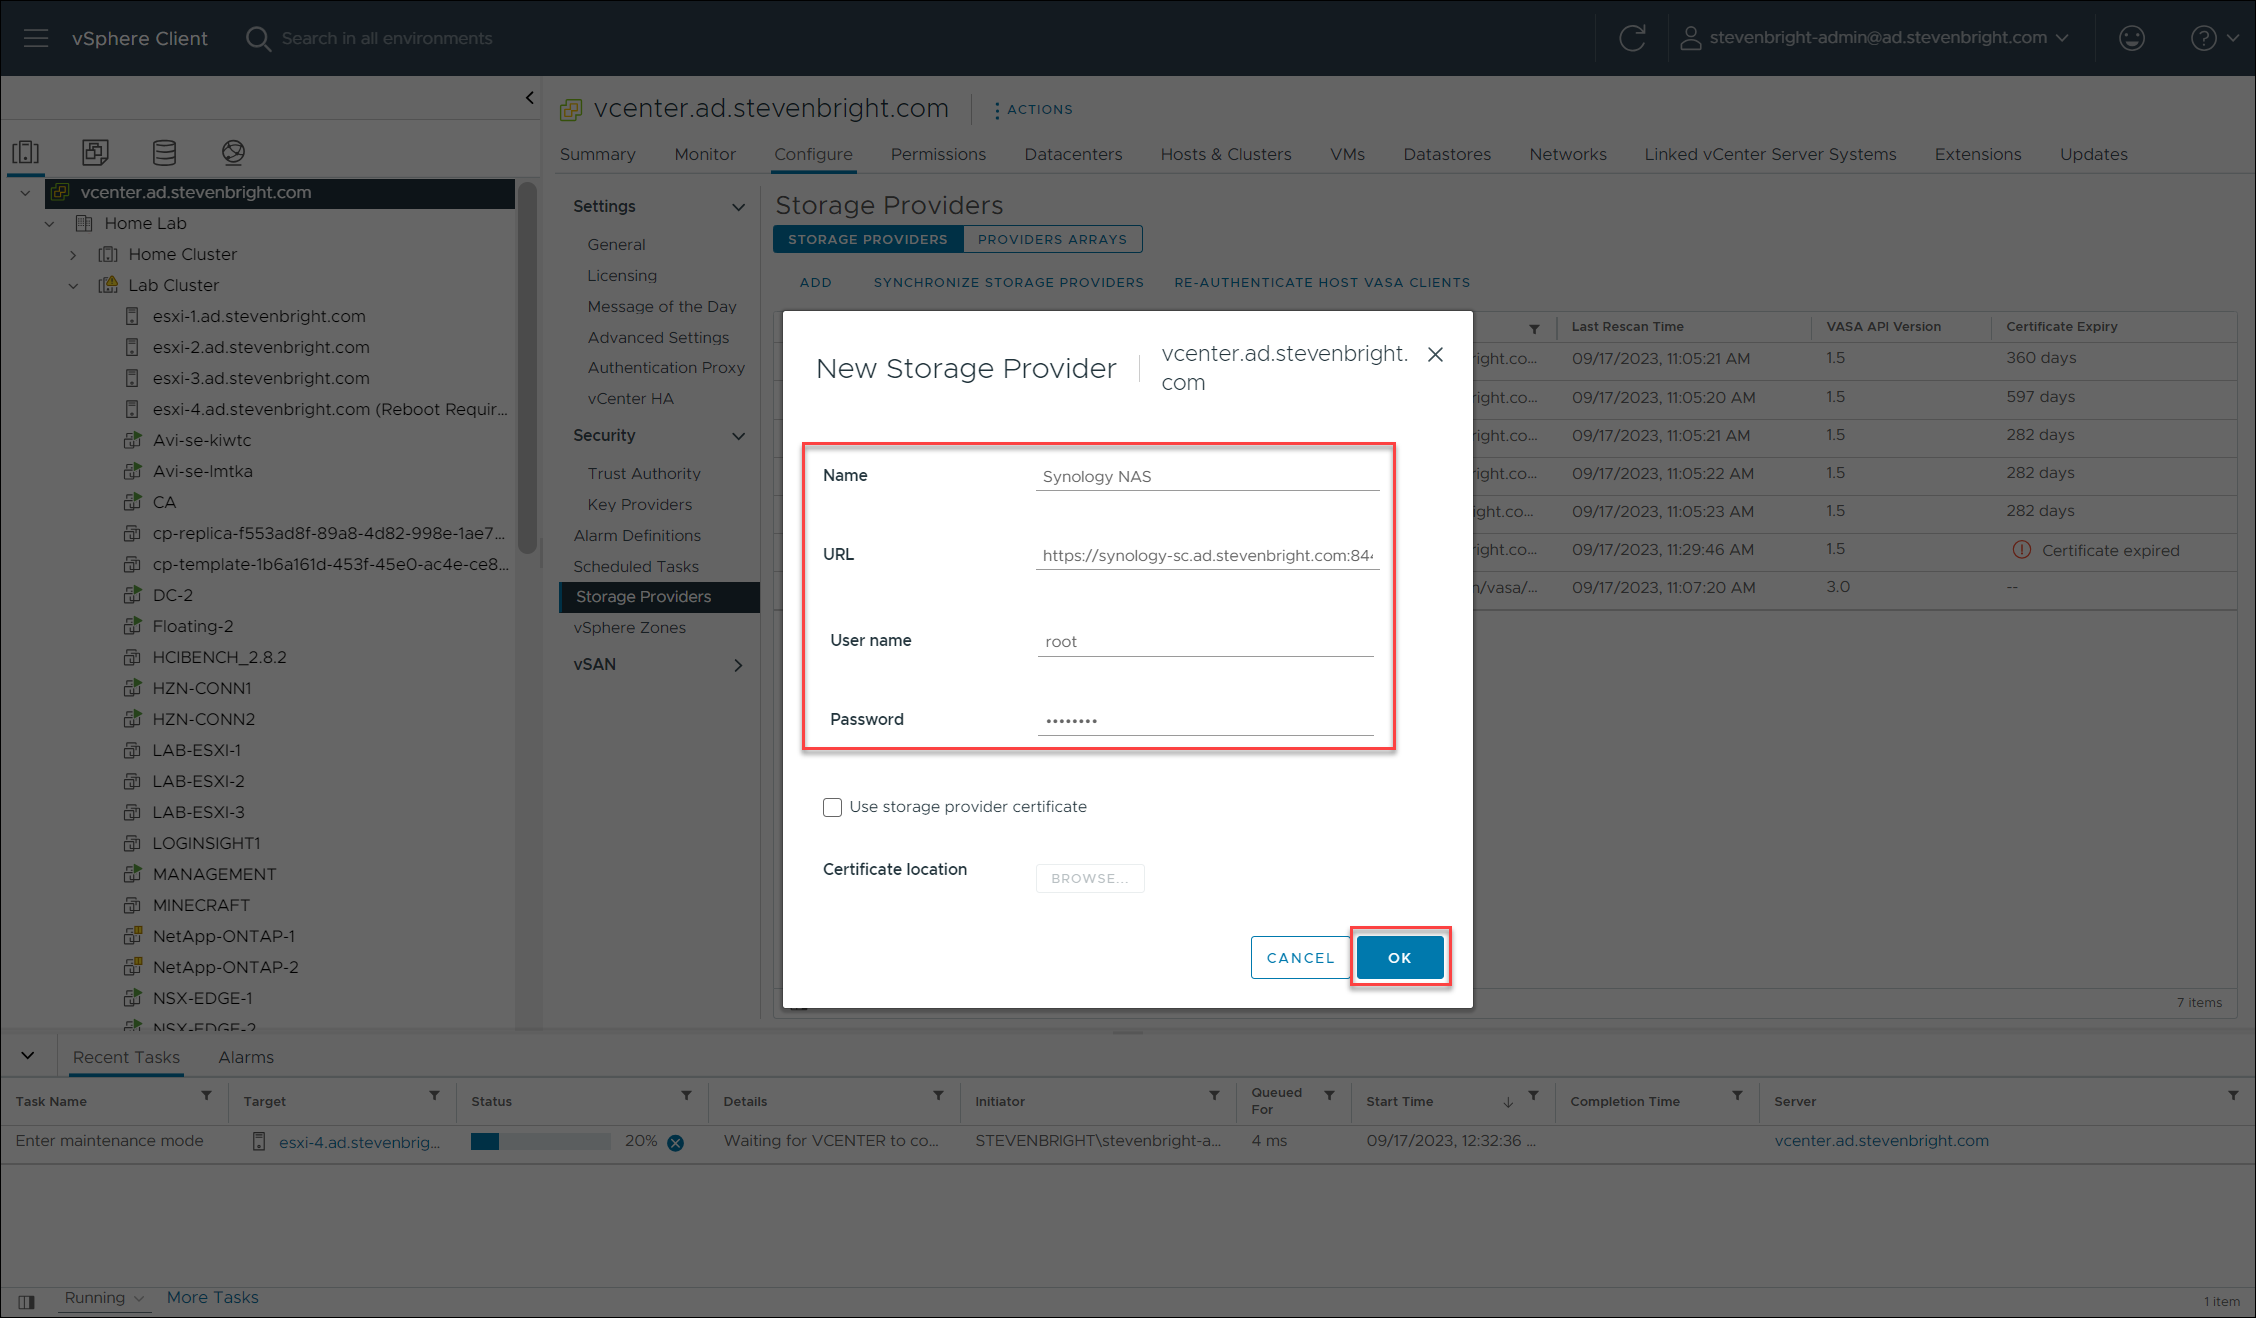
The New Storage Provider dialog will launch, which allows you to provide the VASA provider connection details. Provide a name of your choosing for the VASA provider. Next, provide the path to the VASA provider. This path uses the following format pointing to the Synology Storage Console for VMware: https://IP of Synology Storage Console:8443/vasa/services/vasaService. Provide the credentials for the root user account for the Synology Storage Console for VMware. By default, this password is synology. Leave the Use storage provider certificate checkbox unselected. Click the OK button to add the VASA provider.
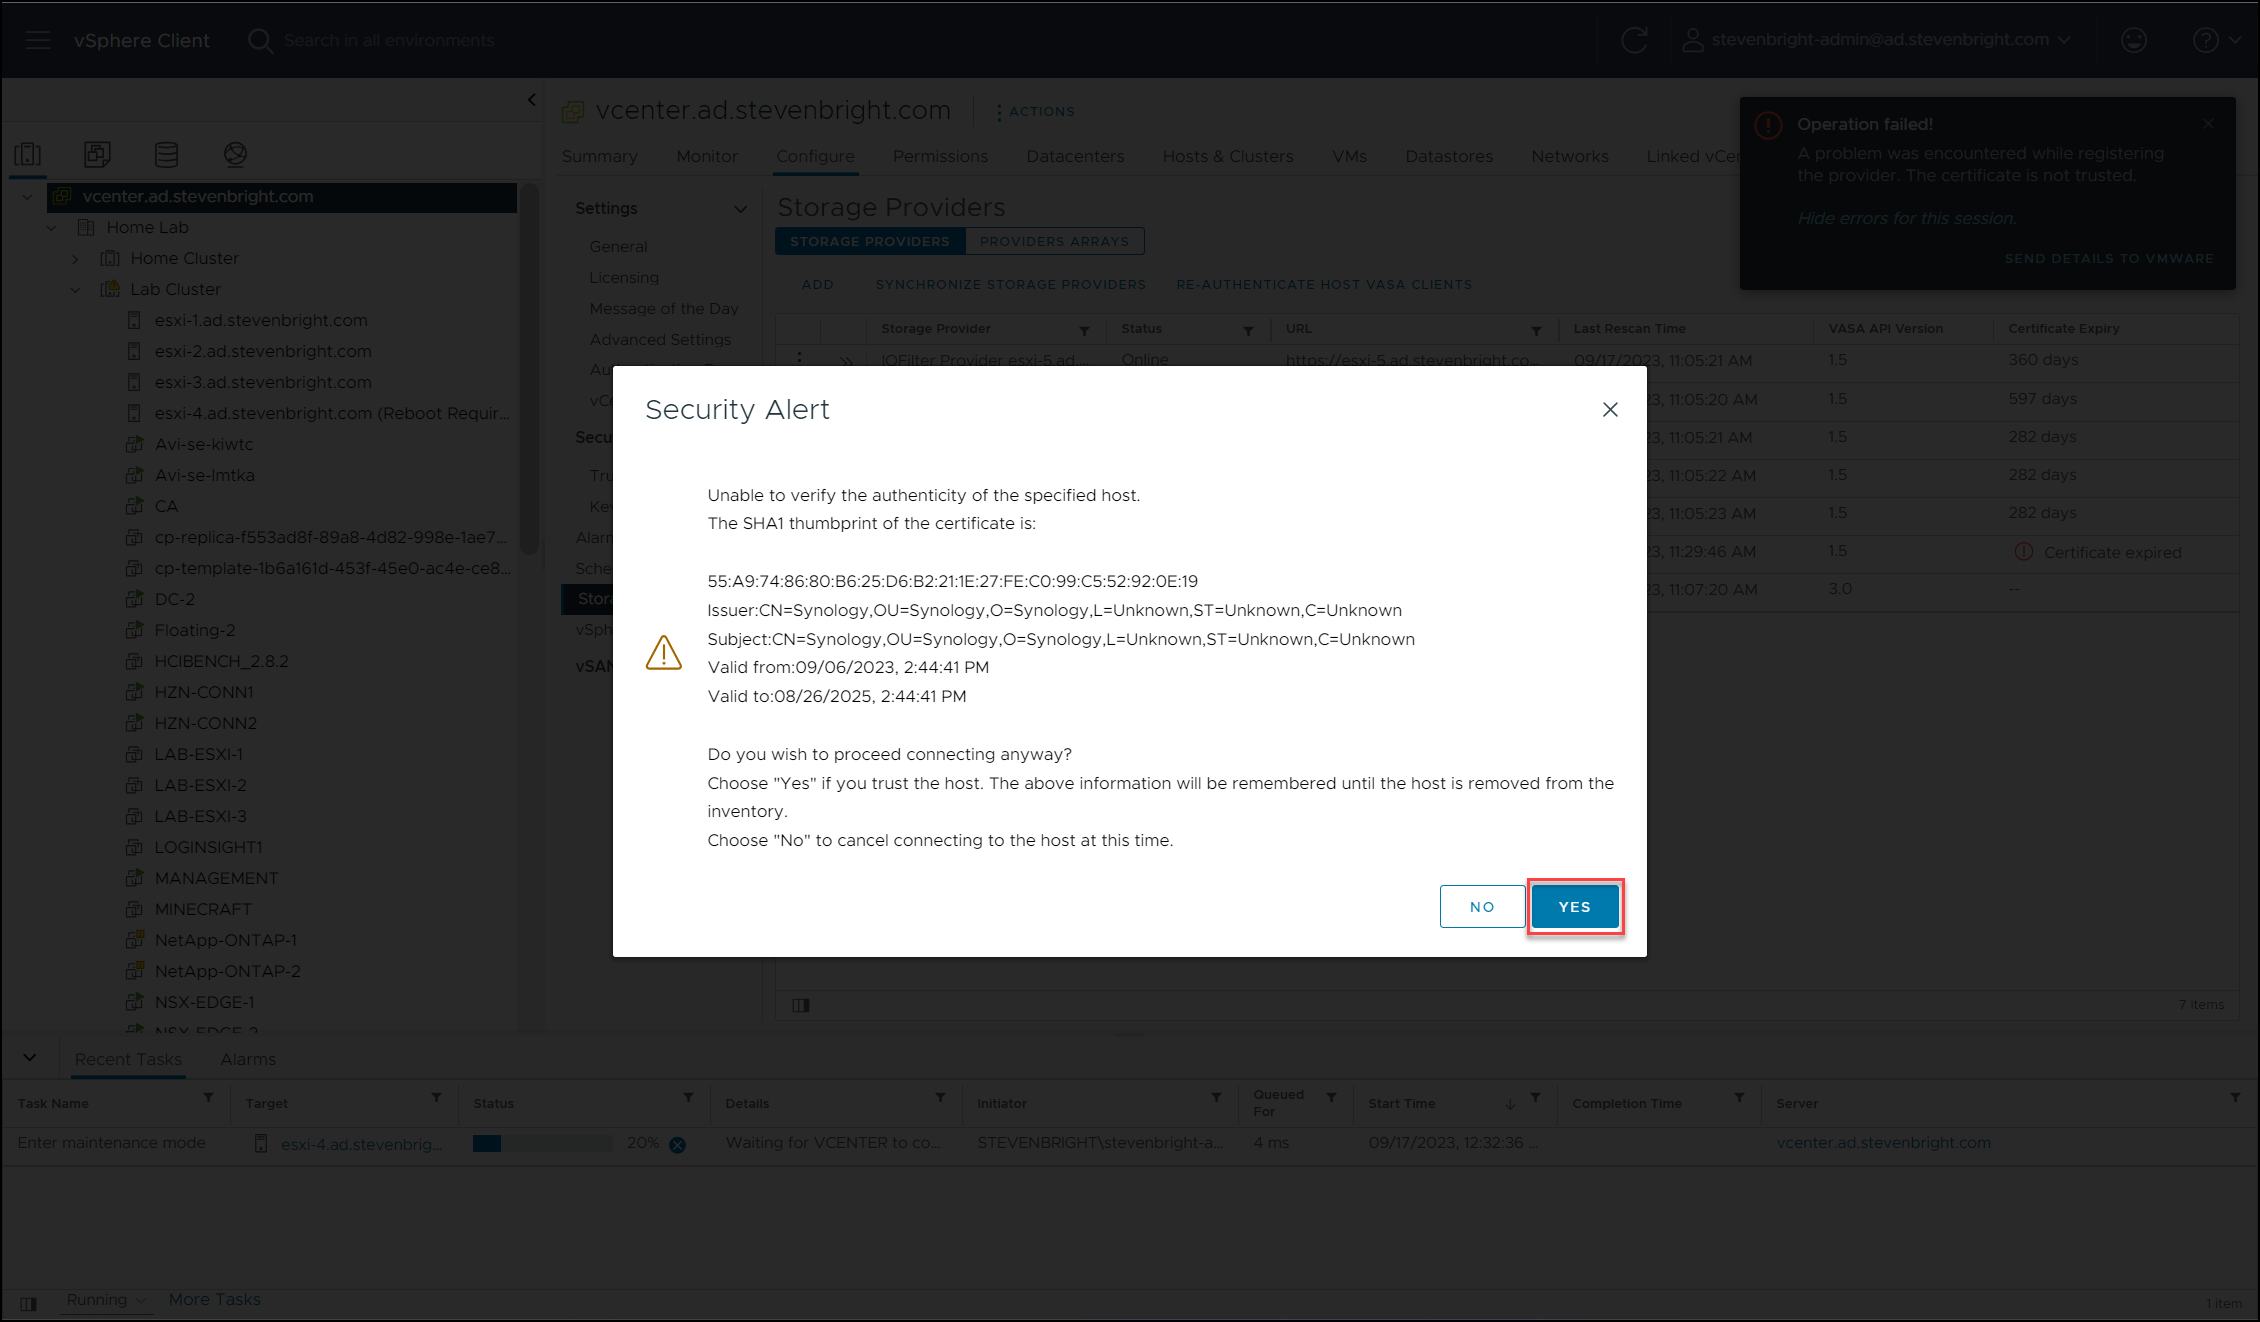
The VMware vSphere Client will provide you with a Security Alert prompt stating that the authenticity of the host can’t be verified. The dialog provides details regarding the certificate provided by the VASA provider. Review the details, then click YES to accept the certificate and complete the addition of the VASA provide.
It will take a small amount of time for the registration process to complete. During this time, the VMware vSphere Client will display a dialog that states that it is registering.
Final Thoughts
The Synology Storage Console for VMware provides the VMware vSphere administrator with easy access to complete everyday storage-related tasks when using Synology storage in a VMware environment. However, the Storage Console does not always utilize the best configuration options when configuring new storage. This is evident in the way it configures NFS mounts to allow any IP address access to the mount and does not utilize Round Robin multipathing for iSCSI LUNs. Additionally, creating a new iSCSI Target for each LUN created can make for a messy configuration. Finally, it should also be noted that the plug-in utilizes a deprecated local plug-in architect. It has not been updated to use the new web plug-in architecture or to be stylized to blend in with the current vSphere Client.
See Also
- VMware vSphere Virtual Machine Backups using Synology Active Backup for Business -
- Managing ESXi Local User Accounts from Aria Automation Orchestrator -
- Managing ESXi Local User Accounts from vCenter Server Using PowerCLI -
- Getting Started with the Aria Automation Orchestrator Plug-in for the vSphere Client -
- Instant VM Restore with Synology Active Backup for Business -
Search
Get Notified of Future Posts
Recent Posts

