Getting Started with vRealize Automation 8.0 Cloud Assembly
As a followup to my Deploying VMware vRealize Automation 8.0 walkthrough, we’ll now utilize our new vRealize Automation 8.0 deployment to configure a basic Blueprint and provision our first virtual machine using Cloud Assembly.
vRealize Automation 8.0 includes a great “Getting Started” wizard that we’re provided when we access our deployment for the first time. While this option gets us up and running the fastest with Cloud Assembly, it obscures the task required to begin using Cloud Assembly. In this post, we’ll walk through the process of everything required to create our first Blueprint in vRealize Automation Cloud Assembly using our local VMware vSphere environment.
Adding a vCenter Server to Cloud Assembly
The first task that we should complete is connecting our vCenter server to our new vRealize Automation 8.0 environment. In previous versions of vRealize Automation, vCenter Servers, vRealize Orchestrators, vRealize Operations, and NSX connections are referred to as “Endpoints.” Under the new vRealize Automation 8.0 and vRealize Operations 8.0 terminology, these connections are now referred to as “Cloud Accounts.”
To get started, log into the vRealize Automation 8.0 deployment and select Cloud Assembly from the Cloud Services Console home screen.
When we access Cloud Assembly, it greets us with a Guided Setup Diagram as well as a Continue button. Clicking this button initiates a guided process of configuring the basics of Cloud Assembly. Again, VMware has done an excellent job of providing a guided walkthrough that assists us in getting up and running as quickly as possible. However, since our goal is to become familiar with working in Cloud Assembly, we’re going to skip this option and do things manually.
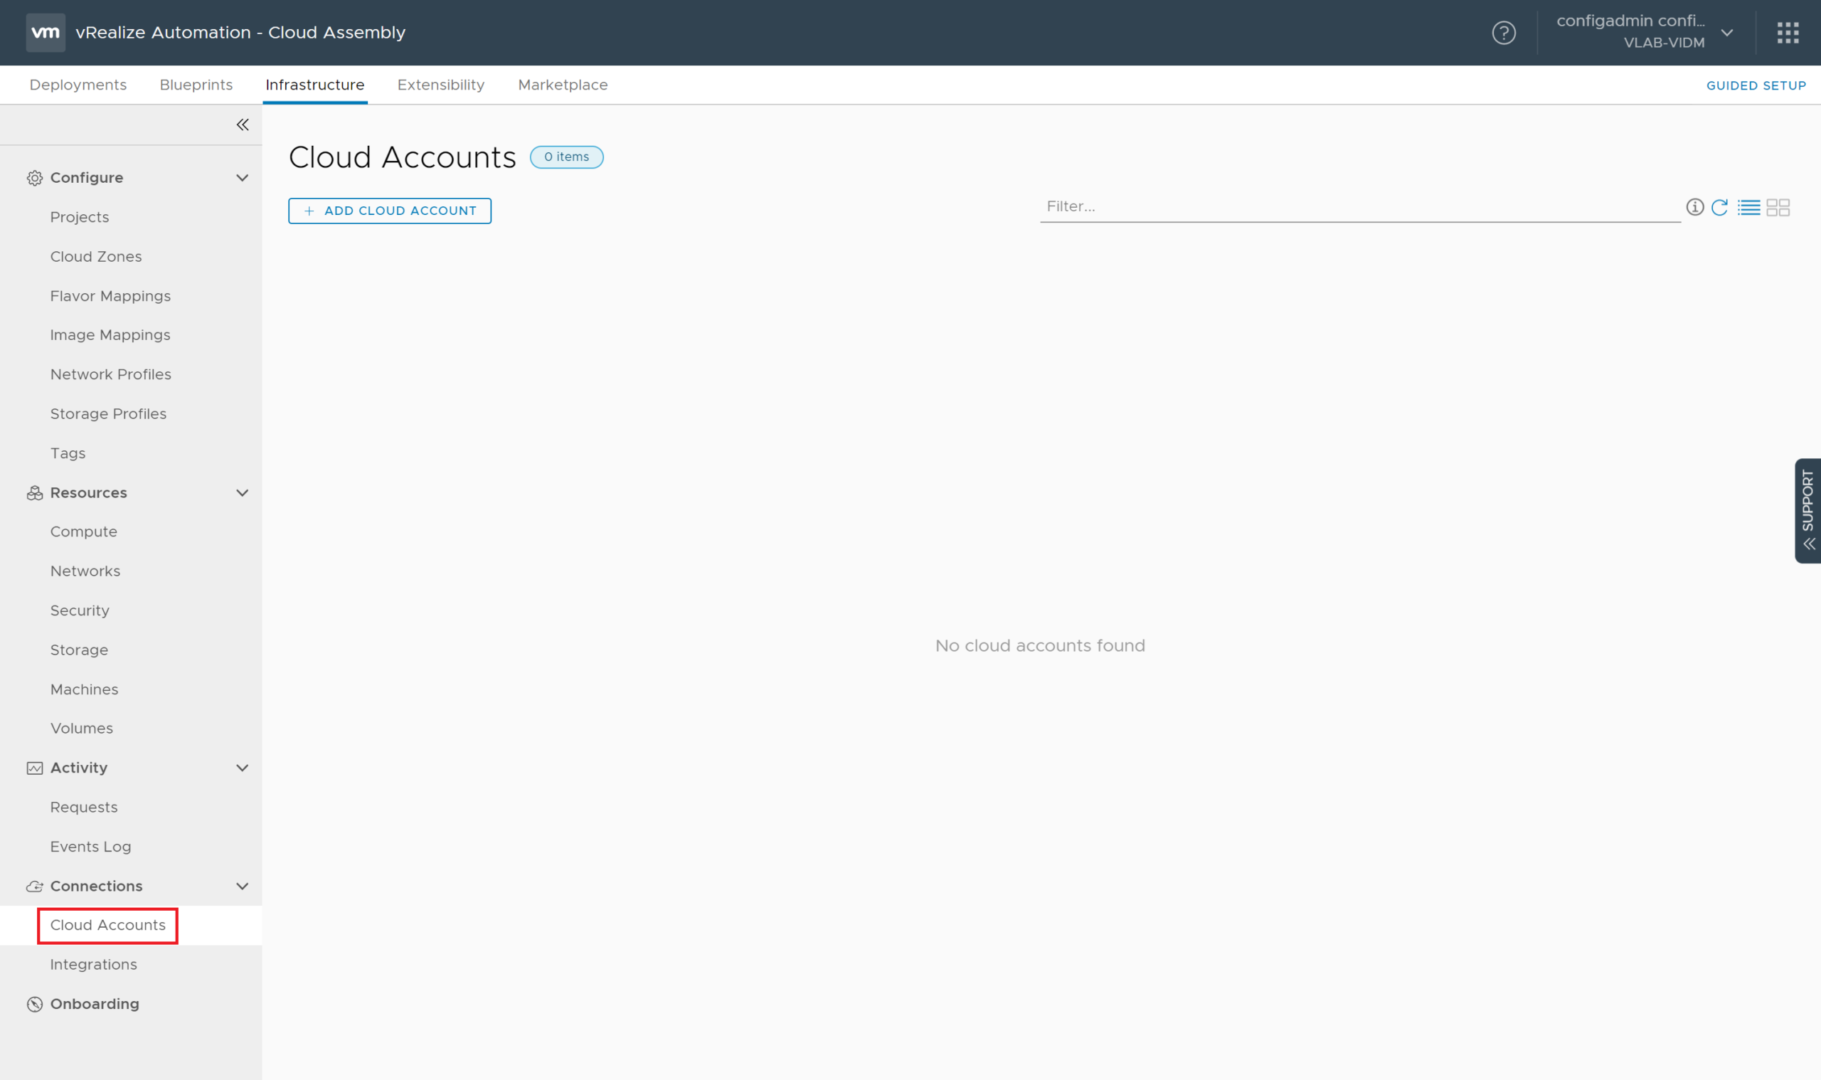
On the left side of the screen under the Connections heading, click on Cloud Accounts. The Cloud Accounts screen loads and shows that “No cloud accounts found.” To add our first account, click the + Add Cloud Account button at the top of the screen.
On the resulting Account Types screen, we select the vCenter button.
Next, we provide all of the information required to add our vCenter server to Cloud Assembly. First, enter the FQDN or IP address of the vCenter server into the vCenter IP address/FQDN field. Enter the credentials for the vCenter Server into the Username and Password fields, then click the Validate button to verify that Cloud Assembly can communicate with the vCenter Server using the credentials provided. Next, provide a Name and Description for this new cloud account. If validation of the credentials was successful, under the Configuration heading, we see a list of the data centers managed by the vCenter. Select the desired datacenters from the Allow provisioning to these datacenters list and ensure the Create a cloud zone for the selected datacenters checkbox is selected. For now, we won’t be specifying an NSX Endpoint or any Capability tags. Click the Add button to add the vCenter Server to Cloud Assembly.
If successful, we should now see the vCenter Server listed on the Cloud Accounts page showing a Status of “OK”.
vRealize Automation Projects
The previous version of vRealize Automation utilized the concept of “Business Groups” to group together managed resources, user access, and entitlements. vRealize Automation 8.0 has replaced this concept with “Projects.” Before we can consider provisioning any new resources in vRealize Automation 8.0, we must define a minimum of one Project.
To get started, click Projects on the left side of the screen under the Configure heading. The Projects screen loads and states, “No projects found.” Click the + New Project button to begin the process of defining our first Project.
vRealize Automation Project - Summary
The resulting New Project screen provides us three tabs across the top of the screen. Under the first tab labeled Summary, provide a Name for the project and an optional Description.
vRealize Automation Project - Users
Next, we select the Users tab to define the users or groups who belong to this Project as well as their role. To add our first user, click the + Add Users button.
On the resulting dialog, in the Email field, begin typing the name of the user that we wish to add. From what I’ve found, this field actually matches usernames, not email addresses. The field provides a list of usernames that match the string that we’ve entered. Select the user from the list, and it is added to the dialog in green. Next, in the Assign role field, select either “Member” or “Administrator” to determine the role assigned to the user within the Project. Then, click Add to add the users to the Project.
vRealize Automation Project - Provisioning
The final step is to define the resources available to the Project as well as any properties that are specific to the project. To begin defining these values, select the Provisioning tab from the top of the page.
There’s a lot on this page to digest, but at a high level, we’ll be defining:
- Cloud Zones - Similar to Reservations in vRealize Automation 7.x, these are the compute resources that the Project can use for provisioning new machines
- Tags - These are the tags applied to all machines provisioned by the Project
- Constraints - These key:value tags override any tags defined on blueprints. They support defining multiple configurations as documented in VMware’s vRealize Automation 8 - Project Tags and Custom Properties Documentation
- Network Constraints - Limit which networks a Project has access to and should match key:value pairs assigned to Network Profiles.
- Storage Constraints - Limit access to Storage Profiles based on key:value pair matching.
- Extensibility Constraints - Limit which extensibility servers are utilized by the project.
- Custom Properties - These are used for several purposes such as reporting or passing values into the custom naming template or extensibility actions.
- Custom Naming Template - Allow for defining a machine naming template based on several properties pulled from Resources, Connections, Projects, Users, as well as the inclusion of random numbering.
- Request Timeouts - Allows for the specification of a timeout value if more than 2 hours is necessary to complete requests. If a timeout value is specified on both the Blueprint and the Project, the largest value takes precedence.
Since we are working through the basics of Cloud Assembly, we specify only the Cloud Zone for the Project and leave everything else undefined. To do so, click the + Add Cloud Zone button to load the Add Cloud Zone dialog. On the resulting dialog, select one of the Cloud Zones created when we added our vCenter Server. The following fields are optional, and we leave them undefined at this time:
- Provisioning Priority - Allows us to define a numeric value as to which Cloud Zone should be preferred by the Project when provisioning new resources.
- Instance Limits - Allows us to define the maximum number of resources that can be created in the Cloud Zone
- Memory Limit (GB) - Allows us to limit the total amount of memory that can be provisioned to all resources within the Cloud Zone by the Project.
Click the Add button to add the Cloud Zone to the Project.
To finish the creation of the Project, scroll to the bottom of the page and click the Create button. If successful, we return to the Projects screen, where we now see the new Project listed.
Cloud Assembly Flavor Mappings
One of the great features of vRealize Automation 8.0 is that it allows us to create Blueprints that can be used to provision machines in any cloud environment. Each of these cloud environments has its own unique hardware sizing/instance options that we must provide when provisioning a new machine. To allow us to define a Blueprint that works in any cloud, vRealize Automation 8.0 provides the ability to create Flavor Mappings. These Flavor Mappings allow us to specify any name such as “Small Database Server”, and then specify that for our vSphere environment, the machine should have 2 vCPUs and 8GB of RAM, or for AWS, the machine should be a t3.large instance. While not required for vSphere-only Blueprints, I recommend that you familiarize yourself with using Flavor Mappings. In this example, we’ll create three Flavor Mappings titled: “Small”, “Medium”, and “Large”.
Creating a New Flavor Mapping
To begin the process of creating our new Flavor Mappings, while on the Infrastructure tab, click on Flavor Mappings under the Configure heading on the left side of the screen. In the resulting Flavor Mappings screen, click the + New Flavor Mapping button.
On the resulting New Flavor Mapping screen, provide the name for the new Flavor Mapping into the Flavor name field. Next, in the Configuration field, select the vCenter Server environment from the dropdown list, and then specify the Number of CPUs and Memory for the new Flavor Mapping. If you’ve added multiple environments or other cloud environments previously, click on the + button to add a new row to the list where you can select a new environment to include in the Flavor Mapping. Finally, click the Create button to create the mapping.
After clicking the Create button, we return to the Flavor Mappings screen where the new Flavor Mapping should be listed. Repeat this process to create the “Medium” and “Large” flavors.
Cloud Assembly Image Mapping
Image Mapping serves a similar purpose as Flavor Mapping. Since each cloud environment specifies virtual machine images differently, vRealize Automation 8.0 provides Image Mapping to allow us to link the different images together to a common name. For example, suppose that we want to support provisioning a Windows Server 2019 machine within our private vCenter as well as within AWS. To do this, we would create a new Image Mapping called “Windows Server 2019”, and then specify the vCenter template VM and Amazon AMI containing our desired Windows Server 2019 operating system image. In this example, we’ll create two Image Mappings titled: “Windows Server 2019”, and “Windows Server 2016”.
Creating a New Image Mapping
To begin the process of creating our new Image Mappings, while on the Infrastructure tab, click on Image Mappings under the Configure heading on the left side of the screen. In the resulting Image Mappings screen, click the + New Image Mapping button.
On the resulting New Image Mapping screen, provide the name for the new Image Mapping into the Image name field. Next, in the Configuration field, select the desired Account/Region (which is our vCenter server). In the Image field, select the virtual machine template containing the desired image. If you’ve added multiple vCenter servers or other clouds, click the + button and select each region and provide the information that corresponds to the desired machine image. Finally, click the Create button to save the Image Mapping.
After clicking the Create button, we return to the Image Mappings screen where the new Image Mapping should be listed. Repeat this process to create the “Windows Server 2016” image mapping.
Cloud Assembly Blueprints
Blueprints are the primary object in vRealize Automation that defines what Cloud Assembly will actually assemble. They are used to define machines, networks, and security groups, as well as how these objects are all interconnected to allow for provisioning of entire application systems. vRealize Automation 8.0 provides many options to support a highly customizable framework for deploying almost any type of application.
What’s New in Cloud Assembly Blueprints
While Blueprints aren’t a new concept to vRealize Automation, very little about the Blueprints that we know from version 7.x is the same in 8.0. The following is a summary of some of the significant changes to Blueprints in vRealize Automation 8.0:
- Blueprints are owned by Projects and can be shared with other Projects instead of belonging to a tenant (tenants no longer exist in vRealize Automation 8.0).
- Blueprints no longer include settings pertaining to lease or archive periods. These settings are now handled by Service Broker Policies.
- Blueprint object properties are no longer configured using a form-driven GUI; instead, objects are configured using a built-in YAML editor.
- Blueprints no longer contain Property Groups or Custom Properties. Tags replace these.
- Software Components are no longer available. There is no replacement for Software Components, although many simple software deployment tasks can be accomplished using cloud-init scripts during machine deployments.
Creating Our First Blueprint
To get started with creating our first Blueprint, at the top of the Cloud Assembly screen, click on the Blueprints tab, then click the + New button.
In the resulting New Blueprint dialog box, we provide “Windows Server” for the Name field. An optional description can be provided in the Description field. For the Project field, select the Project that we created earlier in this walkthrough. As for the Blueprint sharing in Service Broker field, we leave it at the default value of “Share only with this project.” Click the Create button to create the new Blueprint definition.
After clicking the Create button, vRealize Automation loads the Blueprint designer. This interface allows us to drag/drop objects from the left side of the screen onto the design canvas to create a visual layout of our blueprint objects, including any necessary network connections (existing vSphere networks or NSX networks). On the right side of the screen, we see the YAML editor that allows us to configure the details for each object. For this walkthrough, we are creating a Blueprint with a single virtual machine that allows the user to select either Windows Server 2016 or Windows Server 2019 for the operating system.
Adding A Cloud Agnostic Machine to the Blueprint
Since we want to deploy a single virtual machine that can be deployed to any cloud endpoint using the Image Mapping that we created earlier, on the left side under the Cloud Agnostic category, click the Machine object and drag it onto the design canvas. This adds a new resource to the Blueprint with the title of “Cloud_Machine_1”.
This machine is the only object that we will be adding to the design canvas; the rest of our work will be completed on the right side of the screen in the YAML editor. To complete the Blueprint, we need to complete the following tasks:
- Rename the machine from “Cloud_Machine_1” to “Windows_Server_Machine.”
- Define an input dropdown list to allow the user to select the operating system using our previously defined Image Mappings.
- Define an input dropdown list to allow the user to select the hardware configuration using our previously defined Image Flavors.
- Configure the “Windows_Server_Machine” to be deployed using the operating system and hardware configuration selected by the user.
Renaming the Cloud Agnostic Machine
Step 1 is completed by changing the value “Cloud_Machine_1” to “Windows_Server_Machine” in the “resources:” section of the YAML code.
resources:
  Windows\_Server\_Machine:
    type: Cloud.Machine
    properties:
      image: ''
      flavor: ''
Defining the Operating System and Hardware Configuration Selection Input Fields
Step 2 and step 3 are a little more complicated as we need to define new inputs and provide predefined values for these inputs. We accomplish this by updating the “inputs:” section to the following code:
inputs:
  os-image:
    type: string
    oneOf:
      - title: Windows Server 2016
        const: Windows Server 2016
      - title: Windows Server 2019
        const: Windows Server 2019
    title: Select Image/OS
    description: "Specify which operating system should be deployed on the machine."
  hardware-config:
    type: string
    oneOf:
      - title: Small
        const: Small
      - title: Medium
        const: Medium
      - title: Large
        const: Large
    title: Machine Size
    description: "Specify what size the VM should be."
This code defines two new inputs of type “string” that will be assigned to variables “os-image” and “hardware-config”. The inputs are configured to be the type “oneOf” which allows the user to pick a single value from a dropdown list. These values have a display name (“title”), and a value (“const”). Additionally, each input has prompting text prior to the input field (“title”), and a mouse over help tip (“description”). In this example, for the “os-image” input, the user will see the options “Microsoft Windows Server 2016” and “Microsoft Windows Server 2019”. These options will map to the values “Windows Server 2016” and “Windows Server 2019” respectively. Keep in mind that the “const” values should match the values that we created earlier in the walkthrough for the Image Mappings and Flavor Mappings.
Assign Our User Input to the Image Mapping for the Cloud Agnostic Machine
The final step is to assign our user input fields “os-image” to be the “image”, and “hardware-config” to be the “flavor” for our “Windows_Server_Machine” resource. This is accomplished by modifying the “resources” code to the following:
resources:
  Windows\_Server\_Machine:
    type: Cloud.Machine
    properties:
      image: '${input.os-image}'
      flavor: '${input.hardware-config}'
The final completed YAML code should be the following:
formatVersion: 1
inputs:
  os-image:
    type: string
    oneOf:
      - title: Windows Server 2016
        const: Windows Server 2016
      - title: Windows Server 2019
        const: Windows Server 2019
    title: Select Image/OS
    description: "Specify which operating system should be deployed on the machine."
  hardware-config:
    type: string
    oneOf:
      - title: Small
        const: Small
      - title: Medium
        const: Medium
      - title: Large
        const: Large
    title: Machine Size
    description: "Specify what size the VM should be."
resources:
  Windows\_Server\_Machine:
    type: Cloud.Machine
    properties:
      image: '${input.os-image}'
      flavor: '${input.hardware-config}'
The completed Blueprint should look like the following:
Testing and Deploying Our Blueprint
Now that we’ve completed our first Blueprint, it’s time to test the configuration and verify that our YAML code can be successfully executed in our vRealize Automation Cloud Assembly environment. To start the process, click the Test button at the bottom of the Blueprint Designer. We are then presented with a Testing Windows Server dialog box that includes our two input fields. Complete these fields and click the Test button in the dialog box.
After submitting the test deployment, the Blueprint Designer displays the result of the test deployment. The box indicates whether the test was successful or if it failed as well as providing a link to the Provisioning Diagram and additional details about the request.
Assuming the test was successful, the final step is to deploy a new Windows Server machine using our blueprint. To accomplish this, click the Deploy button at the bottom of the Blueprint Designer. A new Deploy Windows Server wizard opens. On the Deployment Type portion of the wizard, select “Create a new deployment” from the dropdown list, then provide a string into the Deployment Name field that uniquely identifies our test deployment. For the Blueprint Version field, select “Current Draft”, then click the Next button to continue to the Deployment Inputs portion of the wizard.
On the Deployment Inputs potion of the wizard, we see the input fields that we defined in our Blueprint. Provide values for these fields, then click the Deploy button to initiate the deployment of our machine.
After clicking the Deploy button, we are redirected to the Deployments portion of Cloud Assembly and are show the details and current status of our Deployment.
Conclusion
If you’ve made it all the way to the end, congratulations! While this is an example of a simple Blueprint, it provides you with the foundation of knowledge to begin experimenting with additional capabilities in Cloud Assembly. VMware has been adding additional documentation to the vRealize Automation 8.0 Documentation page that provides details on additional options for Blueprint designs. The Ways to create blueprints document is a great starting point for additional learning.
See Also
Search
Get Notified of Future Posts
Recent Posts


